

Fit the fold, round whole wedges, and close a low-bulk crown
This free fisherman beanie crochet pattern makes the short, ribbed watch-cap silhouette without relying on a one-size rectangle. You will decide where the folded cuff should sit, calculate the hidden depth inside that fold, and use short-row wedges so the crown closes from a reduced edge instead of a bulky full-width gather.
What makes this a fisherman beanie?
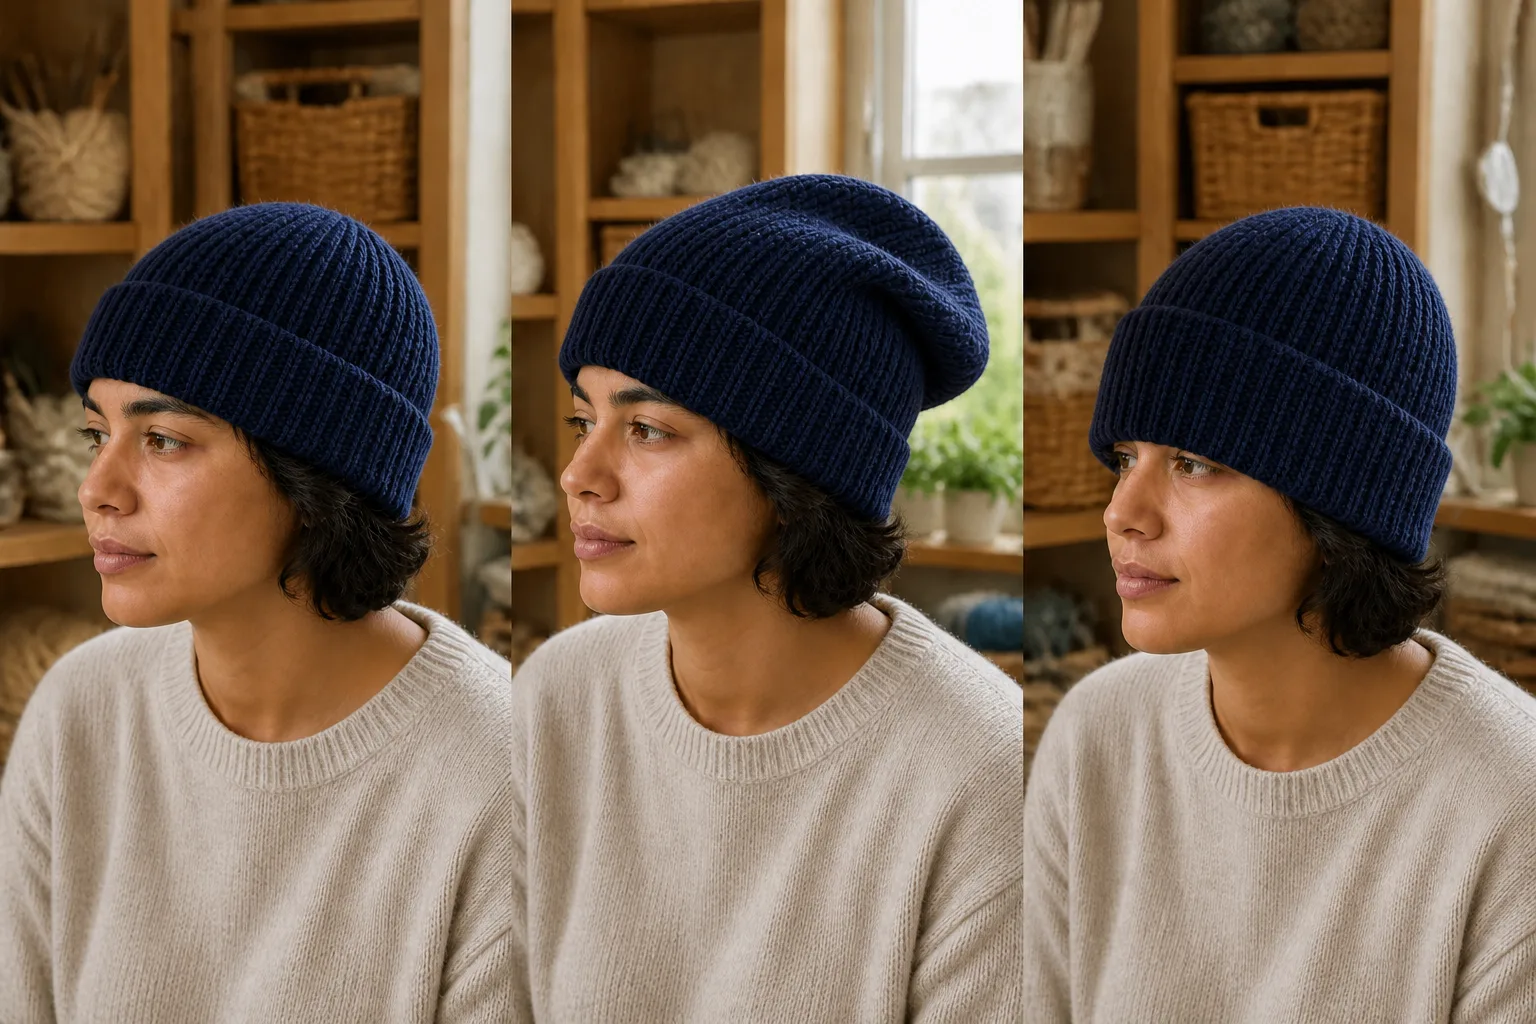
In current crochet-pattern results, “fisherman beanie” usually means a short ribbed cap or watch cap with a folded cuff. It may finish at the top of the ears or overlap the upper ear slightly. It is not the same as a brimmed fishing sun hat, and it is not intended to have the extra back drop of a slouchy beanie.
That silhouette exposes two mistakes quickly. First, a panel can fit around the head but become too tall after the cuff is folded. Second, gathering every row end at the crown can leave a hard knob. A regular rectangle can still make a useful beanie, but this pattern assigns separate measurements to the fold, the wearer line and the crown taper.
Project at a glance
- Skill level: confident beginner to intermediate
- Construction: side-to-side HDC BLO ribbing; ten-row short-row wedges; flat seam; reduced crown closure; folded cuff
- Terms: US crochet terms
- Yarn: CYC #4 medium/worsted yarn with reliable recovery, approximately 190–260 yd (175–238 m) for most adult sizes
- Hook: size that produces a flexible, springy washed rib; 5.0–6.0 mm is a useful swatching range, not a guarantee
- Also needed: five locking stitch markers, flexible tape measure, yarn needle and scissors
The Craft Yarn Council yarn-weight system classifies worsted, afghan and aran yarns as category #4 medium. Hook recommendations are starting points; your washed gauge controls this pattern.
Abbreviations
The terms follow the Craft Yarn Council crochet abbreviations.
| TERM | MEANING |
|---|---|
| BLO | back loop only |
| ch | chain |
| hdc | half double crochet |
| sl st | slip stitch |
| st(s) | stitch(es) |
US terms are used throughout. For UK readers, US hdc = UK htr and US sc = UK dc; ch and sl st use the same abbreviations.
The turning chain does not count as a stitch.
Take two depth measurements
Put the end of a flexible tape at the crown—the highest center point of the head. Bring the tape down to the line where the bottom fold of the finished hat should sit. Record that crown-to-wear-line distance as W.
Next choose the visible cuff height F. A starting range of 2–2.5 in (5–6.5 cm) produces a recognizable adult fisherman cuff, but the wearer’s face, ears and preference decide the final number.
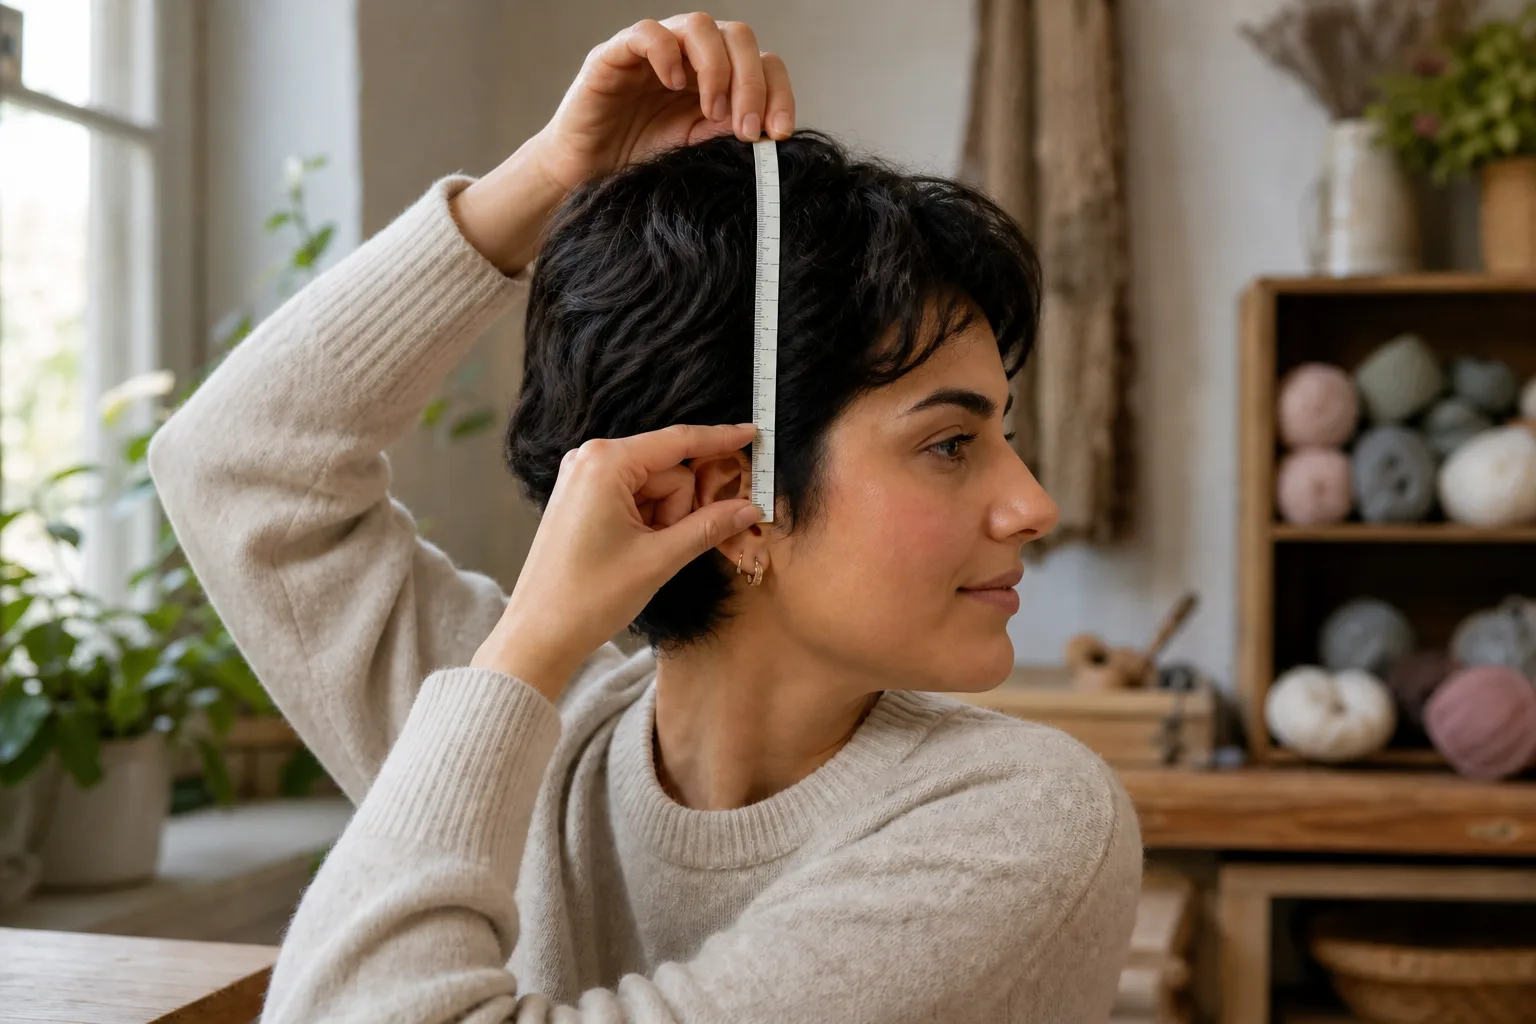
When the cuff is folded upward, the raw lower edge travels up by F. Therefore the flat panel needs that depth in addition to W:
Unfolded panel depth L = W + F
Do not add F twice. The fold doubles the fabric across the cuff area, but it consumes only one cuff height from the crown-to-raw-edge length.
Make and wash a two-direction gauge swatch
Chain at least 25 stitches.
- Row 1: Hdc in the second chain from the hook and in every chain across; turn.
- Row 2: Ch 1, hdc BLO in every stitch across; turn.
- Repeat Row 2 until the swatch has at least 24 rows.
- Wash and dry the swatch the way you will treat the finished hat. Let it rest flat.
Record two different gauges:
- gₛ: comfortably stretched rows per inch (or per 2.5 cm), measured across the ribs. Stretch only to the pressure you would accept around the forehead.
- g_d: relaxed stitches per inch (or per 2.5 cm), measured along a row from lower edge toward crown.
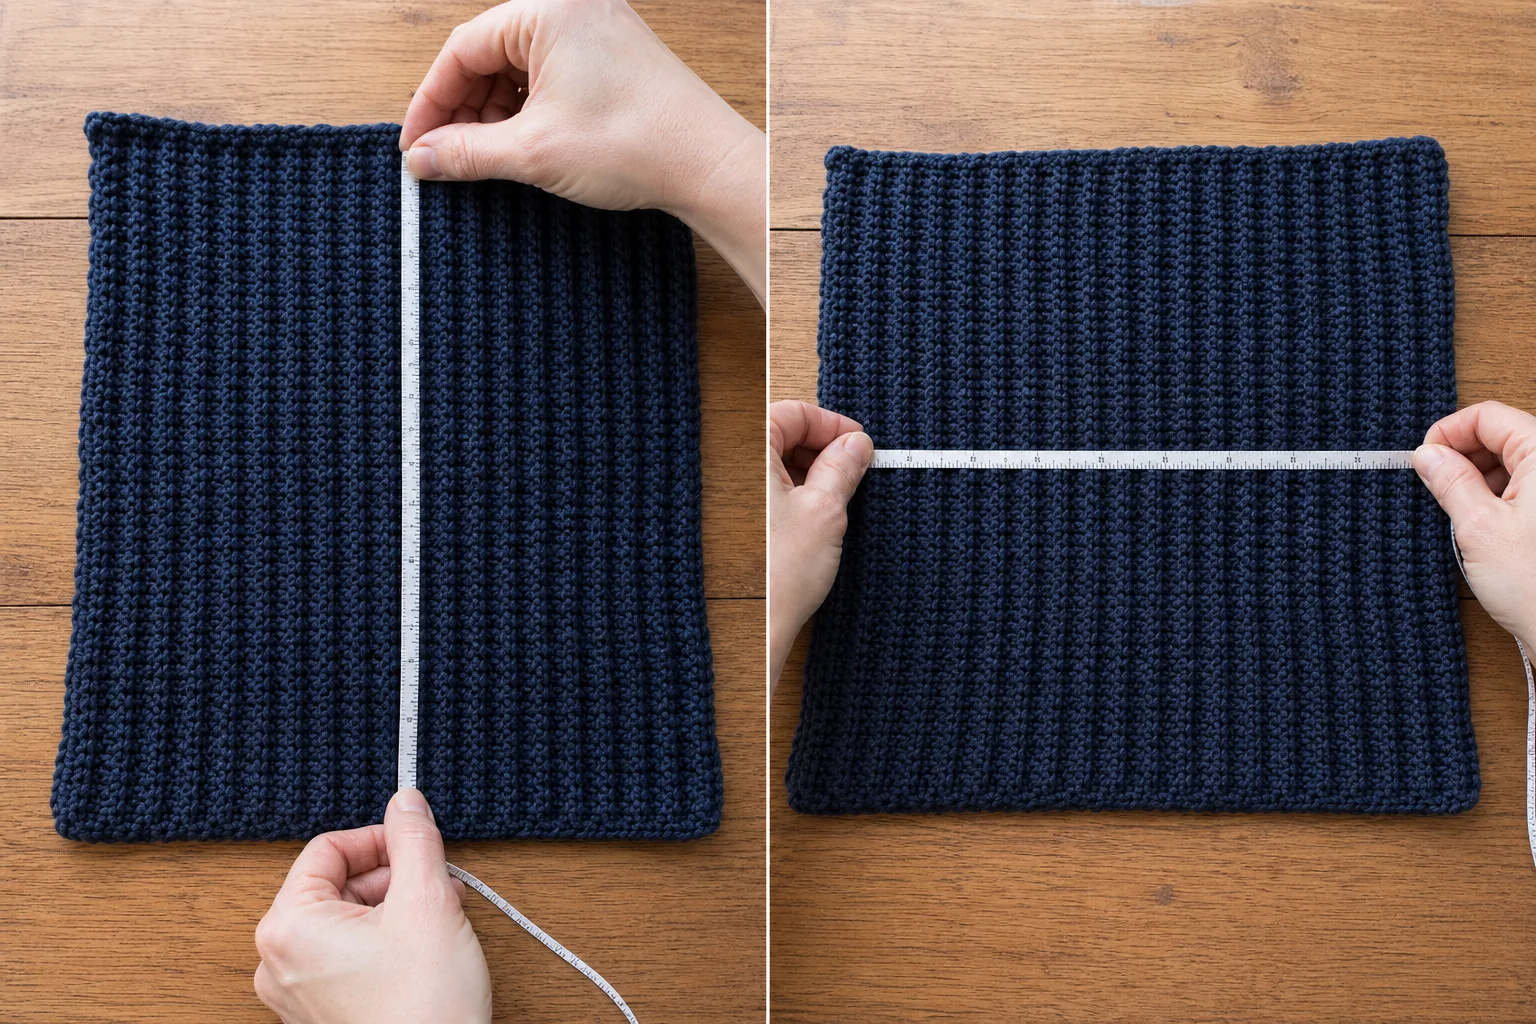
Never substitute one number for the other. Rows travel around the head; stitches travel from the crown to the raw lower edge.
The Fold–Wear–Crown Map
Write down:
- H = head circumference
- e = planned negative ease as a decimal
- W = crown-to-final-wear-line depth
- F = visible cuff height
- gₛ = comfortably stretched rows per inch
- g_d = relaxed stitches per inch
For resilient adult ribbing, 6–12% negative ease is a reasonable swatching range. Use less for firm fiber or pressure sensitivity. The physical opening gate later overrides the percentage.
Calculate the target circumference
Target circumference C = H × (1 − e)
Find a legal wedge count
Raw row count = C × gₛ
Round to a multiple of 10 rows. Each ten-row unit is one crown wedge.
Wedge count = chosen row count ÷ 10
Recheck the estimated ease
Estimated circumference = chosen row count ÷ gₛ
Estimated negative ease = (H − estimated circumference) ÷ H
Do not approve the count merely because it is the nearest multiple of ten. Translate both neighboring legal counts back into inches or centimeters and choose the pressure the washed fabric and wearer accept.
Calculate panel depth and stitch count
L = W + F
Panel stitches S = round(L × g_d)
Chain S + 1. After Row 1 you will have S working stitches.
Place four crown-turn offsets
The crown taper reserve is:
Adult starting value: T = 0.28 × W
Treat 0.28 × W as a starting value for this adult construction, not a universal constant. Keep T between 1.75 and 2.25 in (4.5–5.7 cm), then mark four distances from the crown end: T, 0.75T, 0.50T and 0.25T. Convert each distance to unworked stitches by multiplying by g_d and rounding to a whole stitch.
If two markers round to the same stitch, move one by a single stitch so all four turns remain distinct. The deepest turn must still be at least three stitches farther from the crown than the shallowest turn.
Worked example: 22 in (56 cm) head
Suppose H = 22 in (56 cm), e = 9%, W = 7.25 in (18.4 cm), F = 2.25 in (5.7 cm), gₛ = 5.5 stretched rows per inch and g_d = 3.5 relaxed stitches per inch.
- Target circumference: 22 × 0.91 = 20.02 in (50.9 cm).
- Raw rows: 20.02 × 5.5 = 110.11.
- Legal row count: 110 rows, or 11 wedges.
- Estimated circumference: 110 ÷ 5.5 = 20.00 in (50.8 cm).
- Estimated negative ease: (22 − 20) ÷ 22 = 9.1%.
- Unfolded depth: 7.25 + 2.25 = 9.50 in (24.1 cm).
- Panel stitches: 9.50 × 3.5 = 33.25, rounded to 33 stitches; chain 34.
- Taper reserve: 7.25 × 0.28 = 2.03 in, within the adult limit.
- Four unworked offsets: about 7, 5, 4 and 2 stitches from the crown end.
The finished raw depth from the rounded stitch count is 33 ÷ 3.5 = 9.43 in. After a 2.25 in cuff is folded, the estimated crown-to-wear-line depth is 7.18 in—close to the intended 7.25 in. The wearer check decides whether that 0.07 in difference matters.
Complete fisherman beanie pattern
The 33-stitch, 110-row numbers below belong to the worked example. Replace them with your calculated S and chosen row count.
Part 1: Chain and first row
Chain S + 1.
Row 1: Hdc in the second chain from the hook and in every chain across. You now have S stitches. The end where Row 1 finishes is the crown end; the opposite end is the raw lower edge. Place a contrasting marker at the crown end.
Row 2: Ch 1, turn, hdc BLO in every stitch to the lower edge.
Part 2: Work one ten-row crown wedge
Each short row begins at the lower edge and turns before the crown marker. Work every stitch in BLO.
- Rows 1–2 of the first wedge are already complete from Part 1. For each later wedge, work one full row to the crown and one full row back to the lower edge.
- Rows 3–4: work toward the crown until the deepest offset remains unworked; turn and work back to the lower edge.
- Rows 5–6: work until the second offset remains; turn and work back.
- Rows 7–8: work until the third offset remains; turn and work back.
- Rows 9–10: work until the shallowest offset remains; turn and work back.
For the example offsets, the four outward rows contain 26, 28, 29 and 31 stitches before turning. Do not work into the unworked crown stitches when returning; the next longer short row bridges the previous turn naturally.
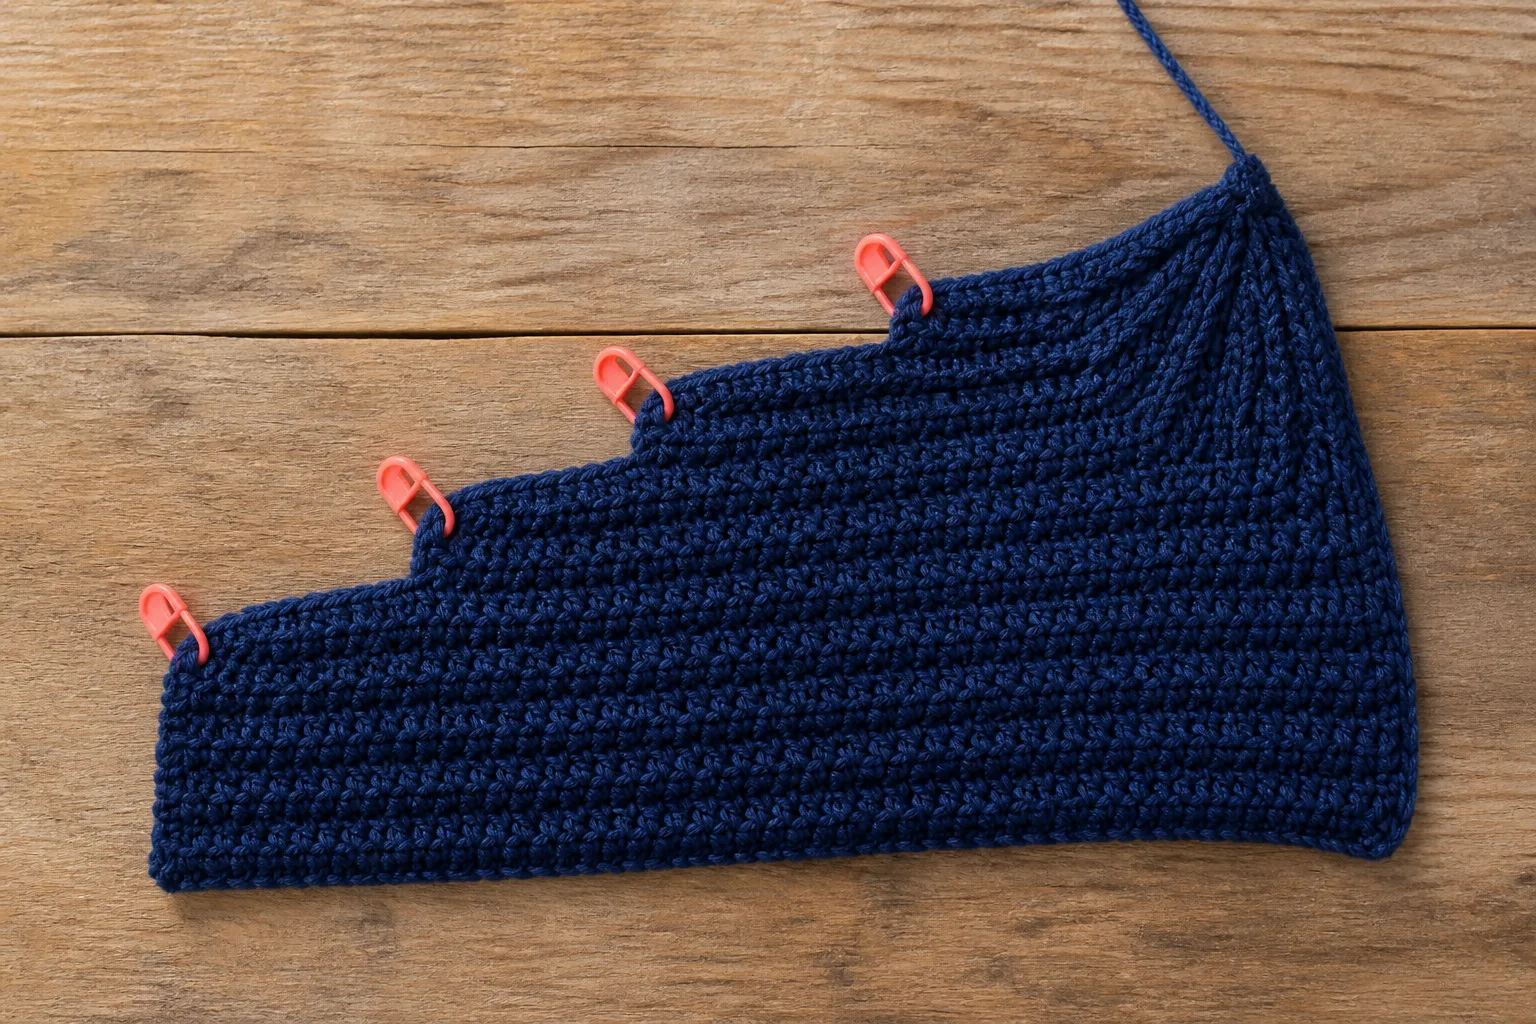
Count the first two rows from Part 1 as Rows 1–2 of the first wedge; continue with Rows 3–10, then repeat the complete wedge until the total row count equals your chosen legal count. For the example, work 11 wedges for 110 rows. Stop at the lower edge after the final short-row return.
Part 3: Check the panel before joining
Wrap the panel around the head with the ribs vertical and the short-row edge toward the crown. Hold the first and last rows together without overlapping them.
- The lower edge should meet at the planned pressure without stretching to its absolute limit.
- Fold F upward. The fold line should land at W and the upper cuff edge should stay below the brow.
- Smooth the short-row edge over the crown. The steps should spread into a shallow curve, not stack into a corner.
If circumference is wrong by a full wedge, add or remove one ten-row repeat and recalculate estimated ease. If the neighboring wedge counts are both unacceptable, change hook size or yarn and reswatch.
Part 4: Join the first and last rows
Place the first and last rows together with the right sides facing. Slip stitch through corresponding loops without pulling tighter than the rib columns, or sew a mattress seam ridge by ridge. Keep a one-for-one seam ledger so the lower edge does not shift.
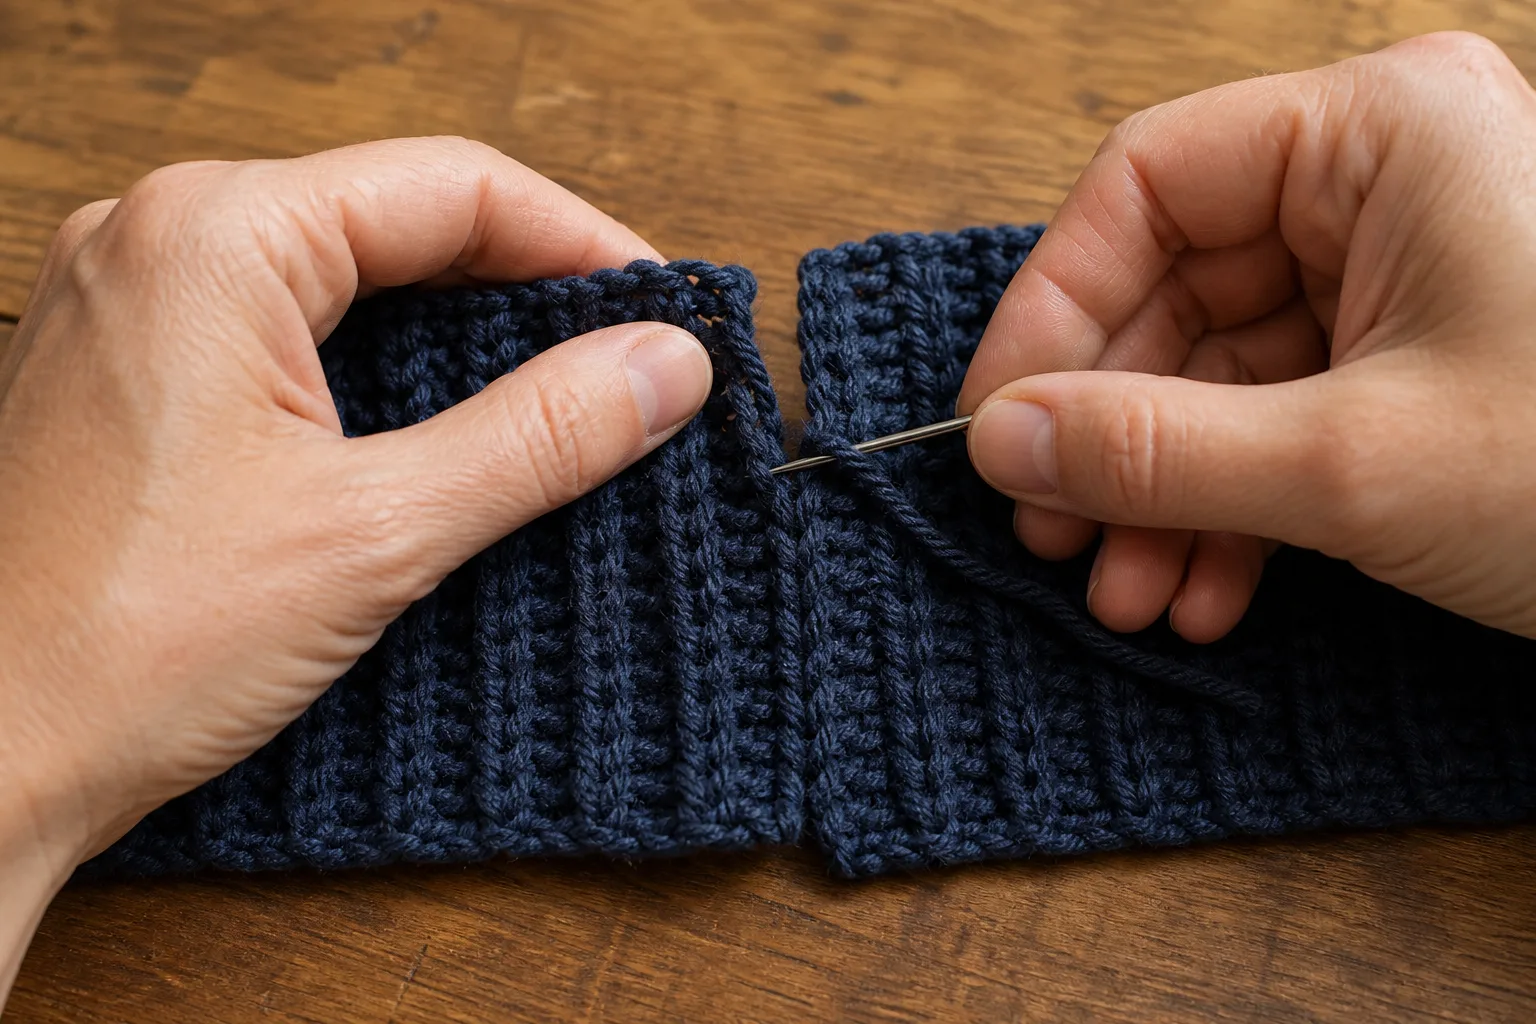
Turn the tube right side out. The seam should recover when stretched with the adjacent ribs.
Part 5: Close the reduced crown edge
Thread a yarn needle with a tail at least three times the crown-edge circumference. Run the tail through the sturdy edge loops around the short-row side. Make a second pass only if the yarn is slippery.
Draw the opening closed gradually while distributing the ribs. Because only the full-row pair in each wedge reaches this edge, you are gathering roughly one fifth of the row ends that exist at the lower opening—not the full adult circumference.
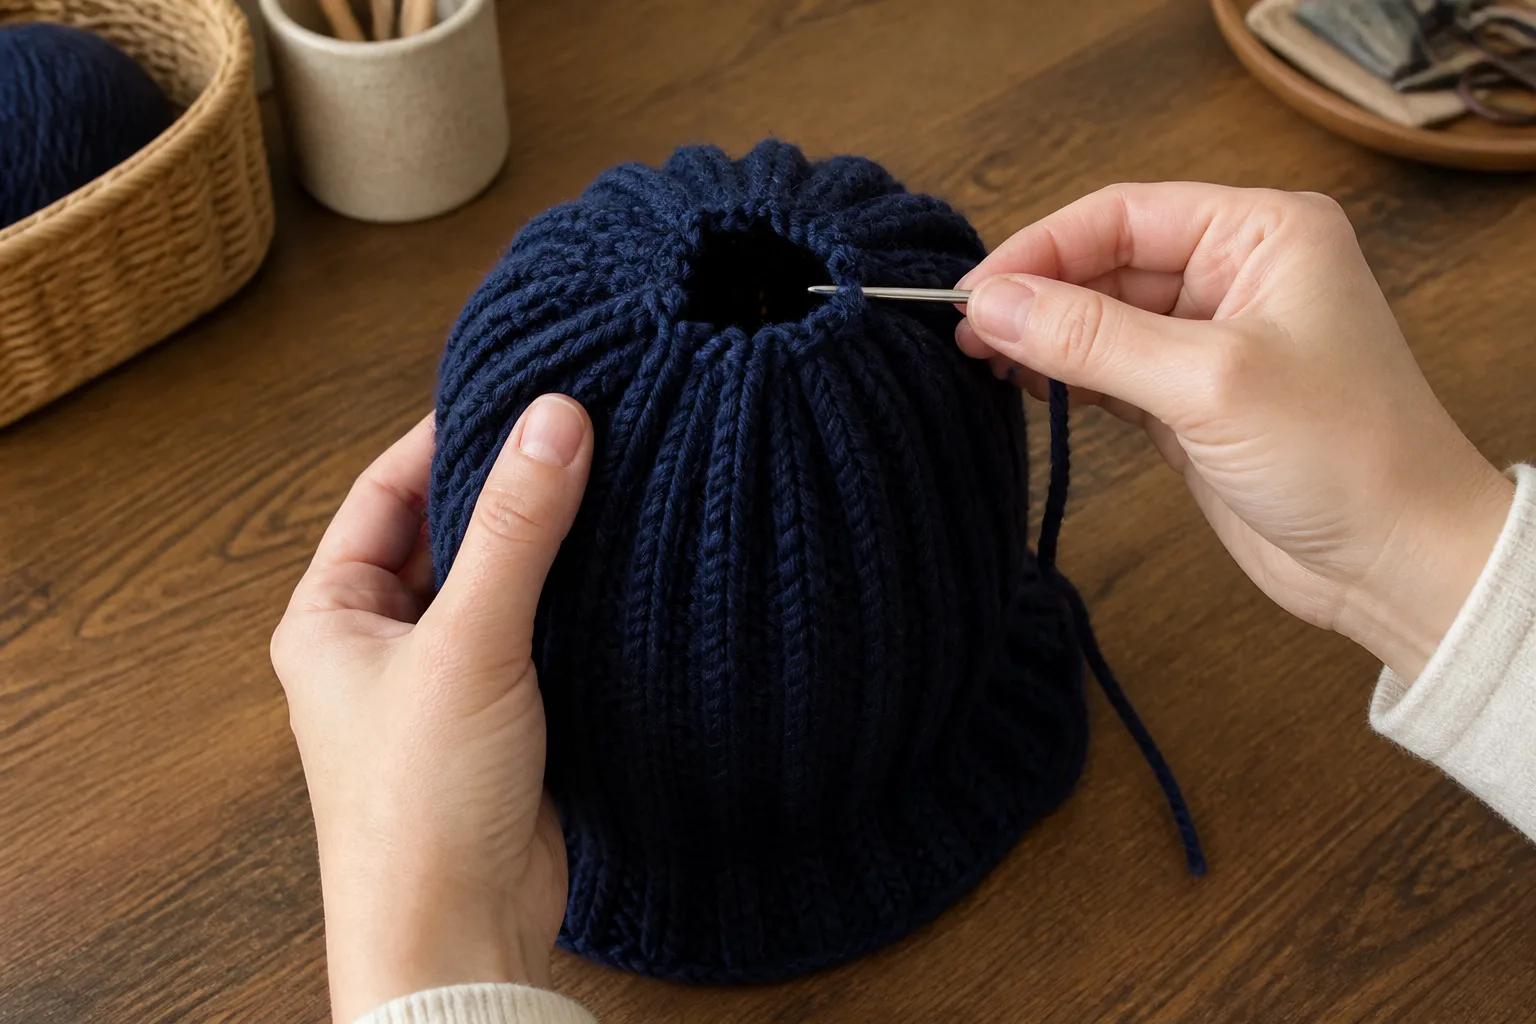
When the opening is about fingertip size, flatten the surrounding crown and check for a hard cone. If it is smooth, close the final gap, pass the needle across the center twice, secure inside and weave the tail through several direction changes.
Part 6: Fold and set the cuff
Fold F upward evenly. Steam only if the yarn label permits it; otherwise wash the completed hat, reshape the fold by hand and dry flat. Do not permanently tack the cuff until the wearer approves both the lower edge and the upper cuff line.
Four acceptance gates
Gate 1: Comfortable-stretch gauge
The circumference gauge is measured at the pressure you would accept on a forehead, not at maximum extension. The swatch springs back after release. If it remains elongated, reduce planned negative ease or choose a yarn with better recovery.
Gate 2: Fold and wear line
With the cuff folded to F, the bottom fold lands at the selected wear line and the cuff top does not crowd the brow. If the opening fits but the hat is tall, correct L or F; do not remove circumference rows to solve a depth problem.
Gate 3: Whole wedges and smooth turn ladder
The panel row count is divisible by ten, all four turn offsets are distinct, and every wedge ends at the lower edge. If a marker is skipped, one wedge will be taller at the crown and the closure will lean.
Gate 4: Reduced crown closure
Before the final knot, the gathered center lies flat when pressed lightly. A firm peak means the crown edge is still too large, the deepest turn is too shallow, or the tail was pulled tight before the gathers were distributed.
Worked Example: 23.5-Inch Head
Suppose H = 23.5 in (59.7 cm), planned ease is 6%, and the washed rib measures 5.2 comfortably stretched rows per inch.
- Target circumference: 23.5 × 0.94 = 22.09 in (56.1 cm).
- Raw rows: 22.09 × 5.2 = 114.87.
- Lower legal count: 110 rows, or 11 wedges.
- Upper legal count: 120 rows, or 12 wedges.
At 110 rows, estimated circumference is 110 ÷ 5.2 = 21.15 in (53.7 cm), which gives 10.0% negative ease. At 120 rows, estimated circumference is 120 ÷ 5.2 = 23.08 in (58.6 cm), which gives 1.8% negative ease.
Choose 110 only when the washed fabric recovers strongly and the wearer approves a close watch-cap fit. Choose 120 for modest recovery or pressure sensitivity. If 120 feels loose while 110 feels tight, do not invent a half wedge: change the hook enough to shift the row gauge, make and wash a new swatch, then recalculate.
For W = 7.75 in (19.7 cm), F = 2.5 in (6.4 cm) and g_d = 3.25 stitches per inch, L = 10.25 in and S = 33 stitches after rounding. The circumference decision changes the number of wedges; it does not change the depth stitch count.
Adapting the fit for a child or a gift
Do not scale the adult 33-stitch or 110-row example by a percentage. Measure the intended wearer’s head circumference, crown-to-wear-line depth and cuff height, then use a washed swatch made in the actual yarn and hook.
Recalculate circumference rows from the comfortably stretched row gauge and depth stitches from the relaxed stitch gauge. Keep those axes independent. The adult T = 0.28 × W starting value and 1.75–2.25 in limit are not child constants; verify the turn ladder on the smaller physical panel and reject any crown that forms a hard point.
For a gift with no try-on access, record the finished opening, unfolded depth, cuff depth and stretch range, and allow adjustment or remaking. A generic age label cannot replace the intended wearer’s measurements.
Troubleshooting
Use the symptom to find the smallest correction, then return only to the affected construction point.
| SYMPTOM | LIKELY CAUSE | MINIMUM CORRECTION | RETURN POINT |
|---|---|---|---|
| The hat fits around but looks like a regular tall beanie | Circumference and depth were treated as one decision; W, F or L is too large. | Remeasure W, confirm that F was added once, and correct L. | Depth calculation; do not remove circumference rows. |
| The cuff springs open | The fabric is thick, F is too deep, or rib recovery is weak. | Wash and dry first; then reduce F or use a more resilient yarn. | Cuff choice or swatch. |
| The crown leans toward the seam | A wedge has the wrong row count, or the seam joins mismatched ridges. | Count ten lower-edge row ends per wedge and restore a one-to-one seam ledger. | Affected wedge or seam. |
| There is a hole at each short-row turn | An extra turning chain was added or the next unworked BLO stitch was skipped. | Turn snugly and work the next unworked BLO stitch on the longer row. | The first faulty turn. |
| The top forms a hard knob | Too many rows reach the crown edge, or the gathers were tightened before distribution. | Restore one full-row pair per wedge and redistribute the gathers before closing. | Wedge construction or crown closure. |
| The seam will not stretch with the cuff | The join is tighter than the rib or catches inconsistent loops. | Redo with a larger hook or mattress stitch, matching one ridge to one ridge. | Seam only. |
Final checklist
- Crown-to-wear-line W measured on the intended wearer
- Cuff height F chosen separately
- Unfolded depth calculated as W + F
- Washed comfortable-stretch row gauge and relaxed stitch gauge recorded
- Total row count divisible by ten
- Estimated circumference and estimated ease checked after rounding
- Four distinct crown-turn offsets marked
- Each wedge contains one full-row pair and four short-row pairs
- Seam matches ridges one for one and stretches with the fabric
- Fold line, brow clearance and rounded crown pass after washing
Frequently asked questions
Is a fisherman beanie supposed to cover the ears?
There is no single universal line. Many are worn at the upper ear or just above it; others overlap more for warmth. Choose W on the wearer before calculating the panel instead of inheriting a fixed depth.
Can I use single crochet instead of half double crochet?
Yes, but make and wash a new swatch. Single crochet changes both row and stitch gauge and may make a denser cuff. Recalculate every value rather than carrying over the example counts.
Can I make the cuff fold twice?
Yes, but measure the total fabric consumed by the double fold and test the bulk near the ears. A double fold may require more depth than F and a softer yarn. Treat the final folded stack as a new physical sample before committing to L.
Why are the wedges ten rows?
Ten rows create one full pair plus four short-row pairs. That leaves a reduced crown edge while keeping the arithmetic auditable. Changing the repeat changes both circumference rounding and crown reduction, so do not casually add two rows inside every wedge.
Can I make this slouchy?
You can add depth, but the result stops being the low fisherman silhouette. Use the slouchy-beanie method when intentional back drop is the goal.
Can I add a pom-pom?
Yes, after the crown passes its closure gate. Use a removable attachment if the hat must be washed often, and confirm the added weight does not pull the short crown upward.