

A measurement-adaptive single-crochet sun hat with a gauge-derived crown, a flat-annulus brim schedule, a washed-fabric support gate and a complete 22-inch worked example.
Sun Hat Brim Shape and Support Planner
Open the tool in a separate page. The article also retains the manual formulas and worked checks.
JavaScript is optional: use the manual calculation method and worked examples in the article.
Quick answer
A useful crochet sun hat pattern has to solve four different problems: the crown must fit the wearer, the top circle must lie flat, the brim must add the right amount of area, and the washed material must be able to support that area. A fixed instruction such as “increase six stitches every round” may work for one yarn and one maker, yet cup or ruffle when stitch gauge and row gauge have a different relationship.
This pattern calculates the flat-circle increase rate from both parts of your washed gauge:
The same rate controls the crown and the brim. For the complete example—22-inch / 55.9-cm head, 18 single crochet across 4 inches, and 20 rounds across 4 inches—the rate is 5.65 increases per round. Cumulative rounding creates a practical sequence of five- and six-increase rounds. The nearest reachable crown/body count is 102 stitches, the estimated circumference is 22.67 inches / 57.6 cm, and a 16-round brim reaches 3.20 inches / 8.1 cm with 192 stitches at its outer edge.
The second calculation is physical rather than purely mathematical. Wash a swatch strip, slide it beyond a table edge, and record the longest overhang that stays nearly level before the tip drops about 1 inch / 2.5 cm. Compare the planned brim depth with that washed stable overhang. This conservative maker’s gate helps you decide whether the fabric can stand alone, needs a firm edge, needs purpose-made nylon brim cord, or should be remade before you invest hours in a broad brim.
What makes a sun hat different from a bucket hat
A bucket hat and a sun hat can begin with similar top-down construction, but they do not ask the brim to do the same job. A classic bucket brim usually angles downward and can remain relatively short. Its silhouette tolerates some softness because the brim hangs near the face. A broad sun-hat brim projects outward as an annulus—a ring surrounding the crown—and must carry more fabric farther from the head.
For a broad, outward-projecting brim, plan the following:
- A broad shade profile beginning around 3 inches / 7.6 cm rather than a short fashion brim.
- A flat-annulus increase schedule derived from the maker’s washed gauge.
- A support decision based on washed overhang instead of the yarn label alone.
- Checkpoints that distinguish excess area, insufficient area and inadequate material stiffness.
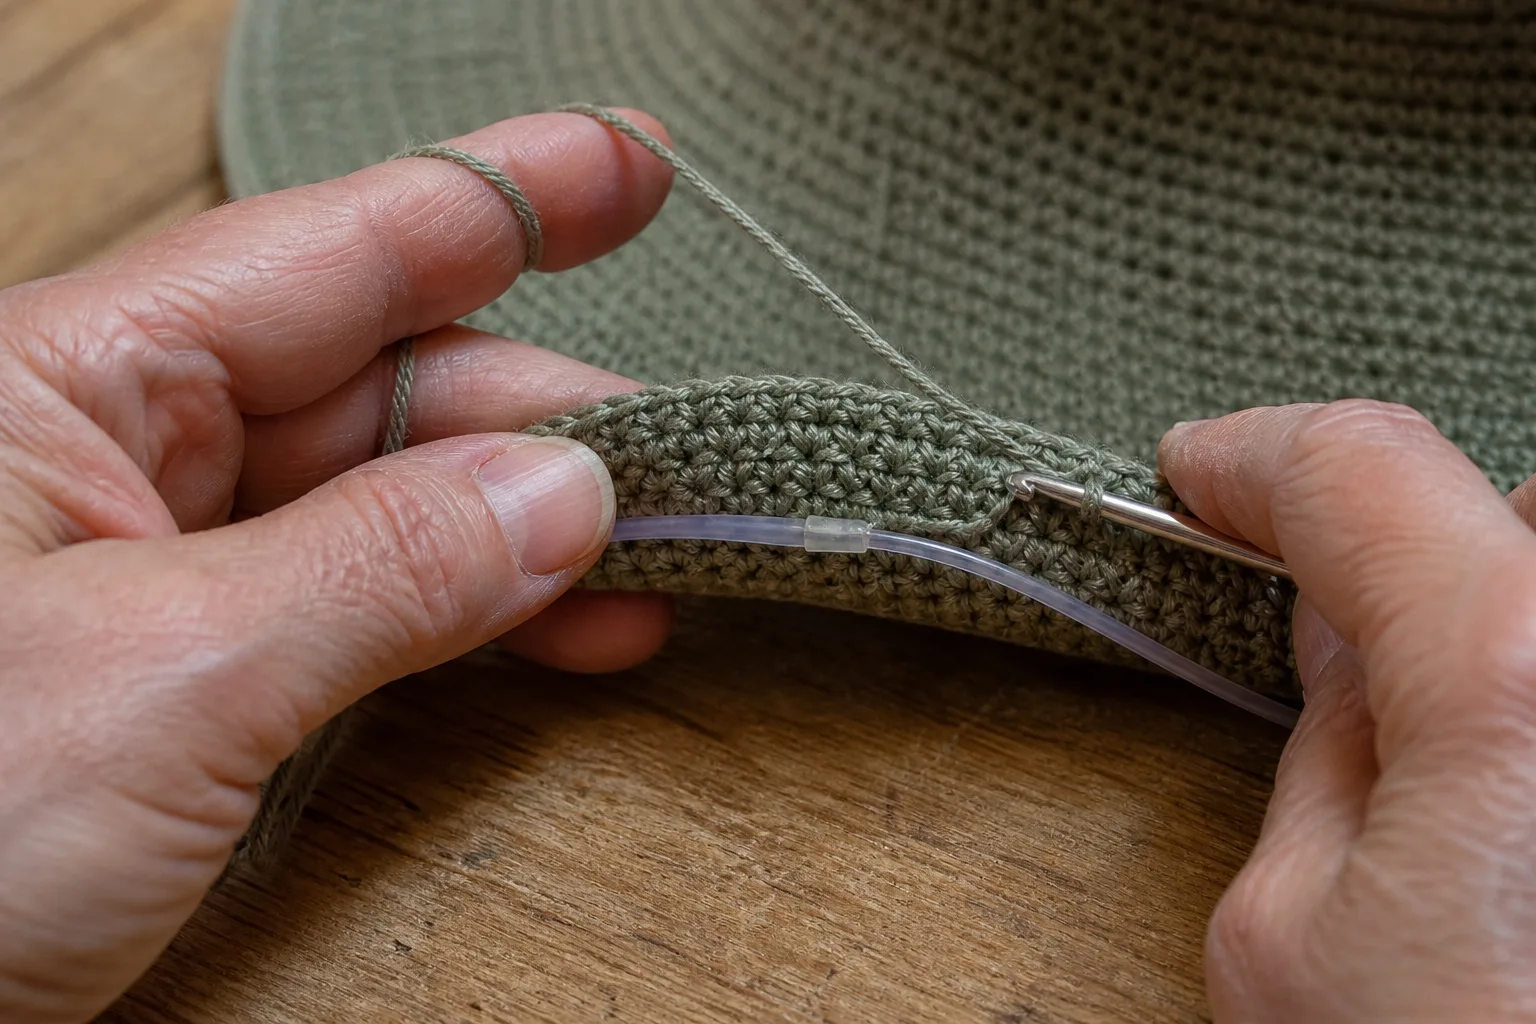
- A safe method for enclosing purpose-made nylon brim cord with no exposed ends.
If you want a short, down-angled brim, use a bucket-hat construction. If you want a flatter, wider silhouette that projects away from the crown, continue with this sun-hat plan.
The four jobs that must agree
Treat the hat as four connected systems rather than one long list of rounds.
- Fit: actual head circumference, intended ease and the selected reachable stitch count determine whether the crown sits securely without squeezing.
- Crown geometry: stitch gauge and row gauge together determine how many increases the growing circle needs per round.
- Brim geometry: the same increase rate adds enough area for a flat ring instead of a ruffle or an upturned bowl.
- Material support: fiber, twist, hook size, stitch density, washing and brim depth determine whether that flat ring holds its intended profile.
Mathematics can make a brim flat on a table. It cannot make a very soft cotton fabric behave like millinery braid. Reinforcement can stabilize a suitable brim, but it is not a substitute for correcting severe ruffles, an open fabric or a brim far beyond the washed material’s stable overhang.
Shade is not a UPF certification
A broad brim can shade parts of the face, ears and neck, but width alone does not establish an Ultraviolet Protection Factor. UPF is a measured rating for a material or finished product under defined test conditions. Handmade crochet varies with fiber, color, moisture, stretch, stitch density and the size of light paths between stitches. This pattern does not assign a UPF rating to your hat.
For a shade-oriented fabric, hold the washed swatch toward a bright light without stretching it. Dense fabric with no easy light paths is preferable to open or lacy fabric, but this is a design check, not certification. Dermatology and cancer-prevention organizations also recommend combining a broad-brim hat with sunscreen, protective clothing, sunglasses and shade. Reapply sunscreen as directed for the product and your activity.
A broad-brim reference of about 3 inches / 7.6 cm is a useful starting point for the silhouette. It does not turn any crochet fabric into a sun-protective product. If a verified level of UV protection is essential, use a product with a tested UPF label and follow professional sun-safety guidance.
Measure the wearer before choosing a stitch count
Use a soft tape around the intended wear line: across the middle of the forehead, above the ears and around the fullest part at the back of the head. Keep the tape level and comfortably snug. Record the actual circumference rather than selecting “adult medium” by assumption.
Measure crown-center-to-brim depth separately. Place the tape at the top center of the head and follow the curve to the point where you want the brim to begin. Hair volume, ear position, crown shape and wearing preference change this depth even when two people have the same circumference. In the worked example, that curved surface depth is 6.75 inches / 17.1 cm.
For a dense single-crochet crown, begin with 0% to about 4% positive ease. The worked example uses 2%. Positive ease here belongs to the crown/body, not the brim. Do not add brim depth to the fit calculation, and do not tighten the crown to compensate for a floppy brim.
If the wearer prefers a secure fit, preserve a comfortable crown and add a concealed crochet cord at the wear line. A fit cord can refine circumference. It does not support the outer brim.
Build a washed swatch that answers four questions
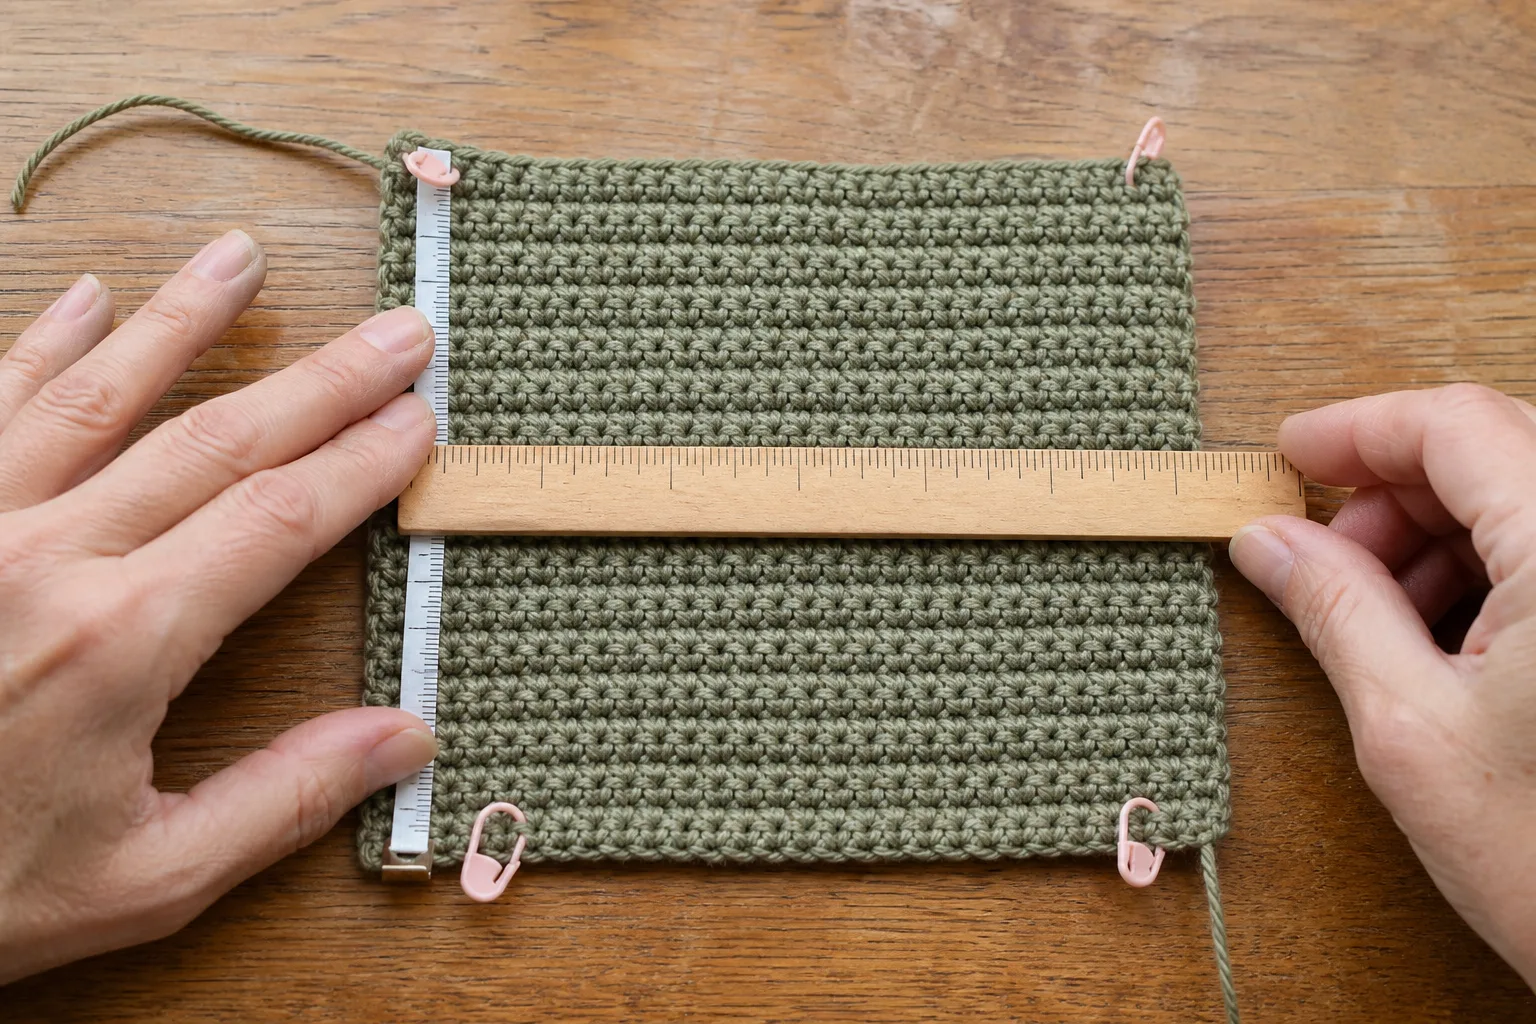
Make the swatch large enough to measure away from the starting edge and turning edges. Use the exact yarn, hook, stitch and working tension planned for the hat. For a round-based single-crochet fabric, a rectangular swatch is acceptable for gauge and overhang screening; work at least 6 × 8 inches / 15 × 20 cm if possible. Wash and dry it as the finished hat will be cared for, then let it rest without stretching.
The swatch must answer four questions.
1. Stitch gauge
Count a broad group of complete single crochet stitches across the center and measure their width. Divide stitches by width. The example has 18 stitches across 4 inches, so stitch gauge is 4.5 stitches per inch.
2. Row gauge
Count complete rounds or rows vertically through the center and measure their height. Divide rounds by height. The example has 20 rounds across 4 inches, so row gauge is 5 rounds per inch.
Do not borrow row gauge from a yarn label. The flat-circle rate depends on the relationship between your stitch width and round height.
3. Density and light paths
Hold the relaxed, washed fabric toward a bright light. If large or repeated openings form easy light paths, a shade-oriented hat needs a denser swatch. Try a smaller hook that remains comfortable, a more suitable yarn or a denser stitch. Do not work so tightly that the hook must be forced through stitches or your hands hurt.
4. Washed stable overhang
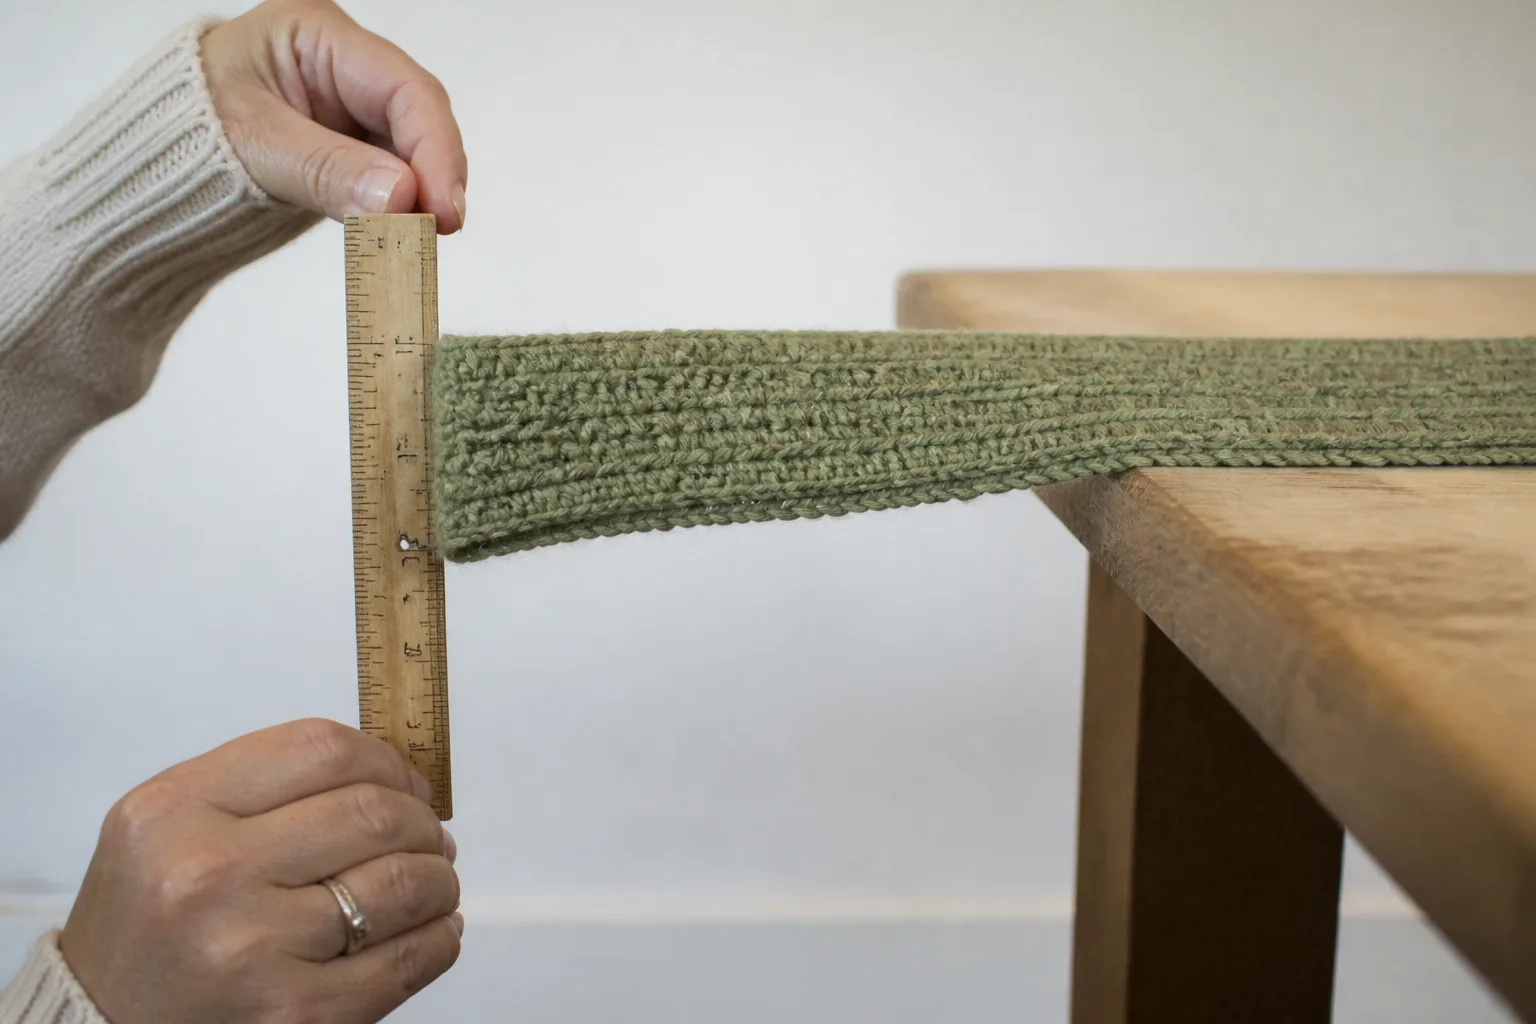
Make or reserve a long swatch strip. Place it flat on a table with one end extending beyond the edge. Slide the strip outward gradually. When the unsupported tip drops about 1 inch / 2.5 cm below the table plane, measure from the table edge to the tip. Record that projection as the washed stable overhang.
This is a conservative maker’s comparison, not a standardized materials test. Repeat it in two orientations if the fabric behaves differently along rows and across stitches, and use the smaller result. The finished-hat checkpoints still override the estimate.
Decide support before beginning the hat
Divide the planned actual brim depth by the washed stable overhang:
| Support ratio | Practical planning decision |
|---|---|
| 0.90 or less | The fabric is a reasonable candidate to self-support; verify on the actual brim. |
| More than 0.90 to 1.10 | Add a firm surface-slip-stitch edge or purpose-made nylon brim cord if the edge begins to fall. |
| More than 1.10 to 1.35 | Plan purpose-made nylon brim cord or reduce the brim depth. |
| More than 1.35 | Change the fabric, reduce the depth and make a new washed swatch; edge reinforcement alone is a poor rescue plan. |
At the assumed gauge, the example’s 16 rounds calculate to a 3.20-inch brim. Assume a washed stable overhang of 2.75 inches for this example; the calculated support ratio is 1.16. That enters the nylon-cord range. If the maker wants no reinforcement, the honest choices are a shallower brim or a firmer washed fabric—not pretending the same material will hold a deeper projection.
Calculate the flat-circle increase rate
Crochet circles are discrete approximations of continuous geometry. Adding a round increases radius by one round-height unit. The extra circumference required for that radius change is approximately 2π times the radial change. Converting that length to stitches gives:
For the example:
Do not round 5.65 to six and add six forever. Cumulative rounding preserves the average. After r rounds, the total number of added stitches is approximately round(q × r). The increase count for one round is the difference between that total and the prior round’s total. That is why the schedule alternates five and six increases while staying close to the fabric’s measured geometry.
Choose a reachable crown/body count
First calculate the target crown circumference and raw stitch count:
The worked example gives 22 × 1.02 = 22.44 inches, then 22.44 × 4.5 = 100.98 stitches. A top-down crown built from the calculated increase path cannot necessarily stop at every integer. Starting near round(q), its reachable counts follow:
The nearby reachable counts are 96 and 102. The nearest is 102. At 4.5 stitches per inch, 102 stitches make an estimated circumference of 22.67 inches / 57.6 cm, or about 3.0% positive ease on a 22-inch head. That is within the intended 0%–4% starting window.
Apply the Brim Geometry and Support Method
Use actual head circumference, positive ease, washed stitch and row gauge, crown-center-to-brim depth, desired brim depth and washed stable overhang. Select the reachable crown count and planned support. The worked calculation immediately shows the crown path, estimated circumference, crown diameter, sidewall rounds, brim increase schedule, outer diameter and support warning.
Complete worked example
| Field | Example input or result | Why it matters |
|---|---|---|
| Actual head circumference | 22 in / 55.9 cm | Personal fit input, not an assumed adult size |
| Crown positive ease | 2% | Allows a comfortable dense crown |
| Washed stitch gauge | 18 SC across 4 in = 4.5 sts/in | Converts circumference to stitches |
| Washed row gauge | 20 rounds across 4 in = 5 rounds/in | Converts radius and depth to rounds |
| Flat-circle rate q | 5.65 increases per round | Controls crown and flat brim geometry |
| Crown target | 22.44 in / 57.0 cm | Head plus chosen ease |
| Raw count | 100.98 stitches | The continuous target before reachability |
| Nearby reachable counts | 96 / 102; nearest 102 | Shows the real alternatives |
| Selected count | 102 stitches | Creates 22.67 in / 57.6 cm estimated circumference |
| Estimated ease | 3.0% positive | Verifies the selected count against the wearer |
| Crown diameter | 7.22 in / 18.3 cm | Flat-circle checkpoint before sidewall |
| Crown rounds | 18 rounds | Reaches the selected count path |
| Crown center to brim join | 6.75 in / 17.1 cm | Personal wearing-depth checkpoint |
| Approximate even sidewall | 16 rounds | Planning estimate; measure the curved depth |
| Desired brim | 3.25 in / 8.3 cm | Silhouette target |
| Actual brim from row gauge | 16 rounds = 3.20 in / 8.1 cm | Reachable whole-round result |
| Brim increases | 90 total | round(5.65 × 16) |
| Brim outer count | 192 stitches | 102 + 90 |
| Washed stable overhang | 2.75 in / 7.0 cm | Assumed example material-support input |
| Support ratio | 1.16 | Calls for nylon brim cord or less depth |
| Approximate outer diameter | 13.62 in / 34.6 cm | Body diameter plus twice the brim depth |
Materials and tools
- A plant-fiber yarn or crochet millinery yarn that produces a dense, comfortable washed swatch. Cotton, paper-based yarn and raffia-style yarns behave differently; choose by swatch result, not fiber name alone.
- A hook that produces the recorded gauge without painful hand tension.
- Removable stitch markers, including one contrasting beginning-of-round marker.
- Soft measuring tape, rigid ruler and flat table for the overhang test.
- Tapestry needle and scissors.
- Optional smooth crochet cord for the concealed wear-line adjustment.
- Purpose-made nylon millinery brim cord or brim reed sized for the fabric, plus a compatible connector, if the support gate calls for it.
Avoid uncoated florist wire, corroding metal, sharp cut ends and any connector that remains exposed. A brim edge rests near the face and hands; its reinforcement must remain smooth and fully enclosed.
Abbreviations and construction notes
- ch: chain
- inc: work 2 SC in the same stitch
- rnd: round
- SC: single crochet
- sl st: slip stitch
- st(s): stitch(es)
Work in a continuous spiral for a discreet surface, moving the beginning marker after every round. If you prefer joined rounds, keep the join consistent and do not count the joining slip stitch as an extra stitch. The numerical path is the same, but the seam will be more visible.
Use the quotient-and-remainder method whenever a round requires K increases across N existing stitches. Divide N by K. The sector sizes will be floor(N ÷ K) or ceiling(N ÷ K), differing by at most one stitch. In each sector, work plain SC through all but the last stitch, then increase in the last stitch. Spread the longer sectors around the circle instead of grouping them together.
Example: distributing six increases across 34 stitches gives four sectors of six stitches and two sectors of five stitches because 34 = 6 + 6 + 6 + 6 + 5 + 5. Work an increase at the end of each sector. On the next increase round, rotate the first increase position by one or two stitches to avoid visible spokes.
Crochet the gauge-derived crown
Begin with a magic ring or a short joined chain ring. For the example, work 6 SC into the center. Do not pull a magic ring so aggressively that the yarn is damaged; leave enough tail to secure the center later.
Follow this cumulative count path:
| Crown round | End count | Increases this round |
|---|---|---|
| 1 | 6 | 6 initial SC |
| 2 | 12 | 6 |
| 3 | 17 | 5 |
| 4 | 23 | 6 |
| 5 | 29 | 6 |
| 6 | 34 | 5 |
| 7 | 40 | 6 |
| 8 | 46 | 6 |
| 9 | 51 | 5 |
| 10 | 57 | 6 |
| 11 | 63 | 6 |
| 12 | 68 | 5 |
| 13 | 74 | 6 |
| 14 | 80 | 6 |
| 15 | 85 | 5 |
| 16 | 91 | 6 |
| 17 | 96 | 5 |
| 18 | 102 | 6 |
Distribute each round’s increases using quotient and remainder. Rotate increase locations. Lay the crown on a flat surface after Rounds 6, 12 and 18 without pressing or stretching it.
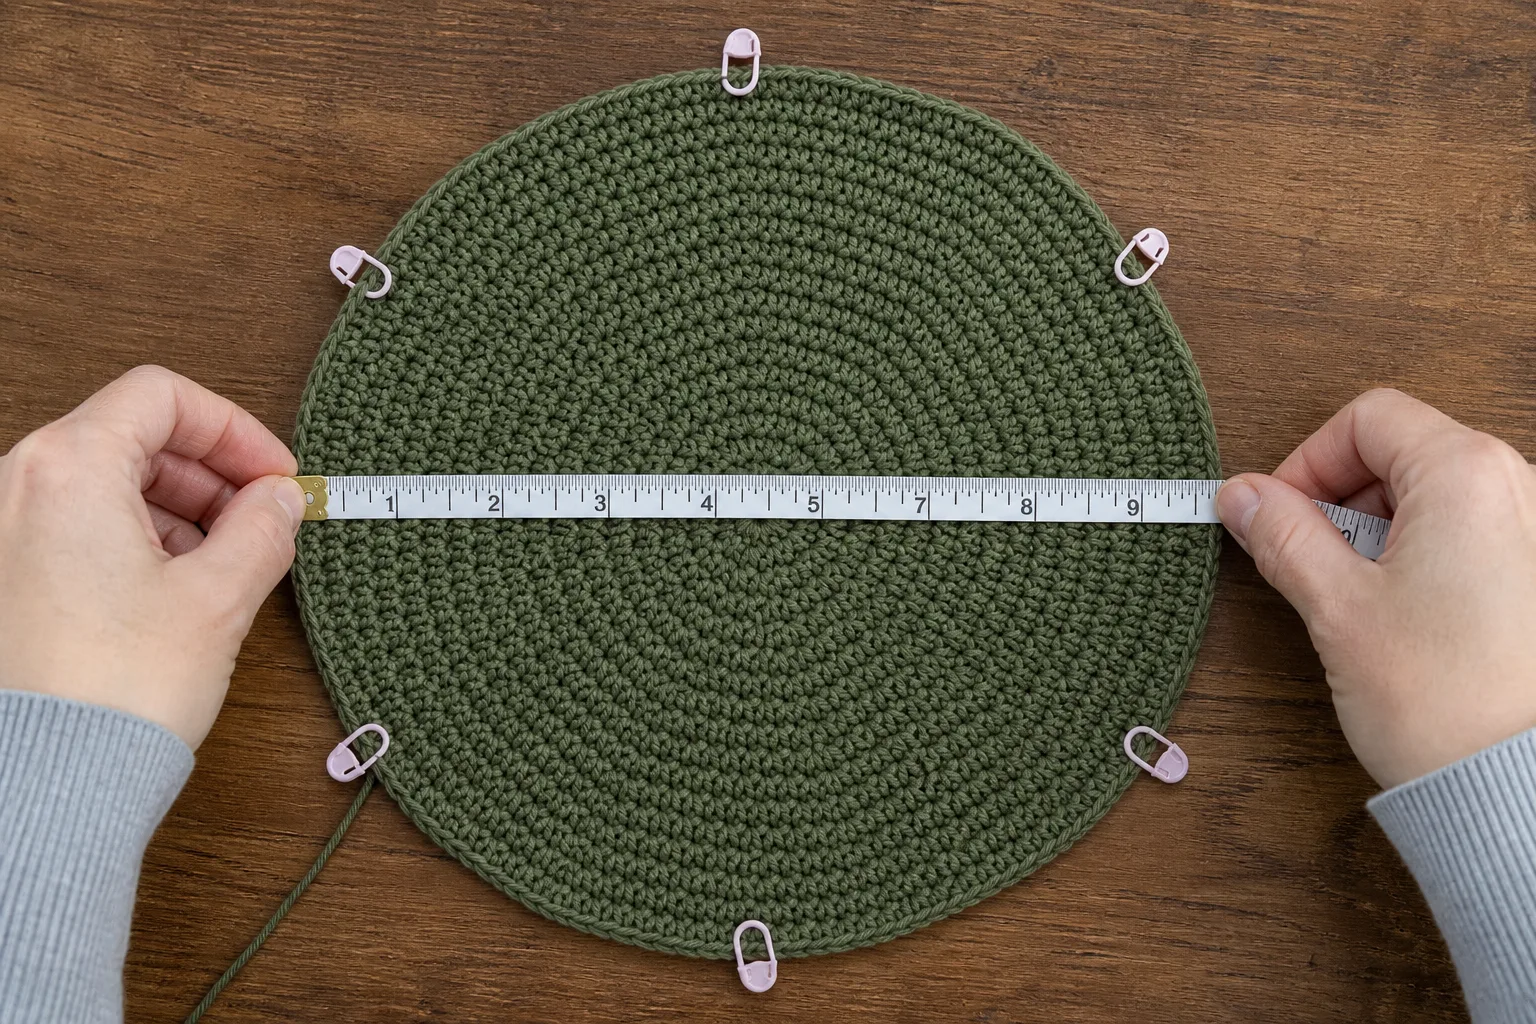
At 102 stitches and 4.5 stitches per inch, the target diameter is estimated circumference ÷ π = 7.22 inches / 18.3 cm. Measure across the widest point through the center. A small difference is normal because crochet is not a rigid circle, but a persistent bowl or ruffle requires correction before the sidewall hides the evidence.
If the crown cups, the fabric is receiving too few increases for its real geometry. Recheck gauge and add an increase sooner. If it ruffles, it is receiving too many increases; work an even round or delay an increase. Record the correction because the same fabric behavior informs the brim.
Work the sidewall to measured wearing depth
Once the crown reaches the selected 102 stitches and lies flat, work 102 SC evenly around without increases. The worked example estimates 16 even rounds because the 18-round crown contributes about 3.6 inches of curved surface radius, leaving approximately 3.15 inches to reach a 6.75-inch crown-center-to-brim depth at 5 rounds per inch.
That round count is a planning estimate, not the final authority. Measure from the crown center down the curved surface to the lower edge. Stop when the sidewall reaches the wearer’s recorded brim-join depth. Try the open crown on if practical: it should settle at the intended wear line without pressing the top of the head or covering the eyes.
Optional concealed fit cord
If the crown is comfortable but could lift in wind, create a small channel one or two rounds above the future brim join. Work a round in back loops or add a narrow interior crochet channel. Thread a smooth crochet cord through the channel and test it on the wearer. Join or tie it so the adjustment remains accessible but does not press the skin. Secure the channel openings.
Do not use the fit cord to make an oversized crown painfully tight. Do not confuse it with outer-brim reinforcement; it controls the wear line only.
Build the flat-annulus brim
The brim begins with the 102-stitch body as the inner circumference of a ring. Continue in SC and distribute the displayed number of increases on each round:
| Brim round | Add | End count | Flat check |
|---|---|---|---|
| 1 | 6 | 108 | Distribute across 102 stitches |
| 2 | 5 | 113 | Rotate increase positions |
| 3 | 6 | 119 | Keep normal hand tension |
| 4 | 6 | 125 | Lay flat; first checkpoint |
| 5 | 5 | 130 | Correct early waviness now |
| 6 | 6 | 136 | Re-space markers |
| 7 | 6 | 142 | Do not stretch the outer edge |
| 8 | 5 | 147 | Lay flat; second checkpoint |
| 9 | 6 | 153 | Confirm the plane, not just count |
| 10 | 6 | 159 | Rotate increase locations |
| 11 | 5 | 164 | Check that edge is not tightening |
| 12 | 6 | 170 | Lay flat; third checkpoint |
| 13 | 6 | 176 | Re-evaluate support as projection grows |
| 14 | 5 | 181 | Keep increases evenly distributed |
| 15 | 6 | 187 | Measure actual brim depth |
| 16 | 5 | 192 | Finish at about 3.20 in / 8.1 cm |
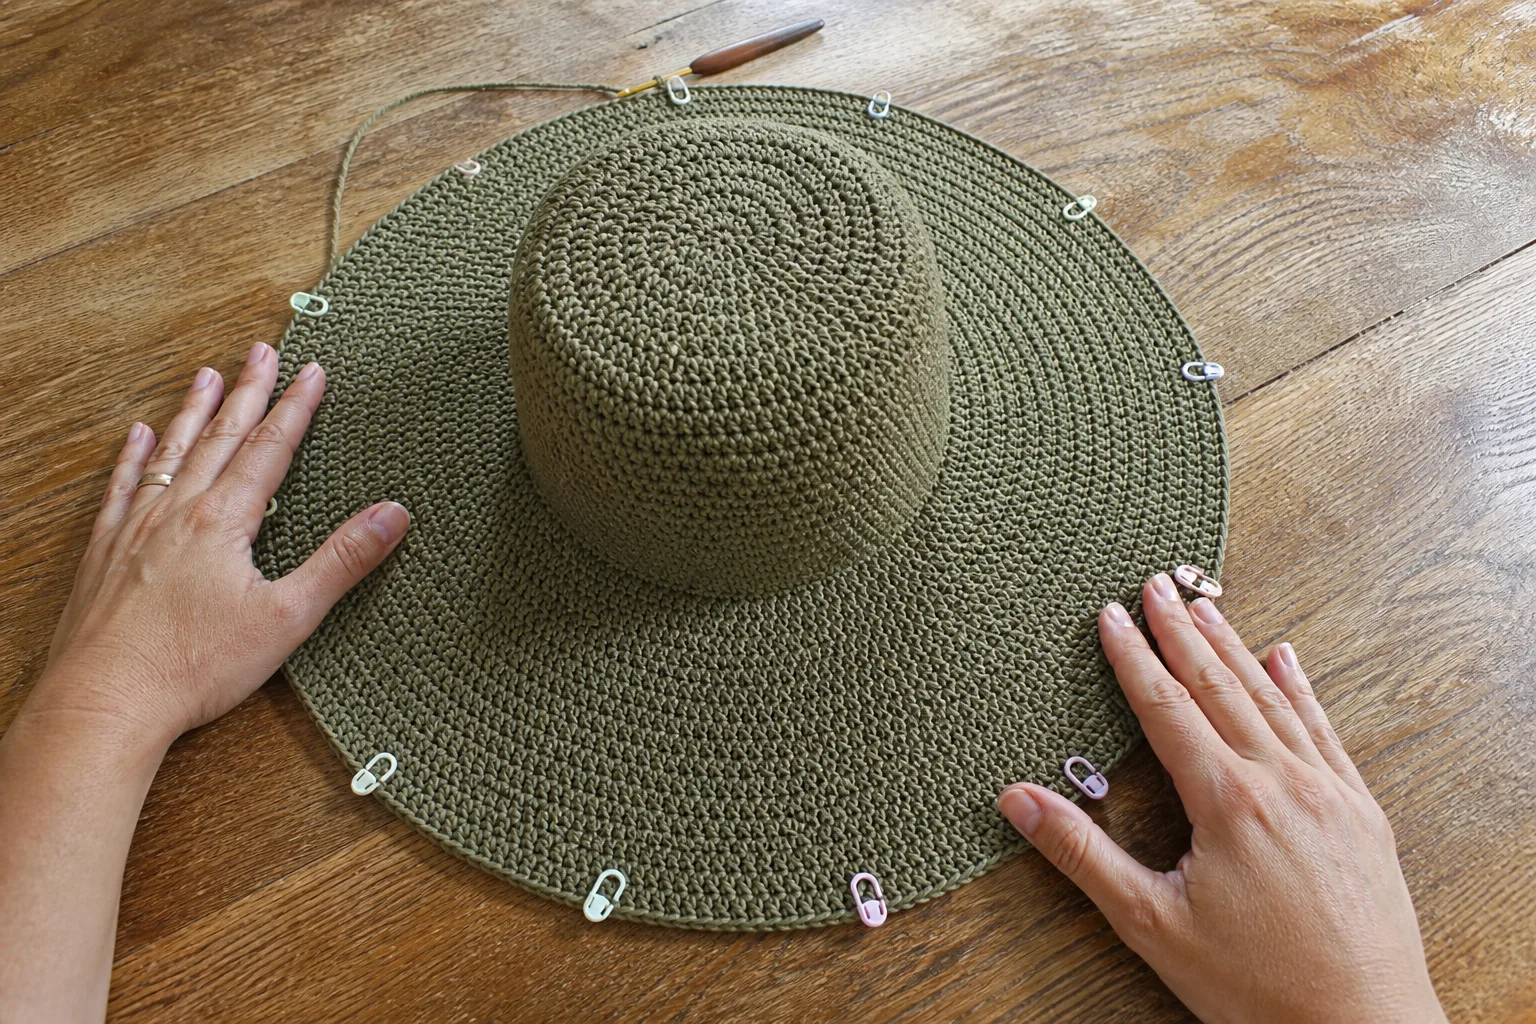
At each checkpoint, set the hat on a flat surface with the crown upright. Let the brim settle without steam, starch, pins or hand pressure. Read the shape:
- Flat and calm: continue the calculated schedule.
- Soft regular waves: excess circumference is forming; omit one planned increase and recheck after the next round.
- Strong ruffles: undo to the last flat checkpoint. Reduce cumulative increases; reinforcement will not remove excess area.
- Edge turning upward: the brim needs more circumference. Add one distributed increase and recheck.
- Plane is correct but the whole brim falls when lifted: geometry is acceptable; the material-support decision is now the issue.
A one-increase correction in a round is a calibration, not a failure. The calculated schedule is the evidence-based starting point; the physical plane is the acceptance test.
Enclose purpose-made nylon brim cord safely
Use cord only after the brim lies flat. Choose smooth purpose-made nylon millinery cord or brim reed, following its manufacturer’s joining guidance. Test a short enclosed sample first to confirm that the hook, stitch and cord diameter work together without gaps or a hard ridge.
- Cut the cord with generous overlap according to the connector method, keeping both ends controlled.
- Place the cord immediately below the active loops along the outer brim edge.
- Work SC over the cord, enclosing it against the prior round. Keep the crochet tension normal; pulling tight can draw the brim into a cup.
- Before closing the circle, lay the brim flat and adjust the cord so it follows the edge without forcing a smaller circumference.
- Join the cord using its compatible connector or recommended overlap. The joint must be smooth, secure and no thicker than the surrounding edge where possible.
- Continue crocheting until the joint and both ends are completely covered. Tug gently at the finished edge to confirm nothing can migrate or poke through.
If the cord creates a ruffle, it may be too long or the crochet edge may have gained area. If it pulls the brim upward, it may be too short or the enclosing stitches may be tight. Do not solve either problem by forcing the brim with steam.
Four checkpoints before calling the hat finished
Checkpoint 1: Crown plane and diameter
The completed crown lies close to flat and measures near the calculated 7.22-inch / 18.3-cm diameter. It neither forms a persistent bowl nor a lettuce-like edge.
Checkpoint 2: Wear-line fit and depth
The 102-stitch body gives about 22.67 inches / 57.6 cm of relaxed circumference and about 3.0% positive ease on the example wearer. The brim begins at the recorded 6.75-inch / 17.1-cm curved depth. The wearer can turn the head, see clearly and remove the hat comfortably.
Checkpoint 3: Brim plane and projection
The brim reaches about 3.20 inches / 8.1 cm after 16 rounds, and the outer edge count is 192 stitches. On a table it rests as a calm ring without repeated waves or an upturned bowl. On the wearer it projects broadly rather than collapsing into a bucket silhouette.
Checkpoint 4: Support and safety
The example’s 1.16 support ratio is matched by fully enclosed purpose-made nylon brim cord. No end, connector or hard point is exposed. The washed fabric is dense enough for the intended shade silhouette, while the wearer understands that the hat has no claimed UPF rating and uses other sun-protection measures.
Diagnose the result instead of restarting blindly
| Symptom | Most likely cause | Best next action |
|---|---|---|
| Crown ruffles | Increase average too high for actual gauge | Remove excess increases and re-measure washed gauge |
| Crown cups | Increase average too low | Add a distributed increase sooner; verify row gauge |
| Brim develops regular waves | Too much area in the annulus | Undo to last flat checkpoint and reduce cumulative increases |
| Brim turns upward | Too little area | Add one evenly distributed increase and recheck |
| Brim is flat on table but collapses when worn | Material cannot support the projection | Apply support gate: cord, less depth or firmer fabric |
| Edge cord creates a bowl | Cord is short or enclosing tension is tight | Open the edge, restore circumference and re-enclose normally |
| Edge cord creates a ruffle | Cord is long or outer edge gained area | Correct length and verify brim geometry before closing |
| Hat feels hot | Fabric/fiber/conditions trap heat | Use a more suitable dense-but-breathable swatch and take heat breaks; do not open large light paths merely to claim ventilation |
| Crown feels tight | Selected count or cord adjustment is too small | Choose the upper reachable count or release the fit cord |
| Hands hurt while crocheting | Hook/fabric/tension combination is too resistant | Stop, rest and make a comfortable swatch with a different hook or yarn |
| Hard point can be felt at edge | Connector or end is not safely enclosed | Stop wearing; reopen and fully cover or replace the reinforcement |
Yarn substitution without losing the plan
Do not substitute by yarn weight alone. Two “worsted” cotton yarns can produce different stitch-to-row relationships and dramatically different overhang results. Paper, raffia-style and ribbon yarns may be lighter or firmer, yet they can split, kink or dislike repeated folding. Cotton may be pleasant to work but can gain weight and soften after washing.
For every substitution:
- Make a new dense SC swatch with comfortable tension.
- Wash, dry and rest it using the intended care method.
- Recalculate stitch gauge, row gauge and q.
- Repeat the light-path and stable-overhang gates.
- Generate a new reachable crown count and brim schedule.
If the new rate is 6.2, for example, do not reuse the 5.65 schedule merely because the head measurement is unchanged. If the stable overhang changes from 2.75 inches to 2 inches, do not reuse the same support decision merely because the stitch count matches.
Packing, washing and reshaping
Follow the yarn and reinforcement manufacturer’s care guidance. If the brim contains cord, avoid crushing the edge into sharp folds. For travel, fill the crown with soft clothing and lay the brim as flat as the luggage allows, or roll only if the selected cord is designed for that treatment.
After washing, blot without twisting. Support the wet brim because water can temporarily increase weight. Arrange the crown to its target diameter and the brim to a calm plane on a breathable surface. Let it dry completely before judging support. Do not use high heat on nylon cord, and do not assume starch is permanent or compatible with every fiber.
Recheck the outer edge before each season. Stop using the hat if reinforcement becomes exposed, cracked or sharply kinked. Repair the enclosure or replace the cord.
Frequently asked questions
How many stitches should an adult crochet sun hat have?
There is no honest universal adult count. Multiply the wearer’s target crown circumference by washed stitch gauge, then choose a count reachable by the calculated flat-circle path. In this example, the raw target is 100.98 and the nearest reachable count is 102. A different head or gauge produces a different result.
Why does my crochet sun-hat brim ruffle?
The growing ring has more circumference than the fabric needs at that radius. Undo to the last flat checkpoint and reduce the cumulative increase total. A stiff edge cannot erase excess area.
Why does the brim curl upward?
The growing ring has too little circumference, the edge tension is tight, or a support cord is shorter than the crochet edge. Add a distributed increase when geometry is deficient; reopen and correct the edge when reinforcement is pulling it inward.
Can I use cotton instead of raffia-style yarn?
Yes only if the washed cotton swatch meets your gauge, density and overhang requirements. Cotton often softens and becomes heavier when wet, so the support plan may change even if stitch gauge looks similar.
Does a wider brim always give better sun protection?
A wider projection can shade a larger area, but actual UV performance also depends on fabric construction, openings, angle and conditions. This pattern does not certify UPF. Use the hat as one part of a broader sun-safety plan.
Can I use wire in the brim?
Use purpose-made smooth millinery brim cord or brim reed and its intended joining system. Avoid uncoated florist wire, exposed metal and sharp ends. Fully enclose every joint and inspect it regularly.
Must I follow every calculated increase exactly?
Use the calculated cumulative schedule as the starting plan, then let the flat checkpoints decide. If your actual brim begins to wave or cup, a small distributed correction is more valuable than blindly preserving a number.
How do I make the hat less floppy without cord?
Reduce brim depth, make a firmer washed fabric, use a more supportive millinery-appropriate yarn, or add a firm surface slip stitch when the support ratio is near the borderline. Do not rely on very tight hand tension; it can cause pain and distort gauge.
What makes this article different
Many sun-hat patterns provide a fixed adult count, repeat a traditional six-increase circle, name one fiber and add wire or fishing line only after the brim collapses. That can reproduce a sample, but it does not explain why a substitution ruffles, why a mathematically flat cotton brim still droops, or how a different head reaches a valid count.
This method connects the entire decision chain:
- Both washed stitch gauge and row gauge produce a material-specific flat-circle rate.
- Reachable-count selection exposes lower and upper choices instead of promising one count for every adult.
- The crown and brim share one cumulative geometry model, so corrections have an understandable cause.
- The washed stable-overhang gate separates flatness from structural support before the full hat is made.
- The article sets an honest boundary between shade geometry and verified UPF performance.
The result is not merely another list of rounds. It is a repeatable way to answer the questions that usually appear only after a maker has restarted the crown, watched a cotton brim collapse, or discovered that reinforcement cannot repair excess area.
References
- American Academy of Dermatology: Sun-Protective Clothing
- Skin Cancer Foundation: Sun-Protective Clothing