
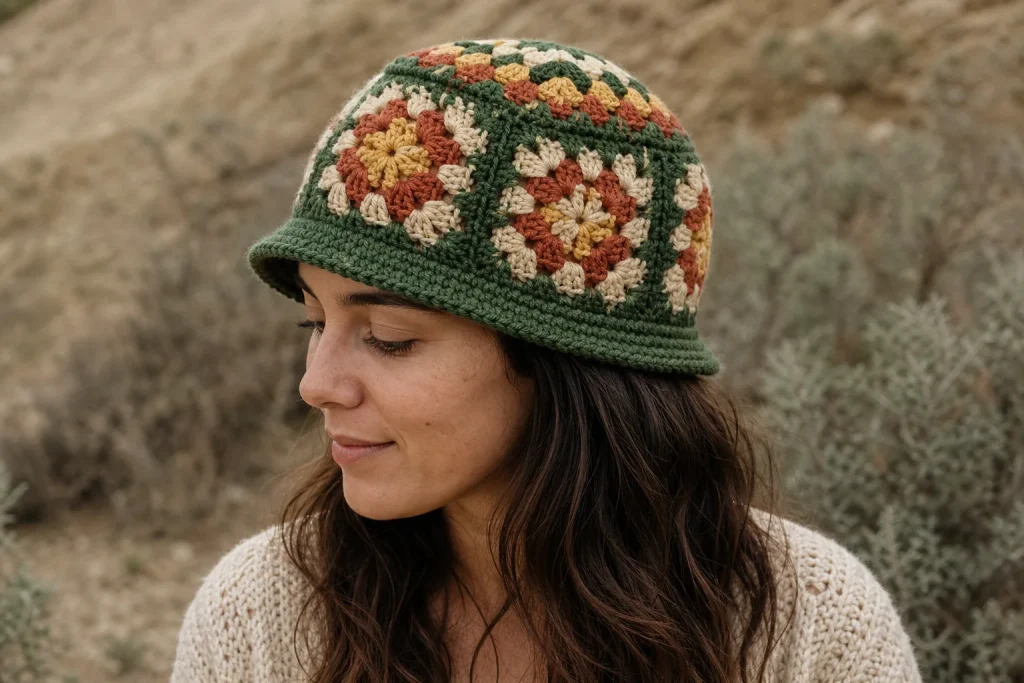
A measurement-adaptive granny square bucket hat that chooses four, five or six side motifs from the wearer’s head, washed square width and real joining contraction—then matches the crown polygon and adds only the depth the wearer needs.
Granny Square Hat Layout Planner
Open the tool in a separate page. The article also retains the manual formulas and worked checks.
JavaScript is optional: use the manual calculation method and worked examples in the article.
Quick answer
A granny square hat is not sized by asking whether an adult square “should be” four or five inches wide. The useful question is how wide the complete ring will be after every square and every seam are included.
This pattern measures one washed square, joins two sample squares with the intended seam, and measures that pair. The difference between the joined-pair width and two separate square widths reveals what the seam adds or removes. The planner then compares four-, five- and six-panel layouts and chooses the one nearest the wearer’s target circumference.
The complete example uses:
- a 22-inch / 55.9-cm head;
- 4% intended negative ease;
- washed squares 4.25 inches / 10.8 cm wide;
- a joined-pair width of 8.45 inches / 21.5 cm;
- 20% comfortable fabric stretch with 2.5% residual growth after recovery;
- a desired finished depth of 8.5 inches / 21.6 cm.
The join contracts each connection by 0.05 inch / 0.13 cm. Five squares and five joins produce a calculated 21-inch / 53.3-cm ring, or about 4.5% estimated negative ease. The matching crown is a five-sided granny-cluster motif. After the crown and side ring are joined, the example shell measures 7.6 inches / 19.3 cm deep, so four band rounds at the measured row gauge bring it to approximately 8.49 inches / 21.6 cm before the brim.
Those are completed example inputs, not universal adult numbers. The supplied web calculator opens with the example, recalculates automatically in inches or centimeters, and gives a specific four-, five- or six-panel construction plan when the reader changes any measurement.
Why granny square hats become unexpectedly huge
A square can look modest on the table and still create an oversized hat. Four common assumptions cause the surprise:
- the maker uses a fixed square width from another person’s yarn and tension;
- the circumference is estimated before washing;
- the width of the joining seam is ignored;
- the crown is forced to fit a side ring with a different number or length of edges.
The first two problems change the size of every motif. The third repeats at every seam. A join that contracts only 0.05 inch becomes 0.25 inch across five seams. A decorative chain join that adds 0.12 inch becomes 0.6 inch across the same ring.
The fourth problem changes shape rather than only size. A square top attached to a five-square ring must absorb an edge mismatch somewhere. The result may pucker, flare, form a hard corner or pull the side ring out of round. This pattern keeps the number of crown edges equal to the number of side squares.
Choose the square layout from your measurements
Choose a layout that fits the wearer’s head, the washed square width, and the joining method.
Measure one joined pair and include every seam in the ring calculation.
Match the crown geometry to the side panels, then check the shell on the wearer before adding the brim.
The panel-and-join sizing system
The system uses four physical measurements and one preference:
- actual head circumference at the intended wear line;
- intended hat ease;
- washed width of one accepted granny square;
- total width of two washed squares joined with the intended seam;
- comfortable stretch and recovery of the same finished fabric.
The calculator first establishes a target circumference:
It then isolates one seam’s effect:
A negative result means the join contracts. A positive result means it adds width. A result close to zero means the join is nearly neutral.
For any candidate panel count n:
There are n seams because the final seam closes the strip into a ring. The planner compares n = 4, 5 and 6, then selects the circumference closest to the target. It also reports every candidate so the maker can prefer fewer larger motifs or more smaller motifs when two choices are close.
Choose four, five or six side squares deliberately
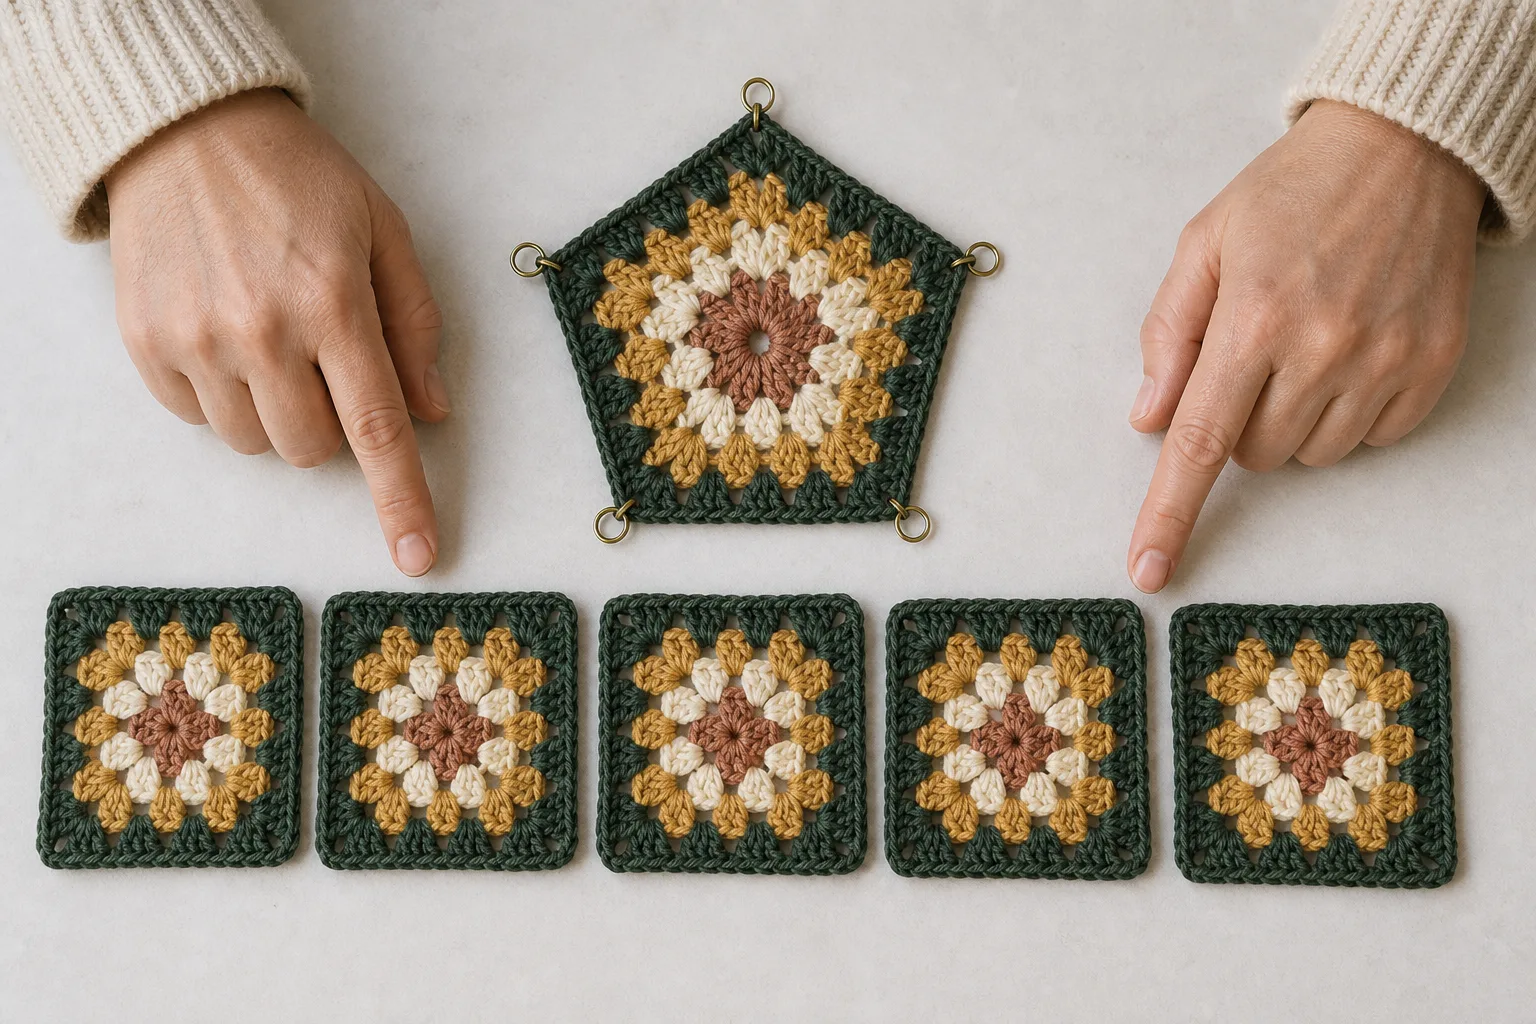
The number of side squares affects more than circumference.
| Side squares | Matching crown | Total motifs | Construction character |
|---|---|---|---|
| 4 | Granny square | 5 | Largest squares, fewest seams, most angular crown |
| 5 | Granny pentagon | 6 | Balanced square size, five crown edges, softly rounded profile |
| 6 | Granny hexagon | 7 | Smallest squares, most seams, roundest modular crown |
With the example target and a seam contraction of 0.05 inch per join, the required washed square widths are approximately:
- 5.33 inches / 13.5 cm for four side squares;
- 4.27 inches / 10.9 cm for five side squares;
- 3.57 inches / 9.1 cm for six side squares.
The example square is 4.25 inches wide, so five panels are the clear match. Choosing four would require a much larger square; choosing six would require a much smaller one.
Do not choose a panel count only because another pattern uses it. Choose it from the actual square, then crochet a crown with the same number of edges.
Measure the wearer at the real wear line
Place a flexible tape where the lower edge of the hat body will sit: across the forehead, above the ears if that is the intended style, and around the fullest part of the back of the head. Keep it level and touching without compressing hair or skin. Repeat the measurement and use the larger careful result.
Measure finished depth separately from crown center over the head to the intended brim-start line. Do not copy depth from head circumference; two wearers with the same circumference can prefer different ear coverage.
For the example:
- head circumference: 22 inches / 55.9 cm;
- intended negative ease: 4%;
- target circumference: 21.12 inches / 53.6 cm;
- desired crown-to-brim-start depth: 8.5 inches / 21.6 cm.
Negative ease is a preference constrained by fabric behavior. A dense cotton square may need little ease; a resilient wool blend may tolerate more. The stretch-and-recovery check below shows whether the selected result remains inside the fabric’s comfortable range.
Make, wash and measure the square that will control the hat
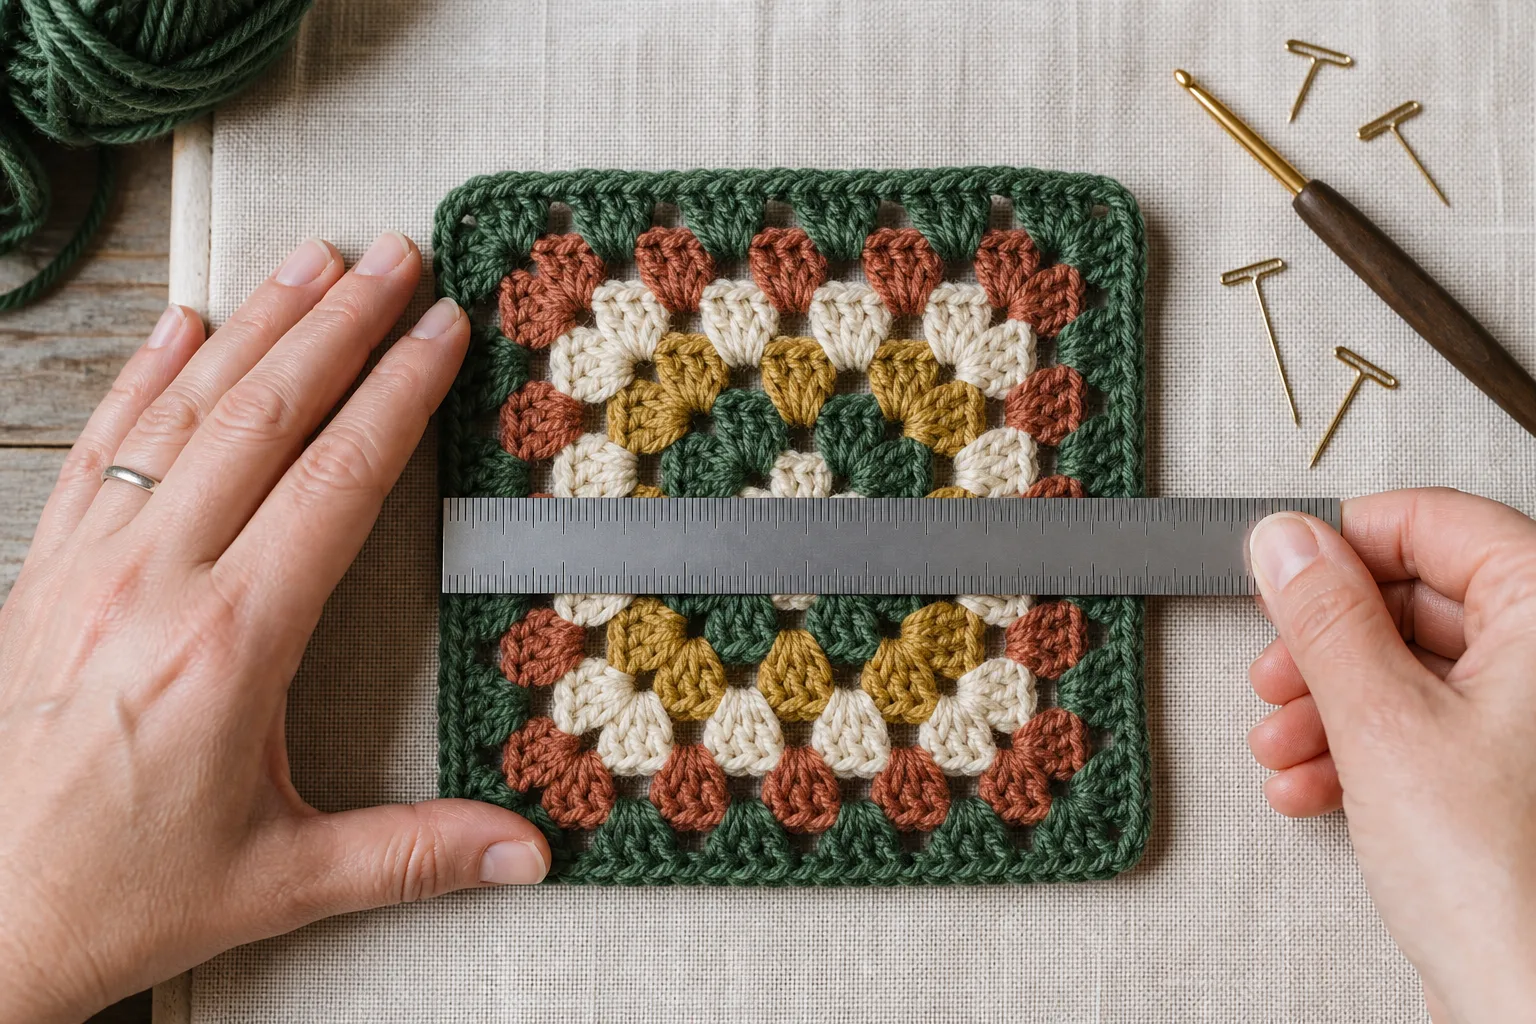
Use the intended yarn, hook, color changes and final border. Make at least two identical square samples because the seam cannot be measured from one motif.
Wash and dry them exactly as the finished hat will be cared for. Lay one square flat without pinning it beyond its natural shape. Measure horizontally from the outermost finished edge to the opposite edge through the center. Measure the second square and confirm that it is within a practical tolerance of the first.
The example uses two six-round granny squares that settle at 4.25 inches / 10.8 cm wide after washing.
If the samples differ visibly, make another motif before proceeding. Joining inconsistent squares does not average the error; it distributes bumps and unequal tension around the hat.
Measure the seam instead of guessing what it does
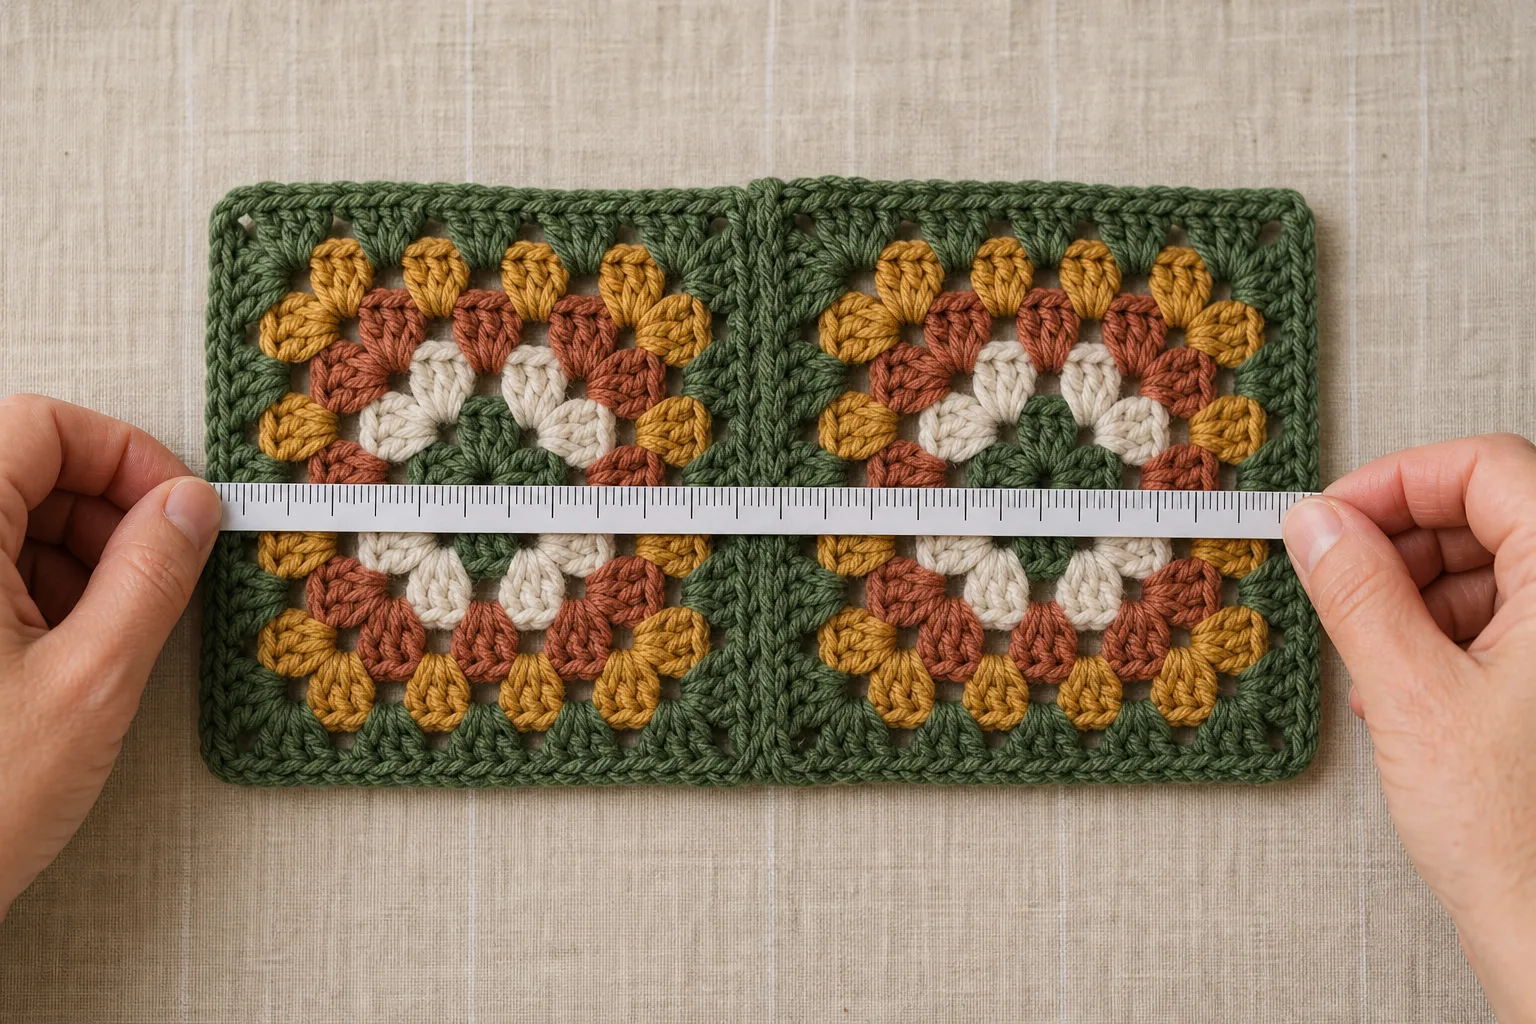
Join the two washed samples using the exact method planned for the hat. Include the same hook, yarn, loop placement and tension. Let the pair rest flat, then measure from the outside edge of the first square to the outside edge of the second through the center.
For the example:
This flat slip-stitch join contracts slightly. The measurement is small, but it repeats at every side seam.
If a join creates a ridge, measure the pair in the orientation it will be worn. Do not flatten a raised seam more firmly than the finished hat will flatten it. If the final closing seam must be worked differently, make a small ring sample or use the more conservative of the two seam effects.
Check stretch and recovery before accepting the layout
Mark a relaxed horizontal span A across the joined fabric. Stretch it only as far as it remains comfortable and visually stable; record B. Release it, allow it to rest, and record the recovered span C.
The example records:
- relaxed span A: 4 inches / 10.2 cm;
- comfortable stretched span B: 4.8 inches / 12.2 cm;
- recovered span C: 4.1 inches / 10.4 cm.
The selected 21-inch ring on a 22-inch head has approximately 4.5% estimated negative ease, leaving about 15.5 percentage points of comfortable stretch reserve.
For this project, five percentage points of remaining reserve is a conservative acceptance gate. Residual growth up to about 3% is a stable starting result; 3%–5% deserves closer monitoring; more than 5% suggests another wash test, a firmer final round or less intended negative ease. These are transparent project heuristics, not universal textile standards.
Calculate the five-panel example
First calculate the target:
The washed square width is 4.25 inches, and the join effect is −0.05 inch.
Four-panel candidate
This is far below the 21.12-inch target.
Five-panel candidate
This is the closest candidate and remains well inside the measured stretch reserve.
Six-panel candidate
This would be looser than the measured head before wear.
The exact required five-panel square width is:
The accepted 4.25-inch square is only about 0.024 inch smaller. Adding a full granny round would overshoot; the existing square is the better choice.
Use the automatic Granny Square Hat Layout Planner
The supplied website calculator is the practical replacement for a blank worksheet. It opens with every example field completed and updates immediately when the reader changes a value.
It returns:
- target circumference;
- per-seam contraction or expansion;
- predicted four-, five- and six-panel circumferences;
- the closest panel count and matching crown polygon;
- required square width for each layout;
- selected layout’s estimated negative ease and stretch reserve;
- whether the current square is close enough or another round is too large;
- total number of motifs to make;
- required band depth and rounded band rounds after the shell is tried on;
- a plain-language construction summary.
The formulas remain visible here so the result can be audited. The webpage performs the repeated arithmetic and comparison automatically; the reader does not fill in a blank table or calculate by hand.
Complete worked example
| Decision | Example result | Why it matters |
|---|---|---|
| Head circumference | 22 in / 55.9 cm | Personal wear-line measurement |
| Intended negative ease | 4% | Starting fit preference |
| Target circumference | 21.12 in / 53.6 cm | Circumference before layout selection |
| Washed square width | 4.25 in / 10.8 cm | Real finished motif, not label gauge |
| Joined-pair width | 8.45 in / 21.5 cm | Includes one actual seam |
| Join effect | −0.05 in / −0.13 cm | Repeats at every seam |
| Selected layout | 5 side squares + pentagon | Six motifs total |
| Predicted ring | 21 in / 53.3 cm | Includes five seams |
| Estimated negative ease | 4.55% | Replaces intended ease after rounding/layout |
| Comfortable stretch | 20% | Measured from finished fabric |
| Stretch reserve | 15.45 points | Remaining after estimated ease |
| Shell depth after joining | 7.6 in / 19.3 cm | Measured on the wearer |
| Desired depth | 8.5 in / 21.6 cm | Crown center to brim start |
| Band gauge | 18 rounds per 4 in / 10 cm | Converts missing depth to rounds |
| Added band | 4 rounds | About 0.89 in / 2.3 cm |
Materials
- Category 3 light/DK cotton or cotton blend is a practical starting fabric for the pictured bucket hat, or another yarn that produces the measured square behavior.
- Hook that produces a square with the desired drape; the example planning values are compatible with many 3.5–4.5-mm starting trials, but the washed result controls.
- Contrasting colors for the motif centers and one joining/brim color.
- Flexible measuring tape, rigid ruler, yarn needle, scissors and at least ten locking stitch markers.
- Blocking mat and rust-resistant pins.
- Optional smaller hook for a firmer final border or larger hook for a join that contracts too strongly.
Yardage changes with panel count, square size, yarn density, brim depth and color arrangement. Make and weigh one complete washed square, multiply by the total motif count, then add yarn for joins, depth band, brim and swatching. This produces a more useful estimate than one universal skein count.
Abbreviations and stitch method
- ch: chain
- sp: space
- st(s): stitch(es)
- sl st: slip stitch
- SC: single crochet
- BLO: back loop only
- dc: double crochet
- rnd: round
- rep: repeat
All terminology is US crochet terminology. The beginning chain 3 counts as the first double crochet in the motif instructions. A granny cluster is three double crochet stitches worked into the same space.
Part 1: crochet two sizing squares
Use the color sequence intended for the hat. Make two identical squares through the proposed final round.
- Round 1: make a magic ring. Chain 3 and work 2 dc into the ring, chain 2. Work (3 dc, ch 2) three more times into the ring. Tighten the ring and join with sl st to the top of beginning ch 3. Four clusters and four corners.
- Round 2: sl st into the next corner. Chain 3, 2 dc, ch 2, 3 dc in the same corner. Chain 1. In each remaining corner work (3 dc, ch 2, 3 dc), placing ch 1 between corners. Join to beginning ch 3.
- Round 3 and later: sl st to the next corner. In that corner work ch 3, 2 dc, ch 2, 3 dc. Along each side, chain 1 and work one 3-dc cluster in every ch-1 side space, with ch 1 between neighboring clusters. In every corner work (3 dc, ch 2, 3 dc). Join to beginning ch 3.
- Continue until the square is near the planner’s required width. Fasten off, weave in ends, wash and dry both samples.
The example reaches six rounds and 4.25 inches / 10.8 cm after washing. Round count alone is not a size; stop from the washed measurement.
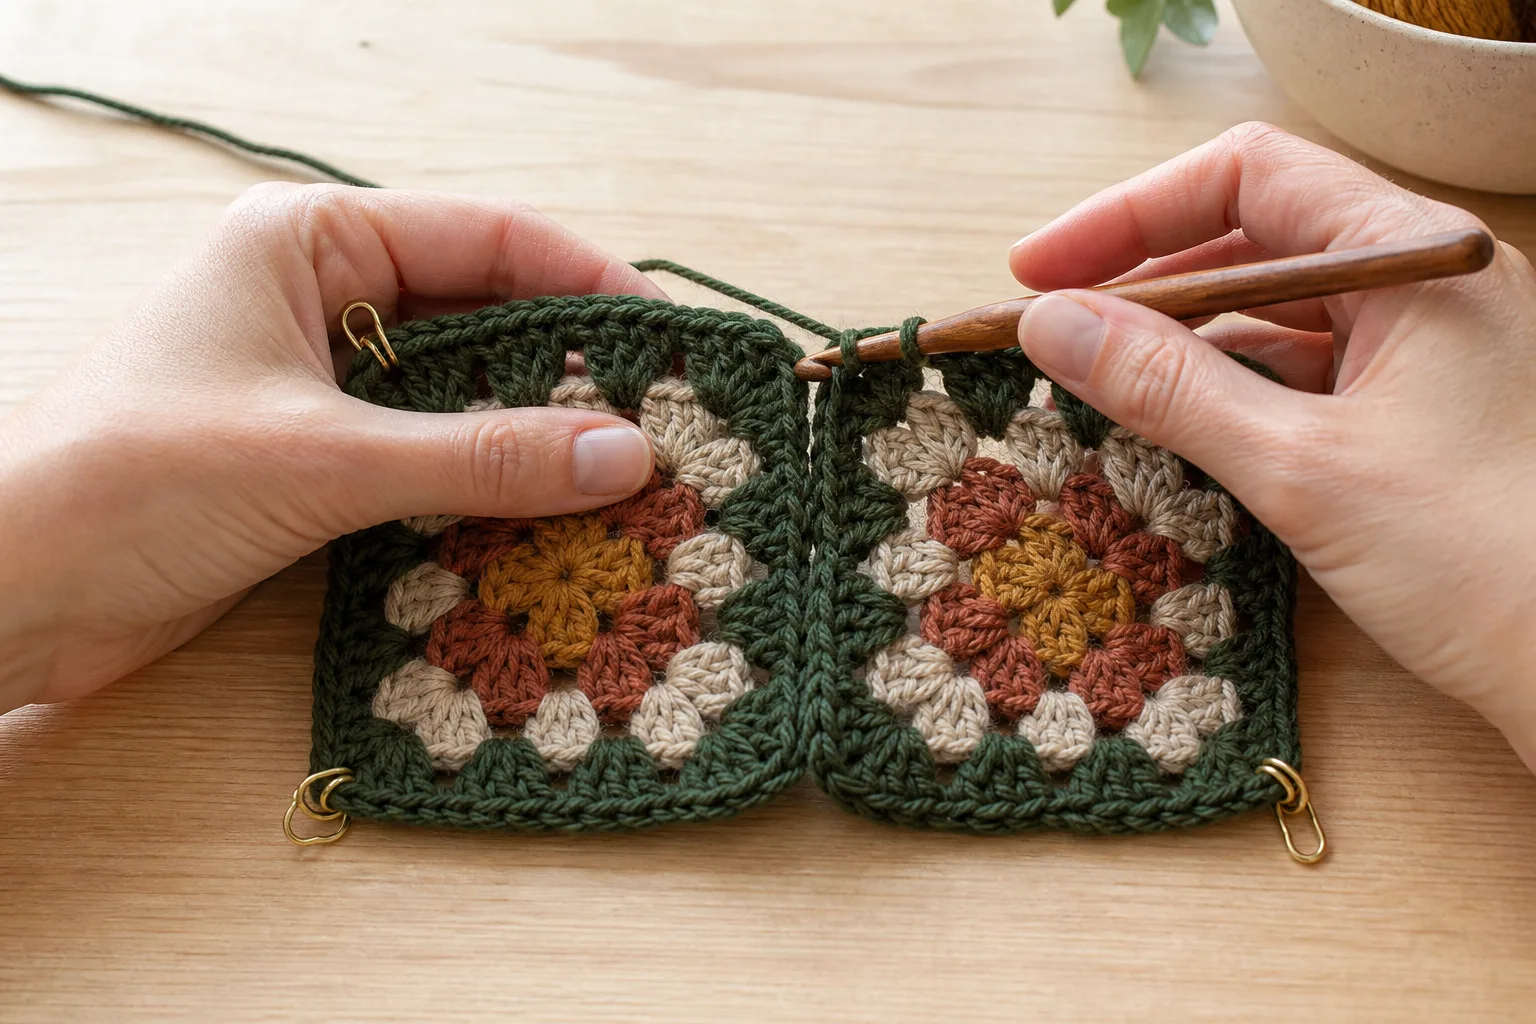
Part 2: test and measure the intended join
Place the two squares with right sides facing outward and edges aligned. Mark both corners and at least the center of the seam so one square is not fed into the other.
For the pictured flat slip-stitch join, hold the wrong sides together and insert the hook through the corresponding back loops of both edge stitches. Yarn over and pull through both edge loops and the loop on the hook. Continue evenly without tightening the working loop against the hook shaft.
At each ch space, match the corresponding spaces. If one square appears to have an extra edge position, stop and compare the final rounds; do not hide a motif-count error by skipping randomly.
Let the joined pair rest, measure its full width and enter that result in the planner. If the predicted layout is not acceptable, change square size or join method before making the remaining motifs.
Part 3: make the accepted side motifs
For the example, make five side squares total, including the two samples. Every square must use the accepted six-round construction and finish close to 4.25 inches / 10.8 cm after washing.
Block to equal natural dimensions, not to a forced template that changes density. Stack the dry squares, align their corners, and inspect the edges. A small yarn variation can be eased through the join; a visibly different width should be corrected or remade.
Keep the two joined samples if their seam is the accepted join. They can become the first two panels of the hat rather than waste swatches.
Part 4: crochet the matching crown polygon
The crown must have the same number of edges as the side ring has squares. The example needs a granny pentagon with five corners.
Example five-sided granny crown
- Crown round 1: make a magic ring. Repeat (3 dc, ch 2) five times into the ring. Tighten the ring and join to the first dc or beginning ch 3. Five clusters and five corners.
- Crown round 2: move to the next corner. In each corner work (3 dc, ch 2, 3 dc), placing ch 1 between corner groups. Join.
- Crown round 3 and later: in every corner work (3 dc, ch 2, 3 dc). Work one 3-dc cluster in every ch-1 side space, with ch 1 between neighboring clusters. Join each round.
- Continue until every crown edge matches the accepted finished edge of one side square. Wash, dry and compare edge to edge without stretching either motif.
Use the same rule for another layout: begin with four corner groups for a square crown or six for a hexagonal crown. The side length—not merely the number of rounds—must match the side-square edge after finishing.
If the crown edge is slightly short but the next full granny round would be much too large, add a controlled final edging rather than forcing the join. Work SC evenly along every edge, keeping the same stitch count on all crown sides and all square top edges. Wash and remeasure before assembly.
Part 5: arrange color and join the side ring
Lay the accepted side squares in one row. Move them until adjacent motifs distribute dominant colors rather than creating an accidental dark or light block. Photograph the arrangement for reference.
Join neighboring square edges with the tested method. After each seam, lay the growing strip flat and confirm that its top and bottom edges remain level.
Before closing the final seam, wrap the strip loosely around the wearer at the intended line. This is an early directional check, not the final fit test: the closing seam has not yet been included. If the strip is already clearly too tight or overlaps excessively, stop and correct the layout.
Join the first square to the last with the same seam. The example now contains five squares and five seams, with a predicted relaxed circumference of 21 inches / 53.3 cm.
Part 6: join the crown edge for edge
Mark every crown corner and every side-ring seam. Place the crown right side outward above the ring. Match one crown corner to each vertical side seam so every crown edge corresponds to exactly one square top edge.
Join one edge at a time with the tested method. Begin and end at marked corners. Do not continue around a corner without stopping to realign the next square.
After two edges, spread the work naturally. If the crown edge must be stretched strongly to reach the square edge, or if it forms a visible fold before the remaining joins, remove those seams and correct the crown measurement. Five equal wrong joins do not become a smooth crown.
Complete all five edges. Weave in only the ends that will not be needed for correction, then let the shell rest before measuring.
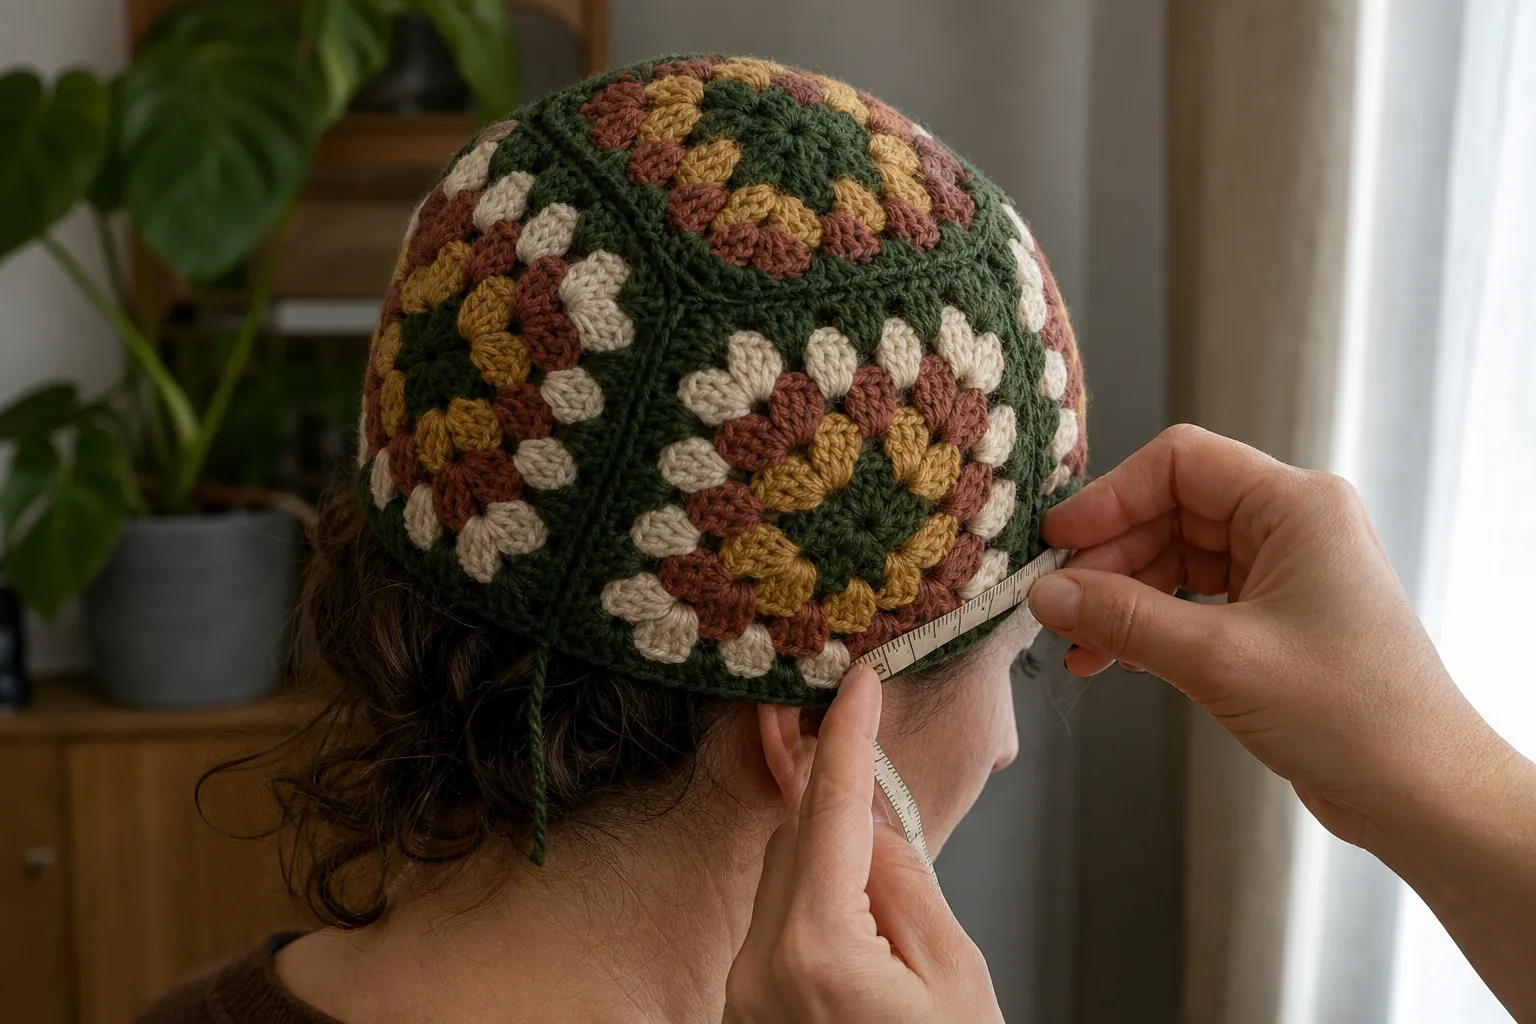
Part 7: perform the wearer checkpoint before adding depth
Place the unfinished shell on the wearer with the crown centered. Check:
- the side ring passes over the head without excessive force;
- it returns to the intended wear line;
- the lower edge remains level;
- the crown corners soften over the head instead of forming deep points;
- no crown edge pulls one side square upward;
- the wearer can slide one or two fingertips under the ring according to the intended fit.
Measure from crown center over the head to the current lower edge. The example shell measures 7.6 inches / 19.3 cm and needs approximately 0.9 inch / 2.3 cm more depth before the brim begins.
This worn checkpoint is more reliable than predicting crown depth from flat polygon geometry. Yarn drape, head shape and seam flexibility change how a flat crown settles.
Part 8: add only the missing band depth
Attach the joining color at the lower edge. Work one setup round of SC, placing the same number of stitches along every square edge. The round should lie flat without gathering or rippling. Record the accepted pickup count per square in the project notes.
Measure the SC round gauge in a washed sample or in a few stable setup rounds. The example has 18 rounds per 4 inches / 10 cm, or 4.5 rounds per inch.
The planner selects four rounds, producing approximately 0.89 inch / 2.3 cm. Work four even SC rounds for the example, including the accepted setup round if it has the same height as the gauge sample. Try the hat on after the third round; stop when the lower edge reaches the selected brim-start line.
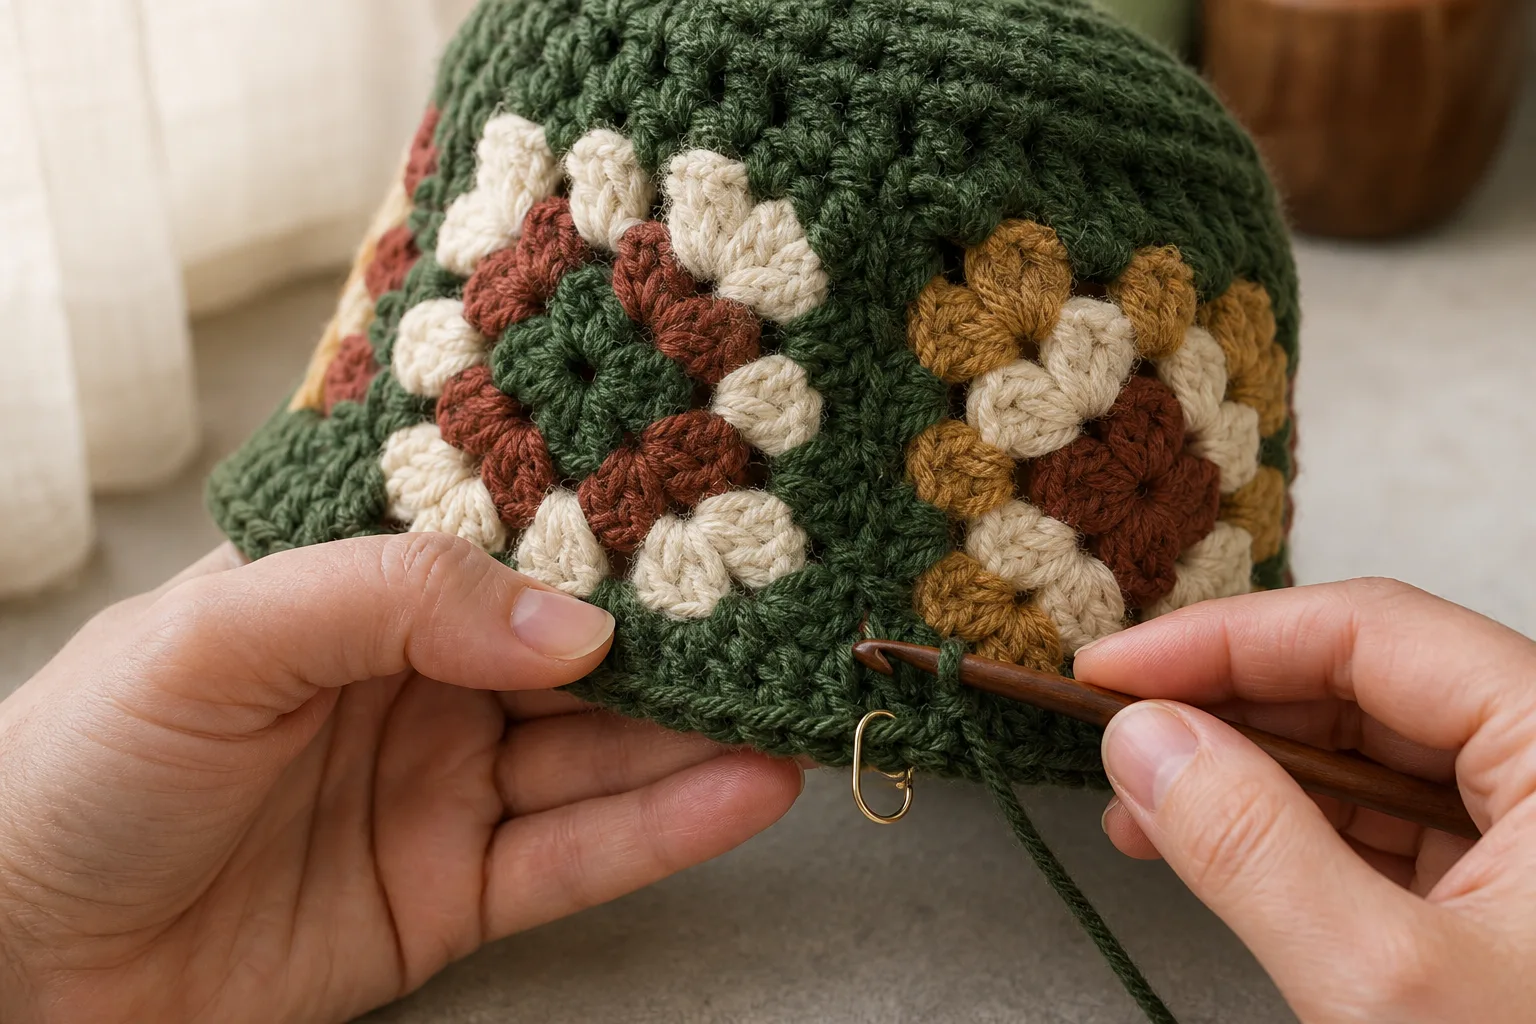
Part 9: crochet a controlled bucket brim
Place one marker at every side-square seam. The example has five equal sectors.
- Brim round 1: work SC in BLO around without increases. This hinge helps the brim turn outward from the side wall. Join and mark the round start.
- Brim round 2: work evenly to each sector marker and make one increase near the marker by working 2 SC in one stitch. Five increases total in the example. Shift each marker to the increase.
- Brim round 3: SC evenly without increases.
- Brim round 4: repeat one increase in every sector, shifting the increase a few stitches away from the previous increase so vertical wedges do not form.
- Continue alternating an increase round and an even round until the brim approaches the preferred width.
Lay the brim on a flat surface after every two rounds. If it ruffles, replace the next increase round with an even round. If it cups sharply downward and the wearer wants more flare, add an increase round sooner. The physical lay-flat test controls because stitch height and yarn stiffness change the required increase frequency.
Finish with one firm SC or reverse-SC round if the edge needs more structure. Do not tighten the last round enough to pull the brim into a bowl.
Part 10: finish, rest and remeasure
Weave in all ends through more than one direction, especially at motif centers, seam corners and the brim-round start. Wash or damp-finish the completed hat as planned for future care.
Shape it over an appropriately sized bowl or head form without stretching beyond the accepted circumference. Allow it to dry completely, then let it rest off the form before measuring.
Confirm the relaxed circumference at the wear line, finished depth, brim width and recovery after a short wear test. Record the final measurements with the project notes so the next hat begins from real data rather than memory.
If the required square width falls between granny rounds
This is one of the most common modular-crochet problems: the current round is too small, but one more full round is too large.
Measure the previous-round square as well as the current square. The example previous round is 3.55 inches / 9.0 cm and the current round is 4.25 inches / 10.8 cm, so one full round adds about 0.70 inch / 1.8 cm.
The five-panel target is 4.274 inches, only 0.024 inch larger than the current square. A full round would overshoot severely. Keep the current round and use the accepted join.
For a larger difference, adjust one controlled variable and rewash:
- use a slightly larger or smaller hook for the final round only;
- replace the final dc border with HDC or SC when less growth is needed;
- change corner-chain length consistently on every motif;
- add the same SC edging to every square and every crown edge;
- change the panel count when the required width is closer to another layout.
Do not stretch-block every square to a distant target. Forced blocking can disappear after washing or wear and can produce weak, open outer rounds.
How to rescue a hat that is already too large
Measure the finished ring at the actual wear line and compare it with the target. Identify whether excess comes from square width, seam expansion or brim pickup.
If the side ring is assembled but the crown is not attached, reopen the final ring seam and test a firmer joining method. Re-measure a joined pair first so the likely correction is known.
If the complete shell is moderately loose and the motifs fit visually, add a removable inner stabilizing band at the wear line. Crochet a separate ribbed or firm SC band to the accepted circumference, join it into a ring, then sew it inside through accessible loops. This preserves the motifs and can be replaced later.
If the ring is dramatically oversized, a tight edging cannot remove several inches without puckering. Separate the motifs and choose a new panel count or remake the outer rounds. A clear correction is better than turning every square edge into a gather.
How to rescue a crown that is too boxy
A four-square ring with a square top naturally creates stronger corners than a five- or six-sided crown. First confirm that the problem is geometry, not a crown that is simply too large.
If edge lengths match and only the corners stand up, wash and shape the crown over a rounded form. If the yarn remains stiff, work one or two interior tacking stitches from each crown corner toward the adjacent seam allowance, leaving enough flexibility for wear.
If the top square is larger than the four side edges it must join, remove it and remake the crown to the correct edge length. Tacking an oversized top hides excess fabric temporarily but does not correct the mismatch.
For the next hat, compare a five-panel pentagon or six-panel hexagon in the planner. More crown sides distribute direction changes more gradually.
Troubleshooting by symptom
| Symptom | Most likely cause | Correction |
|---|---|---|
| Hat is much larger than expected | Square width or seam expansion was ignored | Measure washed square and joined pair; recalculate every seam |
| Ring fits before closing but is tight afterward | Final seam was not included | Use n seams for n panels and retest the closing join |
| One side of the ring climbs upward | Motifs differ in size or were fed unevenly into joins | Compare dry motifs; mark corners and centers before rejoining |
| Crown puckers between corners | Crown edges are longer than square top edges | Remake or edge-match the crown without easing excess |
| Crown pulls side squares inward | Crown edges are too short | Add a controlled crown edging or remake to the accepted edge length |
| Four-panel crown looks boxy | Square geometry and/or stiff fabric | Shape after washing, soften corner tacks, or use five/six panels next time |
| Brim ruffles | Increase rate is too high | Work one or more even rounds and reassess flat |
| Brim cups downward | Increase rate is too low for desired flare | Add an earlier evenly distributed increase round |
| Hat grows after wear | Weak recovery or forced blocking | Reduce ease demand, use firmer border/join, or add replaceable inner band |
| Next granny round is too large | Modular growth jump exceeds needed correction | Change final-round stitch height/hook or select another panel count |
Frequently asked questions
How many granny squares do I need for a bucket hat?
Use four, five or six side squares according to the measured ring calculation, plus one crown motif with the same number of edges. The example needs five squares and one pentagon. The number is a layout result, not an adult-size rule.
What size should granny squares be for an adult hat?
There is no single adult square width. Calculate target circumference from the wearer, measure the seam, and use required square width = target ÷ panel count − join effect. In the example the required widths range from about 3.57 inches for six panels to 5.33 inches for four.
Why measure two joined squares?
Because the seam is part of the finished circumference. Measuring one square cannot reveal whether the join contracts, stays neutral or expands. The pair isolates one real seam so its effect can be repeated around the ring.
Can I use join-as-you-go?
Yes, but make a two-motif sample with the exact join-as-you-go round, wash it, and measure both the single motif and joined pair in a comparable way. Enter the real pair width rather than assuming the join is neutral.
Can I mix different granny square designs?
Yes, after their washed outer dimensions, edge stitch positions and stretch behavior match. Equal round counts do not guarantee equal size when centers use different stitches. Standardize the final one or two rounds and compare stacked dry motifs.
Should the crown be a square, circle, pentagon or hexagon?
Match crown edges to side panels: square for four, pentagon for five, hexagon for six. A circular crown can work, but its circumference must be divided into equal attachment sections that match every square edge; that is a different joining calculation.
Does the brim count affect the hat circumference?
The side ring establishes the wear-line fit. A brim pickup round worked too tightly can still constrict that line, while too many pickup stitches can ruffle. Use the same pickup count on every square edge and test the hat before adding multiple brim rounds.
Can I skip washing the samples?
Skipping the wash removes the only evidence of how the chosen yarn, color changes and seam will behave after care. For a modular hat, a small change repeats across every panel. Wash the samples before committing to all motifs.
Final acceptance gate
The granny square hat is ready when all of these statements are true:
- every side motif has the accepted washed width;
- the joined-pair measurement uses the final seam method;
- the chosen panel ring is close to the wearer’s target circumference;
- estimated negative ease remains inside the measured comfortable stretch reserve;
- the crown has the same number of edges as the ring has side squares;
- every crown edge matches one square top edge without strong stretching or gathering;
- the shell returns to the intended wear line on the wearer;
- added band rounds produce the desired physical depth;
- the brim lies at the intended angle without persistent ruffling or cupping;
- the finished fabric recovers after wear and rest.
If one statement fails, correct that variable. Do not solve an oversized ring by forcing the crown smaller, a short crown by stretching every join, or a ruffled brim by blocking it flatter than the yarn can maintain.
References