

A free cat ear hat pattern worked bottom up in joined half double crochet rounds, with a straight top seam and optional ear-shaping stitches.
This sack-style beanie is a hat for a person. Work a fitted HDC tube, check its opening and height, then sew the top straight across so its corners form the cat ears. No separate ears are crocheted or attached. Start with the calculation example below if your gauge matches; use the linked calculations first if it differs.
Start here: a 22-inch calculation example
This is a worked calculation, not a measured finished hat. Assume a 22 in head, 8% negative ease, 3.5 hdc stitches and 2.5 rounds per inch in your washed, joined-and-turned gauge tube. Replace these inputs with your own measurements before making the hat.
- Gather the materials and calculate an even tube count of 70 stitches; the example height gives about 27 rounds. Check the full calculation.
- Chain 70 and join without twisting. Follow the foundation instructions. Work Round 1 once, then repeat Round 2 until you have completed 27 rounds, keeping 70 hdc in each round.
- Fold the brim and check the open tube on the intended wearer. Adjust the count or height before closing the top. Then center the seam and try matching temporary ear-shaping stitches; follow the complete pattern and fit gates.
The calculated relaxed opening is about 20 in at the example gauge. The actual fit depends on your fabric and wearer; do not treat these counts as a universal size.
Materials and US Terms
- Medium-weight yarn is a practical starting point. For the 22-inch worked example, plan approximately 200-250 yd (183-229 m), but treat that as a purchasing range rather than a promise. Fiber, stitch size, brim depth and head size change the amount.
- Crochet hook that produces a comfortable, recoverable washed fabric. The label’s hook range is only a starting point.
- A second hook 0.5-1 mm larger if the foundation chain feels tighter than the body.
- Flexible tape measure, four locking stitch markers, yarn needle and scissors.
- Smooth contrasting scrap yarn for temporary ear-shaping stitch basting.
US abbreviations: ch chain, hdc half double crochet, sl st slip stitch, st(s) stitch(es), RS right side and WS wrong side.
This pattern joins and turns after every round. The beginning chain does not count as a stitch. Work the first hdc in the same stitch as the join.
Complete Bottom-Up Cat Ear Beanie Pattern
In the instructions, N is your even stitch count, Q is your total round count, and F is the folded-brim depth. The matching calculation example uses N = 70, Q = 27 and F = 2 in. If your head measurement or gauge differs, calculate N and calculate Q before starting.
Make the Foundation Ring
With the larger hook if needed, chain N. Keeping the chain untwisted, slip stitch in the first chain to form a ring. Return to the pattern hook.
If the joined chain cannot stretch over the wearer’s head, stop. Remake it more loosely or with the larger hook. Adding body rounds cannot repair a tight foundation.
Work the Tube
Round 1 (RS): Ch 1, hdc in the same chain as the join and in each chain around, sl st in the first hdc to join. N hdc. Turn.
Round 2 (WS): Ch 1, hdc in the same stitch as the join and in each stitch around, sl st in the first hdc to join. N hdc. Turn.
Repeat the Round 2 instructions until you have Q total rounds, including Round 1, or the tube reaches your planned height. Join and turn after every round; odd-numbered rounds face RS and even-numbered rounds face WS. Keep N hdc in each round, mark the first hdc, and do not count the beginning chain or joining slip stitch. For the matching 70-stitch example, Round 1 plus 26 more rounds gives 27 total rounds. Keep the join at one back landmark.
Pass the Open-Top Fit Gate
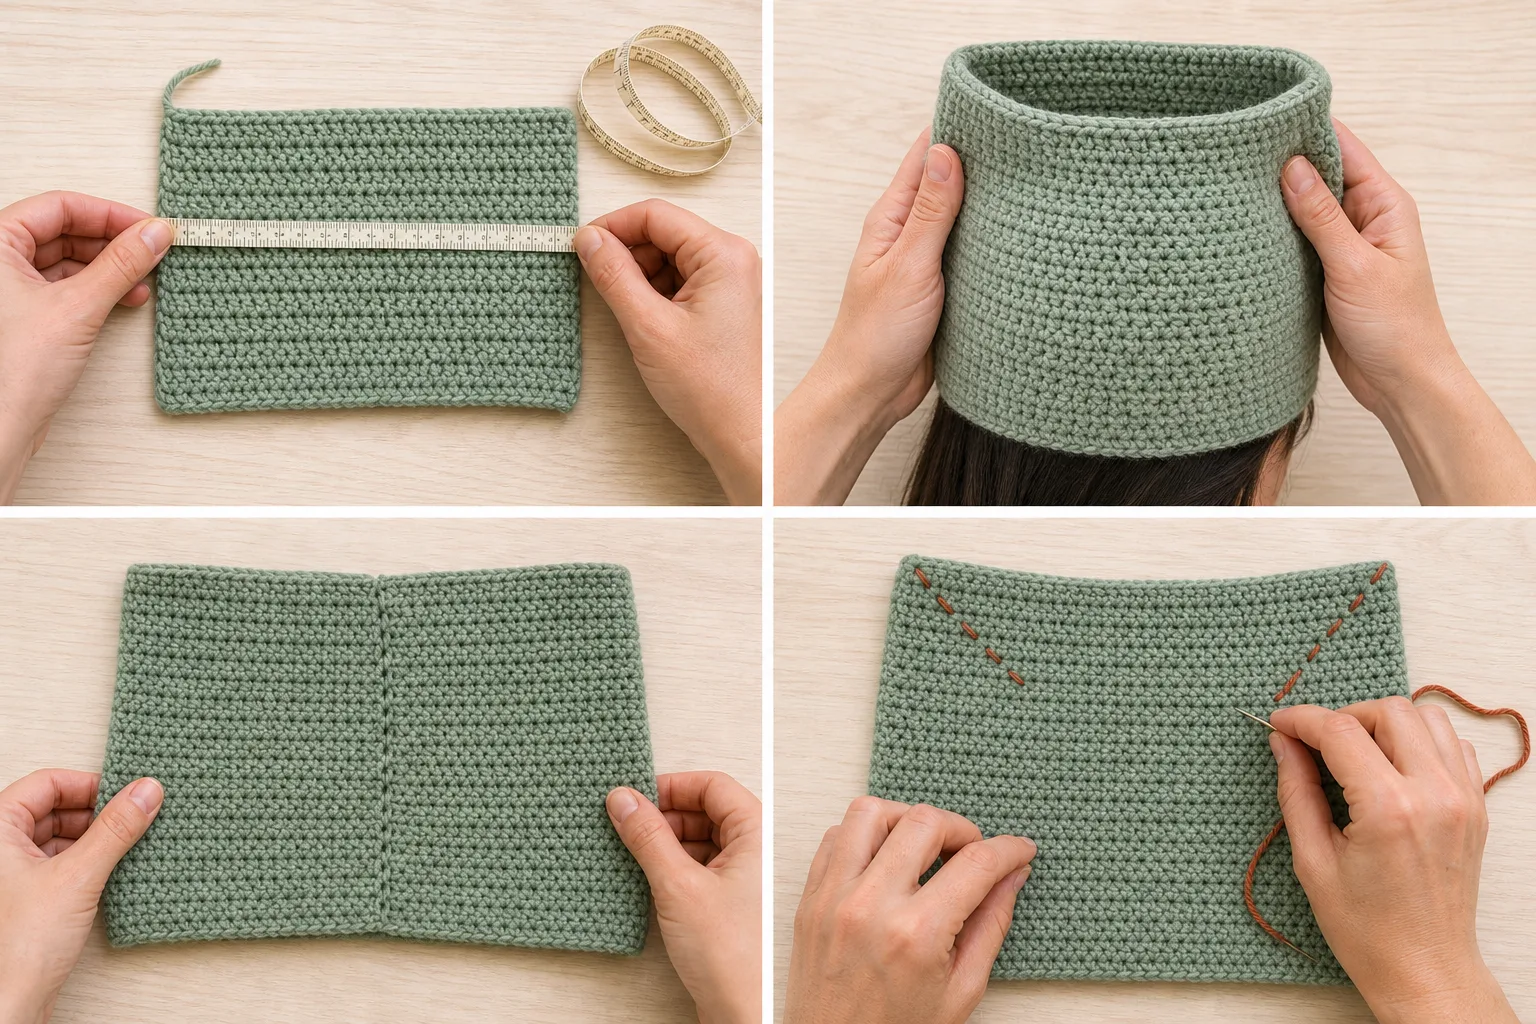
Fold the lower edge up by F. Put the open tube on the wearer and check four things:
- the lower edge reaches the intended forehead and ear line;
- the opening is secure without pressure, rolling or a deep mark;
- the tube reaches the crown and still has the planned reserve above it;
- the join can sit at center back.
If the lower edge is wrong, return to the count. If only the height is wrong, add or remove rounds. Do not close the top until both checks pass.
Center and Close the Top
Fasten off with a tail at least three times the flattened top width. Turn the tube inside out.
Put the round join at the center of the back layer. Flatten the tube so the left and right side creases are equally distant from that join. Place a marker at each side crease and at the center of the front layer. The four quarter points should be evenly spaced around the opening; a one-stitch difference can be shared between opposite quarters.
Match the front and back top edges. Whip stitch through both layers from one side crease to the other. Keep the seam secure but do not pull it shorter than the fabric. Fasten off and turn the hat right side out.
Optional: baste diagonal ear-shaping stitches
Try on the square-topped hat first. If the natural corners are already the size you want, skip the diagonal locks.
For more definition, turn the hat inside out and flatten it again. At each top corner, place one marker down the side crease and a matching marker inward along the top seam. Start with equal measurements, such as 1.25 in by 1.25 in (3.2 by 3.2 cm), as a reversible trial rather than a universal setting.
With contrasting scrap yarn, baste a diagonal line between the two marks through both layers. Repeat on the other corner using the same measurements and stitch spacing.
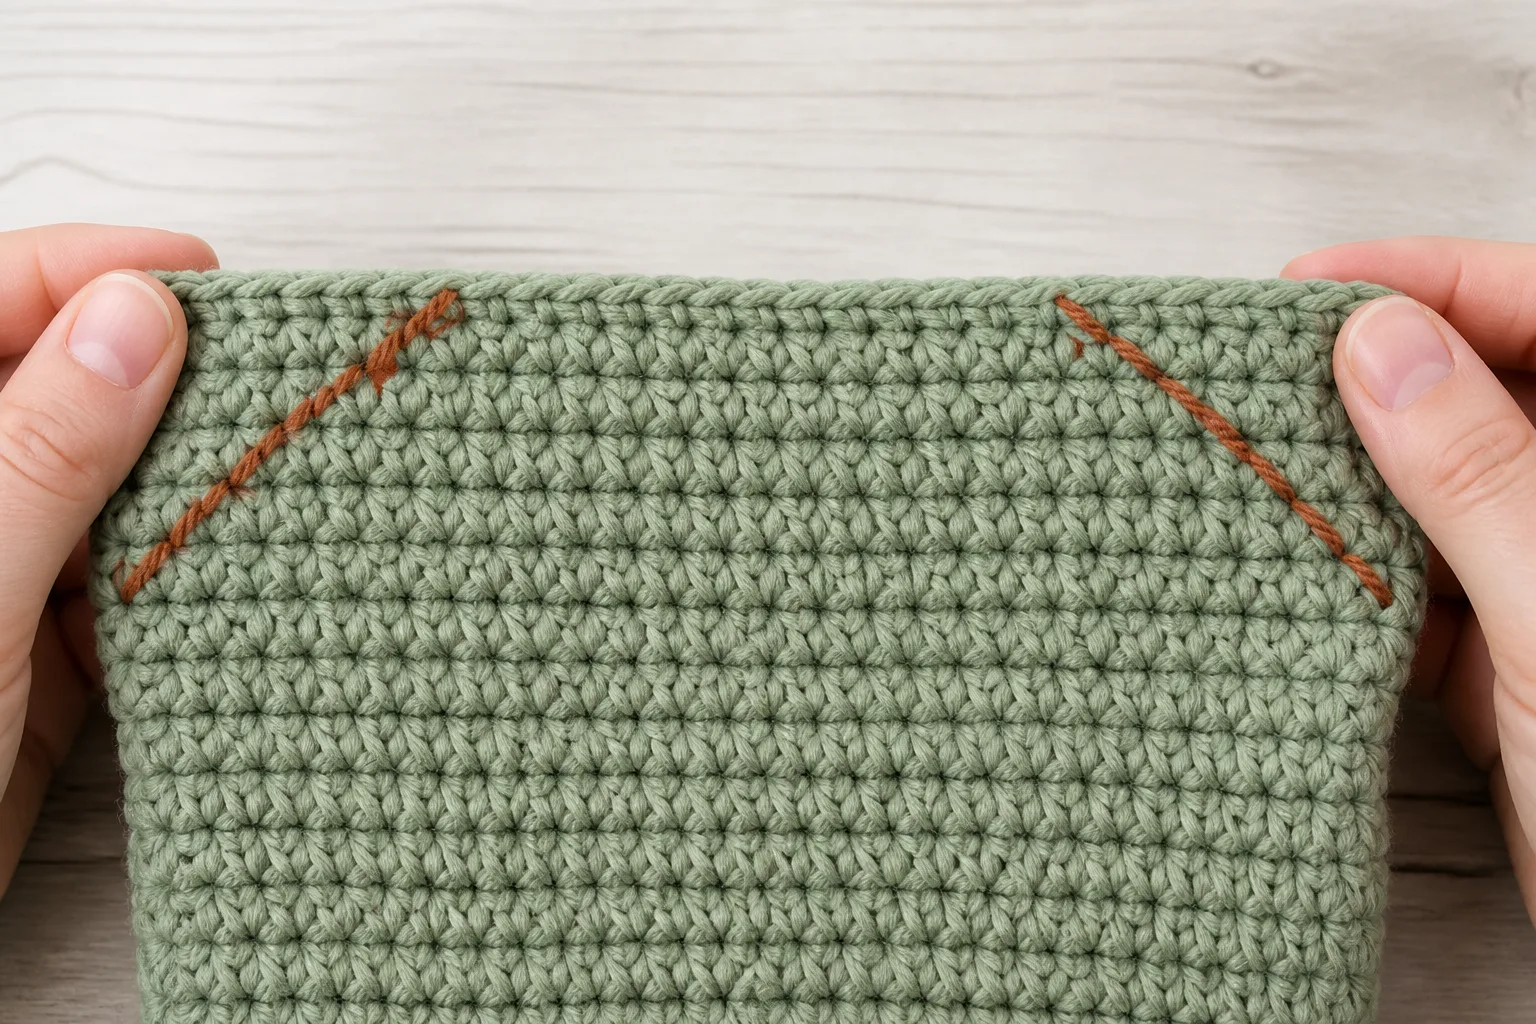
Turn the hat right side out and put it on. Check the ears from the front and both sides. The points should rise above the crown, begin at similar heights and leave the center top comfortable.
Change one variable at a time:
- Move both diagonal lines closer to the corners for smaller ears.
- Move both lines farther down and inward for larger, more isolated ears.
- Add height to the tube if the center top pulls tightly over the crown.
- Remove height before changing the ear lines if the entire top collapses into excess fabric.
When the wearer accepts the shape, replace each temporary line with matching-yarn backstitches or small whip stitches. Remove the basting yarn, secure the tails inside the isolated corners and weave in all ends.
Why a Square Top Makes Cat Ears
A rounded beanie reduces stitches until the fabric follows the crown. This pattern keeps the tube at one stitch count and closes it straight across. Your head pushes into the center of that closed top, leaving a corner on each side. Those corners become the ears.
Three variables change the result:
- Circumference controls the lower-edge fit. It does not set ear size.
- Total tube height supplies the folded brim, head depth and a small ear-reveal reserve.
- ear-shaping stitch placement decides how much of each corner remains visible.
This is a sack-style hat for a person. It is not a pet hat, an earflap hat or a rounded beanie with separate animal ears.
Adjust the opening and ear shape separately
Use these four decisions in order:
- Calculate the tube count from the wearer’s head and the washed round gauge.
- Calculate the total height from visible depth, folded-brim depth and a small top reserve.
- Close the top only after the open tube passes its fit check.
- Baste matching diagonal ear-shaping stitches, try on the hat, then make the stitches permanent.
The important separation is simple: if the opening feels wrong, change the tube count. If the opening fits but the ears look wrong, change the height or the temporary ear-shaping stitches.
Make and Wash the Gauge Tube
Flat gauge and in-the-round gauge can differ. Make a small joined, turned HDC tube with the same yarn, hook and joining method you will use for the hat. The sample should be large enough to measure across several stitches and rounds without including the join.
Wash and dry it as you will care for the hat. Lay it flat without stretching.
- Measure stitches across at least 4 in (10 cm) in the center of the fabric. Divide to find washed stitches per inch or per centimeter.
- Measure several complete rounds vertically. Divide to find washed rounds per inch or per centimeter.
- Stretch the sample around a curved surface, hold for ten seconds and release it. Choose only the negative ease that still feels comfortable and returns close to its relaxed width.
Calculate Your Tube Count
Use one unit throughout a calculation.
| Symbol | Meaning | Source |
|---|---|---|
| H | Actual head circumference at the intended wear line | Measure the wearer |
| e | Chosen negative ease as a decimal | Washed stretch-and-recovery check |
| T | Target finished circumference | H x (1 – e) |
| g_s | Washed stitches per unit | Gauge tube |
| N_raw | Unrounded tube count | T x g_s |
| N | Usable tube count | Nearest even whole stitch count |
An even N lets the tube flatten into two equal layers for the top seam. After rounding, verify the result:
estimated relaxed circumference = N / g_s
Compare that number with H. If rounding produces more or less ease than the washed fabric can comfortably support, choose the other nearby even count and check again.
Worked Example: 22-Inch Head
A 22 in (55.9 cm) head uses 8% ease and a washed gauge of 3.5 sts/in:
- T = 22 x 0.92 = 20.24 in (51.4 cm)
- N_raw = 20.24 x 3.5 = 70.84 sts
- nearest even N = 70 sts
- estimated relaxed circumference = 70 / 3.5 = 20 in (50.8 cm)
The calculated opening is about 9.1% smaller than the example head. That is acceptable only if the washed fabric reaches the wear line comfortably and recovers after release.
Calculate the Total Height
Measure D, the vertical distance from the crown to the visible lower edge where you want the folded brim to finish. Then choose:
- F: the depth of the fold. A 2 in (5.1 cm) visible fold consumes 2 in of the tube.
- R: a small ear-reveal reserve above the crown. Start near 0.5-1 in (1.3-2.5 cm), then accept or change it on the wearer. This is not a guaranteed size range.
- g_r: washed rounds per unit.
Calculate:
Q_raw = (D + F + R) x g_r
Round to the nearest whole round, then measure the real tube. Stitch height can drift during a long project, so the tape measurement and open-top try-on are the final checks.
For the 22-inch worked example, D = 8 in, F = 2 in, R = 0.75 in and g_r = 2.5 rounds/in:
Q_raw = (8 + 2 + 0.75) x 2.5 = 26.875
Work 27 rounds, then perform the open-top fit gate.
Worked Example: 20-Inch Head
This second calculation shows how the starting counts change with the assumed head measurement and gauge.
For a 20 in (50.8 cm) measured head, 6% ease and 4 sts/in:
- T = 20 x 0.94 = 18.8 in (47.8 cm)
- N_raw = 18.8 x 4 = 75.2 sts
- nearest even N = 76 sts
- estimated relaxed circumference = 76 / 4 = 19 in (48.3 cm), or 5% ease
With D = 7 in, F = 1.5 in, R = 0.5 in and g_r = 3 rounds/in:
Q = (7 + 1.5 + 0.5) x 3 = 27 rounds
This worked example is not an age label. Measure the intended wearer and repeat the acceptance gates.
Troubleshooting: Fix the Right Variable
| Symptom | Likely cause | Minimum correction | Return point |
|---|---|---|---|
| Opening is tight but ears look good | N is too small or the foundation is tighter than the swatch | Remake the foundation or recalculate N | Foundation / count |
| Opening is loose | N is too large or the washed fabric did not recover | Recalculate with verified recovery; change the count | Foundation / count |
| Top pulls across the crown | Tube lacks height or reserve | Remove the top seam and add rounds | Height gate |
| Whole top slumps backward | Excess height is acting like slouch | Remove rounds before changing the ears | Height gate |
| Corners look wide or bulky | ear-shaping stitches isolate too much fabric, or the reserve is too large | Move both basting lines closer to the corners; if needed, reduce height | ear-shaping stitch, then height |
| Ear points disappear | Fabric is very drapey, reserve is too small or locks are too shallow | Increase reserve or move both trial lines slightly down/inward | Height or ear-shaping stitch |
| One ear sits forward | Tube was not centered before the top seam or marks differ | Recenter the back join and remeasure both temporary lines | Center-and-crease gate |
| Ear lines pucker the outside | Permanent stitches are too tight | Remove them and resew without shortening the diagonal | ear-shaping stitch |
| Join becomes a diagonal ridge | Rounds were not turned consistently or the first stitch moved | Mark the first hdc and turn after every join | Tube rounds |
Final Acceptance Checklist
- The folded lower edge sits at the intended wear line without rolling or pressure.
- The back join is centered and the top seam runs straight between equal side creases.
- Both points remain visible from the front and begin at similar heights.
- The center top touches the crown without pulling or a large collapsed pocket.
- The permanent ear-shaping stitches match the accepted basting lines and do not pucker.
- All tails are woven inside; no temporary yarn remains.
- The finished hat is washed and reshaped using the same care method as the gauge tube.
Frequently Asked Questions
Do I need to crochet separate cat ears?
No. The straight top seam creates two corner points. Optional diagonal ear-shaping stitches make those corners smaller or more defined without adding separate pieces.
Can I make this as a flat rectangle?
A flat rectangle is another way to make a cat ear beanie, but it needs a side seam and row-gauge calculations. This pattern uses a joined tube and round gauge. Follow the tube instructions here; do not copy rectangle row counts into this version.
Why are my ears too large?
First check whether the whole tube is too tall. If the center also sags, remove height. If the center fits and only the corners are large, move both temporary diagonal lines closer to their corners before sewing permanently.
Will a smaller hook make the ears stand up?
It can make the fabric firmer, but it also changes circumference and height gauge. Do not change hooks only at the ears. Make and wash a new gauge sample, then recalculate the tube if the fabric must change.
Can I omit the folded brim?
Yes. Set F = 0, recalculate total height and verify the lower edge on the wearer. A plain edge may need a final round of single crochet if the foundation or last visible edge needs more stability.
Save Your Finished-Hat Record
Keep the measured head circumference, selected ease, washed stitch and round gauge, final count N, final rounds Q, folded-brim depth, reserve, ear-shaping stitch measurements, hook and care method. That record explains why this hat fits and makes the next version faster to reproduce.