

A measurement-adaptive bottom-up HDC hat that chooses a lower-edge slot, back window or crown ring from the wearer’s real ponytail position—and sizes the opening from gathered-hair dimensions and washed stretch instead of one universal hole.
Ponytail Opening Planner
Open the tool in a separate page. The article also retains the manual formulas and worked checks.
JavaScript is optional: use the manual calculation method and worked examples in the article.
Quick answer
A crochet ponytail hat does not need “a hole somewhere in the back.” It needs the right opening structure at the height where the wearer actually gathers her hair.
This pattern separates three situations:
- a low ponytail needs an opening connected to the lower edge so a thin strip of fabric is not trapped beneath it;
- a mid-height ponytail needs an enclosed back window in the straight body of the hat;
- a high ponytail or messy bun that overlaps crown shaping needs a crown ring rather than a window forced through decrease rounds.
For the calculation example, assume a 22-inch / 55.9-cm head, 6% intended negative ease, an 8.5-inch / 21.6-cm target depth and a washed HDC gauge of 14 stitches and 11 rounds per 4 inches / 10 cm. These are planning inputs to replace with your own measurements. The selected body count is 72 stitches. Crown shaping begins approximately 5.59 inches / 14.2 cm above the lower edge.
In this calculation example, assume the gathered hair is centered 3.75 inches / 9.5 cm above the lower edge and is 2.4 inches / 6.1 cm wide by 1.35 inches / 3.4 cm high at the pass-through point. After applying 8% horizontal opening ease and 0.1 inch / 0.25 cm of vertical clearance, the method selects an eight-stitch by four-row back window. Its calculated relaxed size is about 2.29 by 1.45 inches / 5.8 by 3.7 cm, extending from roughly 3.02 to 4.48 inches / 7.7 to 11.4 cm above the edge.
The real problem is opening position, not only opening size
Many messy-bun patterns begin around a hair elastic or stop crown decreases early. That can produce a useful high opening, but it assumes the wearer gathers her hair at that crown position. A low ponytail cannot move through a high crown ring without changing the hairstyle. A mid ponytail pulled through a crown opening lifts the hat, tilts the lower edge and leaves extra fabric below the bun.
An opening can also be the correct size and still fail because its center is too high, too low or too far to one side. Enlarging the hole does not correct misplaced geometry; it only adds gaping.
The planning order in this article is therefore:
That order keeps four different decisions from being hidden inside one fixed stitch count.
What current patterns answer—and what remains unanswered
Current results for crochet ponytail hats include useful bottom-up ribbed hats, top-down patterns that begin around an elastic, and patterns that stop crown shaping early for a messy-bun opening. They demonstrate several workable constructions. However, the maker is commonly given a preset size and one opening location.
Crochet-help discussions reveal the missing decisions: how to add a hole to an existing hat, whether an unclosed crown can become the opening, what to do when an elastic breaks, and why a high opening does not suit a low ponytail. Use the exit-position system to choose the opening structure and location before finishing the hat.
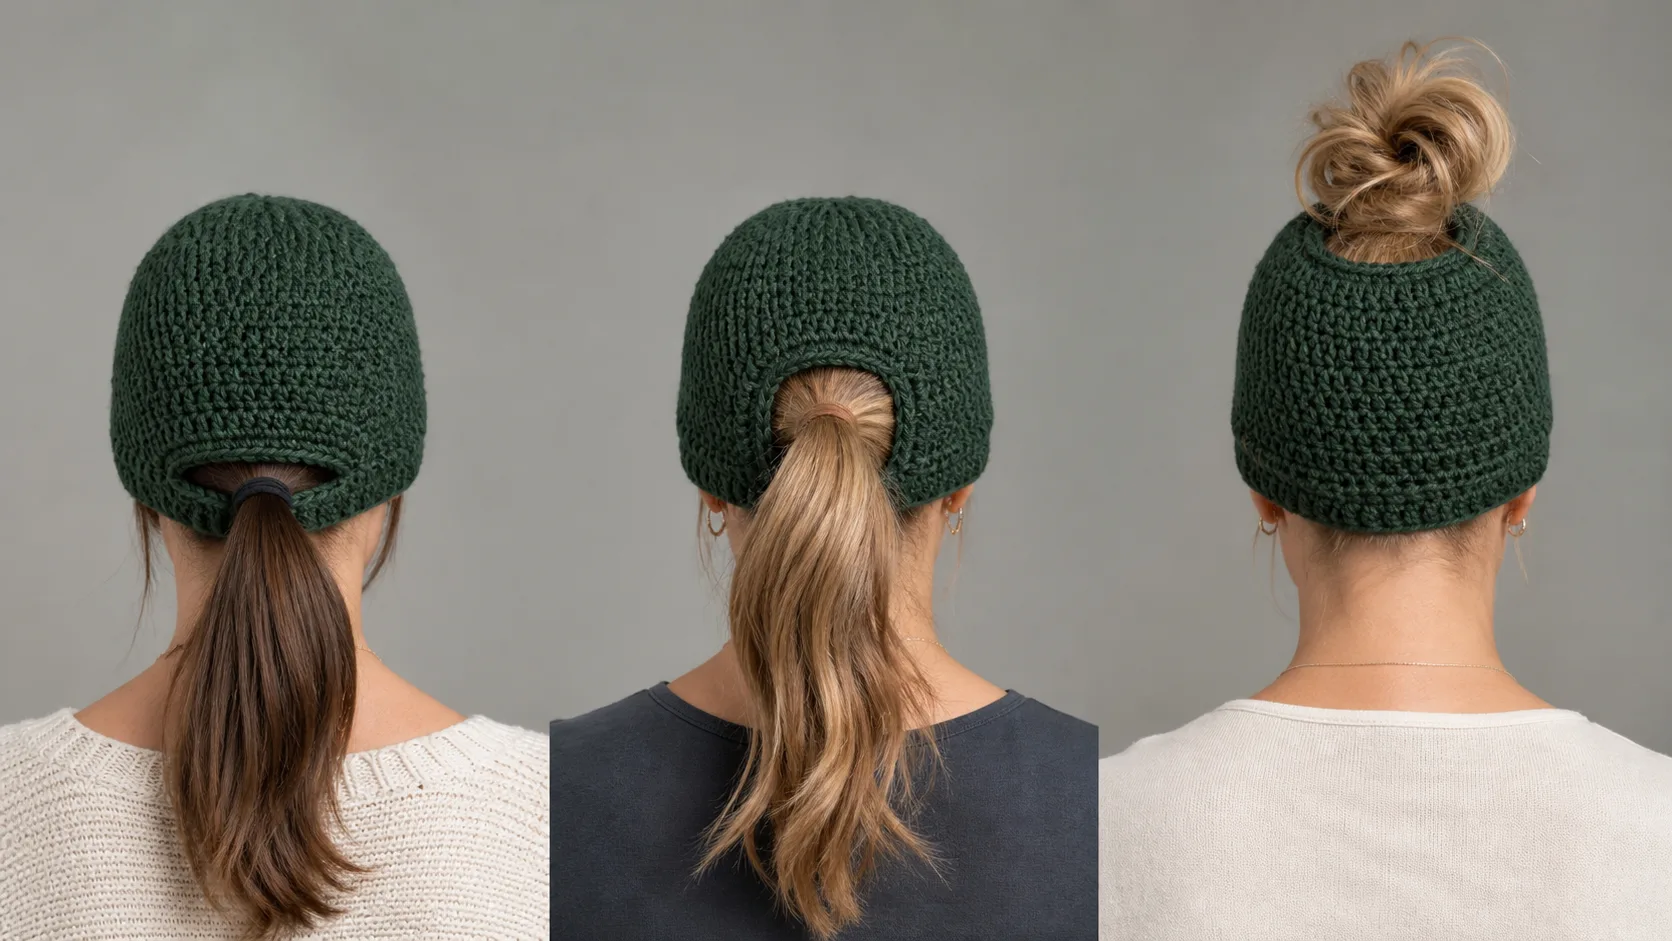
The original three-zone hair-exit system
Measure the planned exit center vertically from the lower edge of the worn hat. Then compare the full calculated opening with two structural boundaries.
Zone 1: lower-edge slot
If the calculated bottom of the opening falls within approximately 0.75 inch / 1.9 cm of the lower edge, use a slot connected to that edge. An enclosed window would leave a narrow fabric bridge below the hair. That bridge tends to pull upward or bunch beneath the ponytail.
The lower-edge slot is worked flat from the beginning. After reaching the calculated top of the opening, bridge the gap and join for rounds. Reinforce both vertical sides and the lower corners.
Zone 2: back window
If the complete opening fits above the lower-edge guard and below the crown-shaping zone, make an enclosed window. Work the body to the calculated opening bottom, leave the centered opening stitches unworked, crochet the remaining body stitches in turned rows for the calculated opening height, bridge the gap, and resume joined rounds.
This is the example construction because its 3.02-to-4.48-inch opening lies safely between the edge and the 5.59-inch crown start.
Zone 3: crown ring
If the calculated opening top touches the crown zone, do not interrupt the decrease sectors with a rectangular body window. Work the body normally, begin the crown decreases at the calculated height, and stop when the nearest compatible ring count remains. Edge that ring instead of closing it.
The boundary values are transparent maker heuristics. The wearer checkpoint decides whether the planned location works with the actual hairstyle and hat angle.
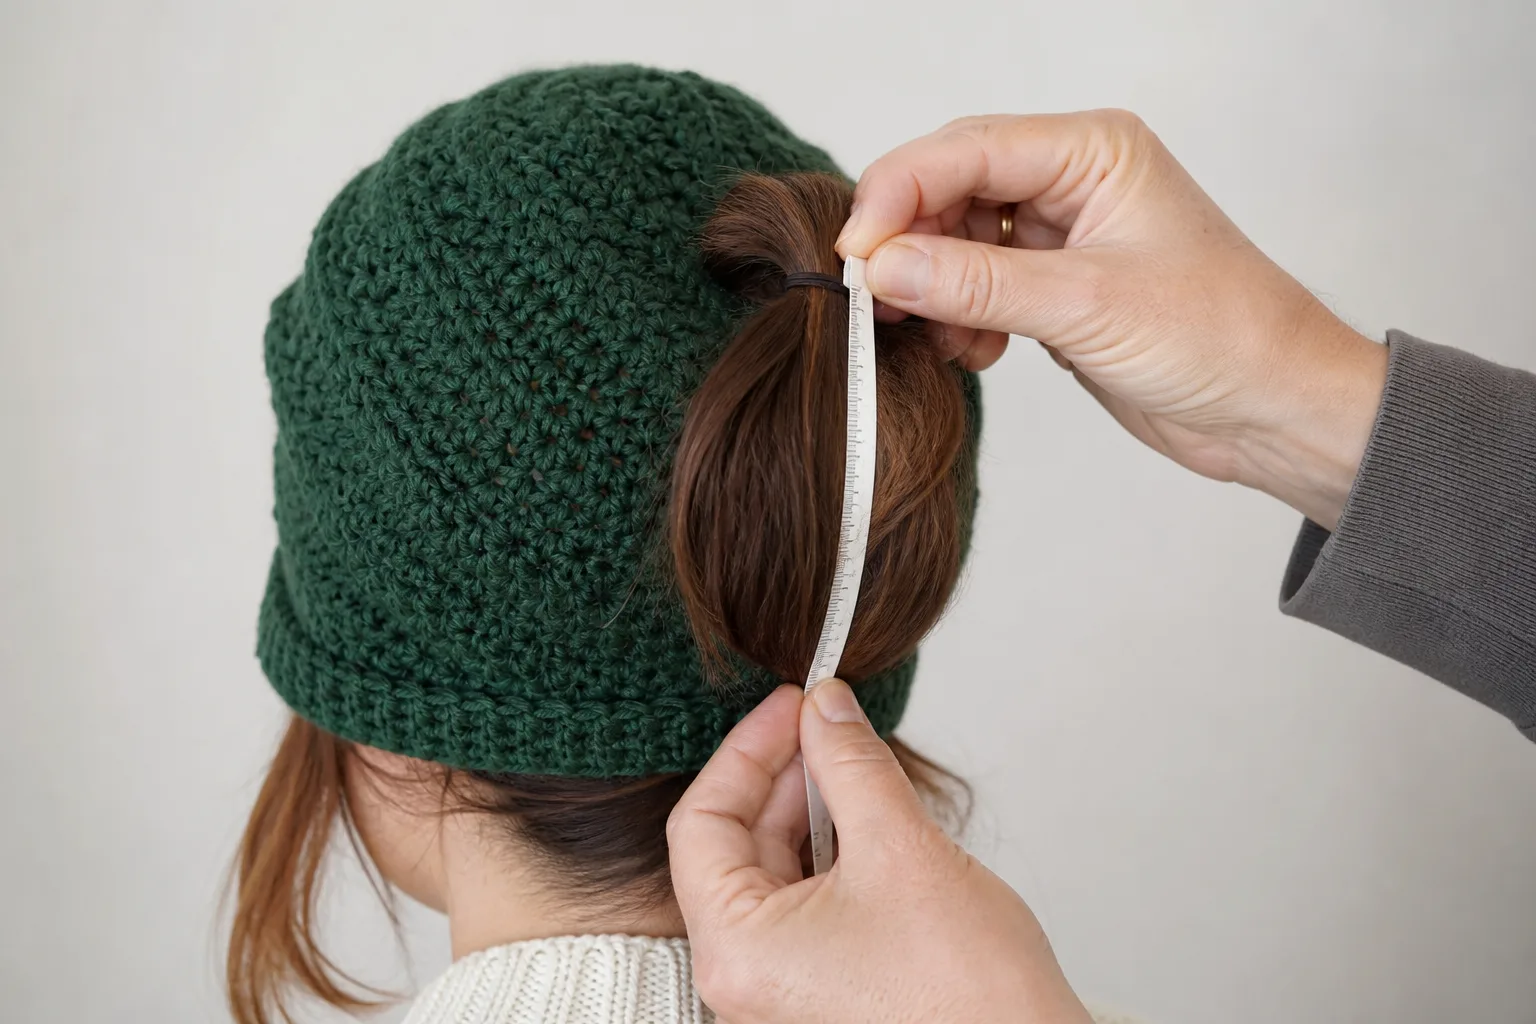
Measure the wearer in the intended hairstyle
Measure head circumference at the planned lower-edge line, keeping the tape level around the forehead and fullest part of the back of the head. The tape should touch without compressing hair or skin. Repeat the measurement and use the larger careful result.
Choose the finished hat depth by measuring from crown center along the head to the intended lower edge. The example uses 8.5 inches / 21.6 cm.
Now style the hair as it will be worn with the hat. Put a close-fitting hat or stretch cap on the wearer and mark the intended lower edge. Measure vertically over the hat surface from that edge to the center of the gathered hair. This is the hair-exit center height, not the height of the hair tie from the floor.
For the example, the exit center is 3.75 inches / 9.5 cm above the lower edge.
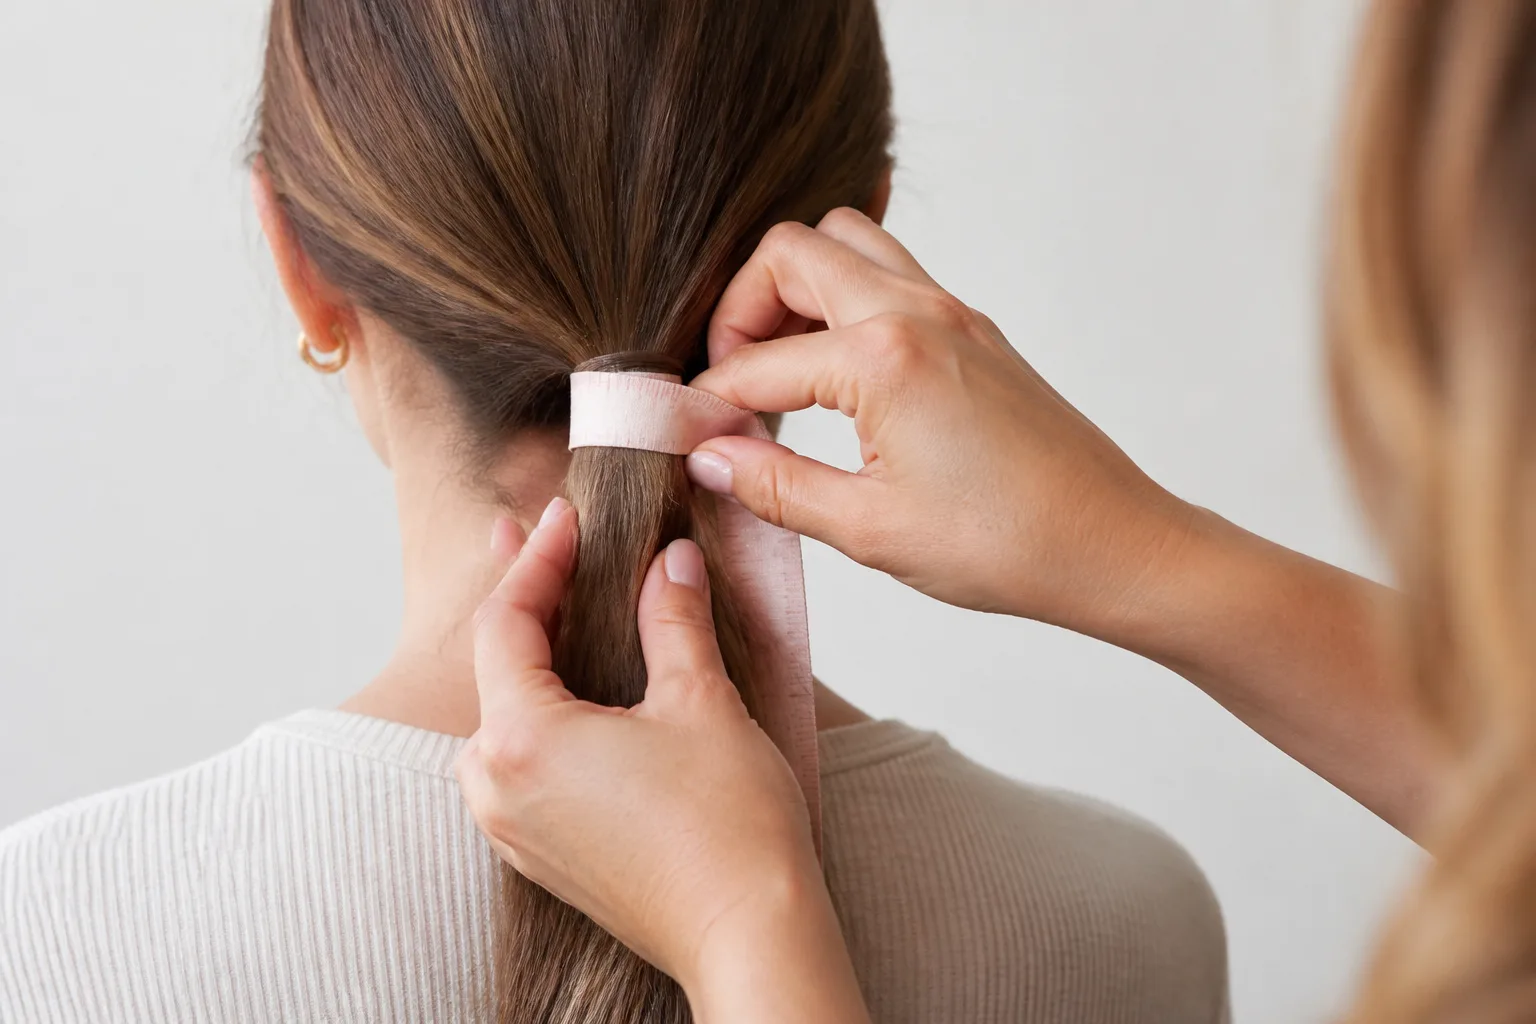
Measure the gathered-hair profile
At the point that must pass through the opening, gently compress the gathered hair to the shape it will take in the hat. Measure its horizontal width and vertical height. Do not pull the tape so tightly that the bundle becomes smaller than it will be during wear.
For a ponytail, measure immediately beyond the hair tie. For a bun, measure the narrowest base that will pass through the ring—not the widest outer diameter of the finished bun. Thick braids or locs may form a flatter oval; direct width and height measurements preserve that shape better than assuming a perfect circle.
The example profile is:
- gathered-hair width: 2.4 inches / 6.1 cm;
- gathered-hair height: 1.35 inches / 3.4 cm;
- desired horizontal opening negative ease: 8%;
- added vertical clearance: 0.1 inch / 0.25 cm.
Horizontal negative ease keeps the opening close to the hair. Vertical clearance prevents the upper and lower edges from pinching. These controls are separate because a ponytail window does not behave like a circular hat band.
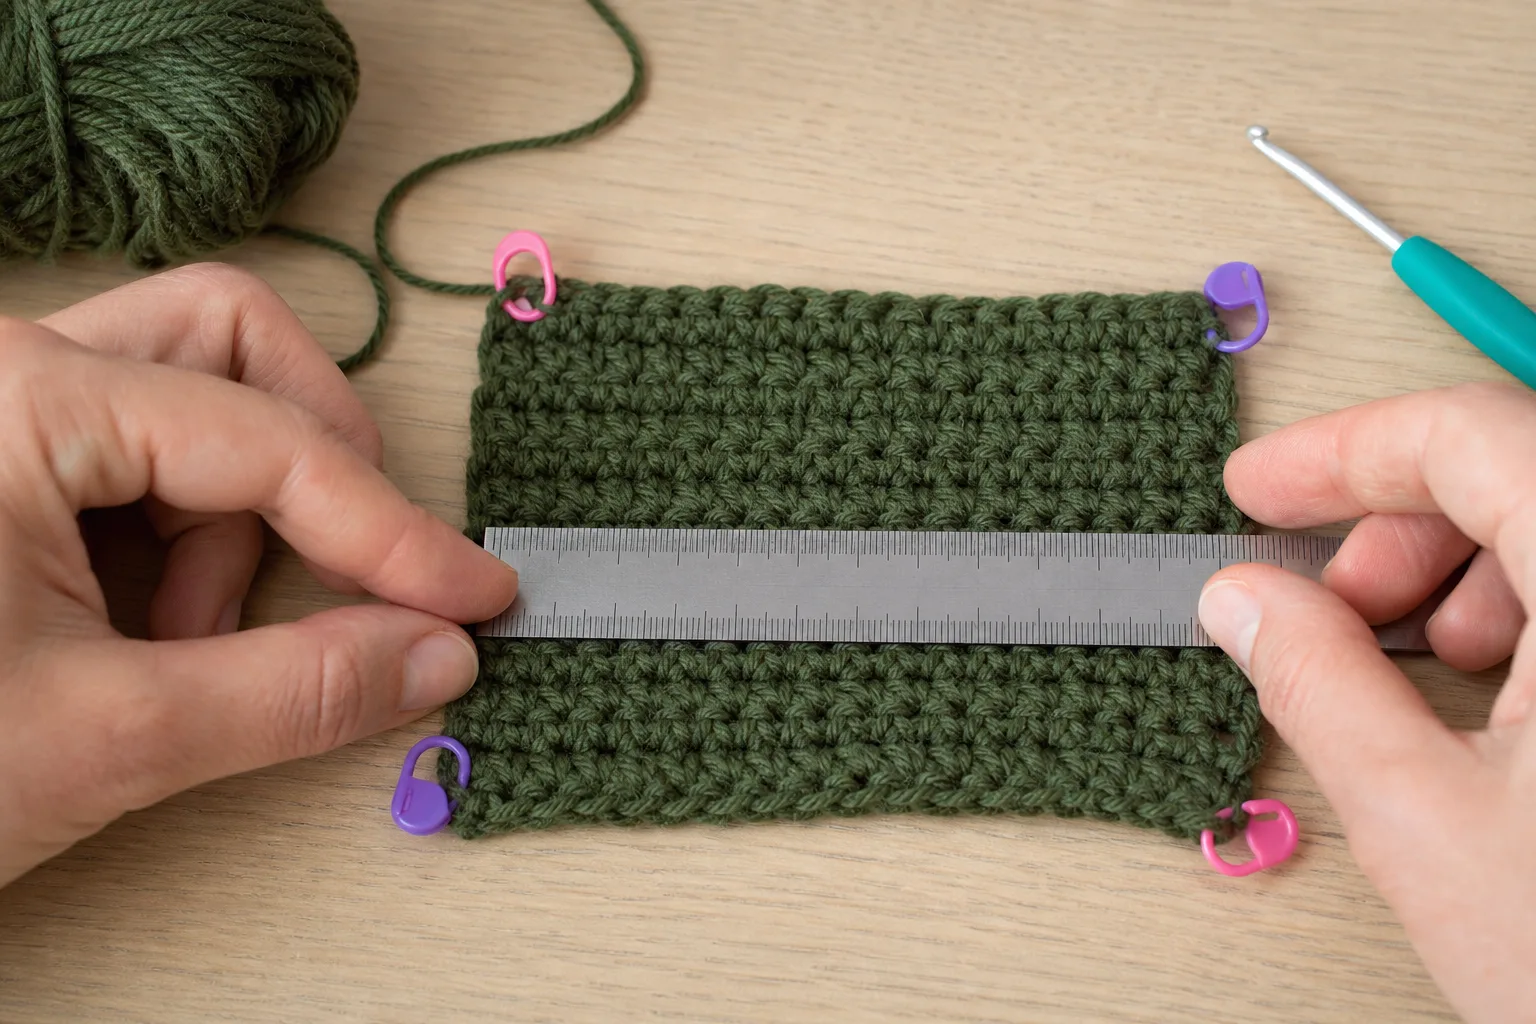
Make, wash and measure the useful swatches
Use the exact yarn, hook, HDC method and finishing method planned for the hat. Make a body swatch large enough to measure away from the edges, wash it, and dry it as the finished hat will be cared for.
The example gauge is:
The Craft Yarn Council lists common crochet-gauge and hook ranges by yarn category but labels them as guidelines. Your own washed gauge controls the calculations.
Make a second narrow swatch with the planned opening edging. Mark a relaxed horizontal span A, stretch it comfortably to B, then release it and allow it to rest before measuring C.
For the calculation example, assume a 4-inch relaxed span, 5.2 inches of comfortable stretch and 4.1 inches after release; use your own washed edging swatch to check these inputs:
After whole-stitch rounding, the example opening is 2.29 inches wide around a 2.4-inch bundle. Its estimated horizontal negative ease is about 4.8%, leaving approximately 25.2 percentage points of stretch reserve.
As a conservative project gate, keep at least five percentage points of reserve. Residual growth up to about 3% is a stable starting result, 3%–5% deserves closer monitoring, and more than 5% suggests another washed swatch or firmer edging. These are stated project heuristics, not textile standards.
Calculate the 72-stitch body
Start with the target circumference:
Convert to stitches:
The bottom-up crown decreases in eight sectors, so the method selects the nearest multiple of eight: 72 stitches.
This count belongs to the example head, ease and washed gauge. A different combination produces another count.
Calculate where crown shaping begins
A 72-stitch crown decreasing by eight stitches per round follows this path:
That requires eight decrease rounds. At 2.75 rounds per inch, the calculated taper height is:
Subtract the taper from finished hat depth:
This is a row-gauge estimate. Measure physical depth as the work progresses. If decrease rounds compress or lengthen differently from straight rounds, the finished depth checkpoint controls.
Calculate the back window
Convert gathered-hair width into a relaxed target width:
Convert to stitches:
The method selects eight stitches so the window can be centered evenly at the back.
Add vertical clearance and convert to rows:
Center the window on the measured 3.75-inch exit height:
The bottom is well above the 0.75-inch edge guard, and the top is below the 5.59-inch crown start. The correct structure is therefore a back window.
Apply the Ponytail Exit-Window Method
It returns:
- target, raw and selected body counts;
- estimated relaxed circumference and negative ease;
- the crown-start height and eight-sector decrease path;
- calculated opening stitches, rows, physical width and height;
- opening bottom and top positions;
- lower-edge slot, back-window or crown-ring selection;
- whole-stitch construction instructions for the selected mode;
- opening stretch, recovery and remaining reserve;
- a compatible crown-ring count for a high bun.
The formulas remain visible in the article so a maker can audit the result. The same formula handles the repetitive conversion, rounding and structural classification.
Complete worked example
| Decision | Example result | How to use this value |
|---|---|---|
| Head circumference | 22 in / 55.9 cm | Assumed wear-line input; replace with your measurement |
| Intended hat negative ease | 6% | Starting preference |
| Assumed washed body gauge | 14 sts and 11 rnds per 4 in | Controls body and crown |
| Selected body count | 72 sts | Nearest eight-sector count |
| Predicted relaxed circumference | 20.57 in / 52.2 cm | About 6.5% calculated negative ease |
| Finished depth | 8.5 in / 21.6 cm | Lower edge to crown center |
| Crown shaping starts | 5.59 in / 14.2 cm | Straight body ends here |
| Hair-exit center | 3.75 in / 9.5 cm | Assumed exit position; measure your own wearer |
| Gathered-hair profile | 2.4 × 1.35 in / 6.1 × 3.4 cm | Pass-through width and height |
| Selected structure | Back window | Complete opening fits below crown zone |
| Opening plan | 8 sts × 4 rows | About 2.29 × 1.45 in / 5.8 × 3.7 cm |
| Opening limits | 3.02–4.48 in / 7.7–11.4 cm | Bottom and top above lower edge |
| Opening stretch | 30% available | About 25.2 points remain after estimated ease |
Materials
- Category 4 medium / worsted yarn or another yarn that produces the entered washed HDC fabric.
- Hook that produced the washed gauge; one hook 0.5–1 mm larger can make the opening bridge more flexible.
- Six locking stitch markers for center back, both opening sides, opening bottom and crown-sector checks.
- Flexible measuring tape, ruler, yarn needle and scissors.
- Optional narrow elastic cord for a replaceable opening-edge support.
Yardage changes with head size, depth, gauge, opening structure and yarn density. Weigh a measured swatch or track a skein rather than relying on one universal amount.
Abbreviations and stitch method
- ch: chain
- st(s): stitch(es)
- sl st: slip stitch
- SC: single crochet
- HDC: half double crochet
- HDC2tog: half double crochet two together
- rnd: round
HDC: yarn over, insert the hook into the next stitch, yarn over and draw up a loop, yarn over and draw through all three loops.
HDC2tog: yarn over, insert into the next stitch and draw up a loop; yarn over, insert into the following stitch and draw up a loop; yarn over and draw through all five loops.
The starting chain does not count as a stitch. The body is worked in joined rounds so center back and window boundaries remain visible.
Part 1: make the fitted lower body
Using the example count, foundation HDC 72. Without twisting, join to the first HDC. Place the round marker at center back.
Work HDC evenly in joined rounds—72 stitches. Measure upward from the lower edge, not from the working loop. Stop at approximately 3.02 inches / 7.7 cm, the calculated bottom of the example window.
Try the lower body on before opening construction. It should pass over the head, return to the intended wear line and remain level. Correct circumference now. A ponytail opening cannot repair a body that is loose, tight or twisted.
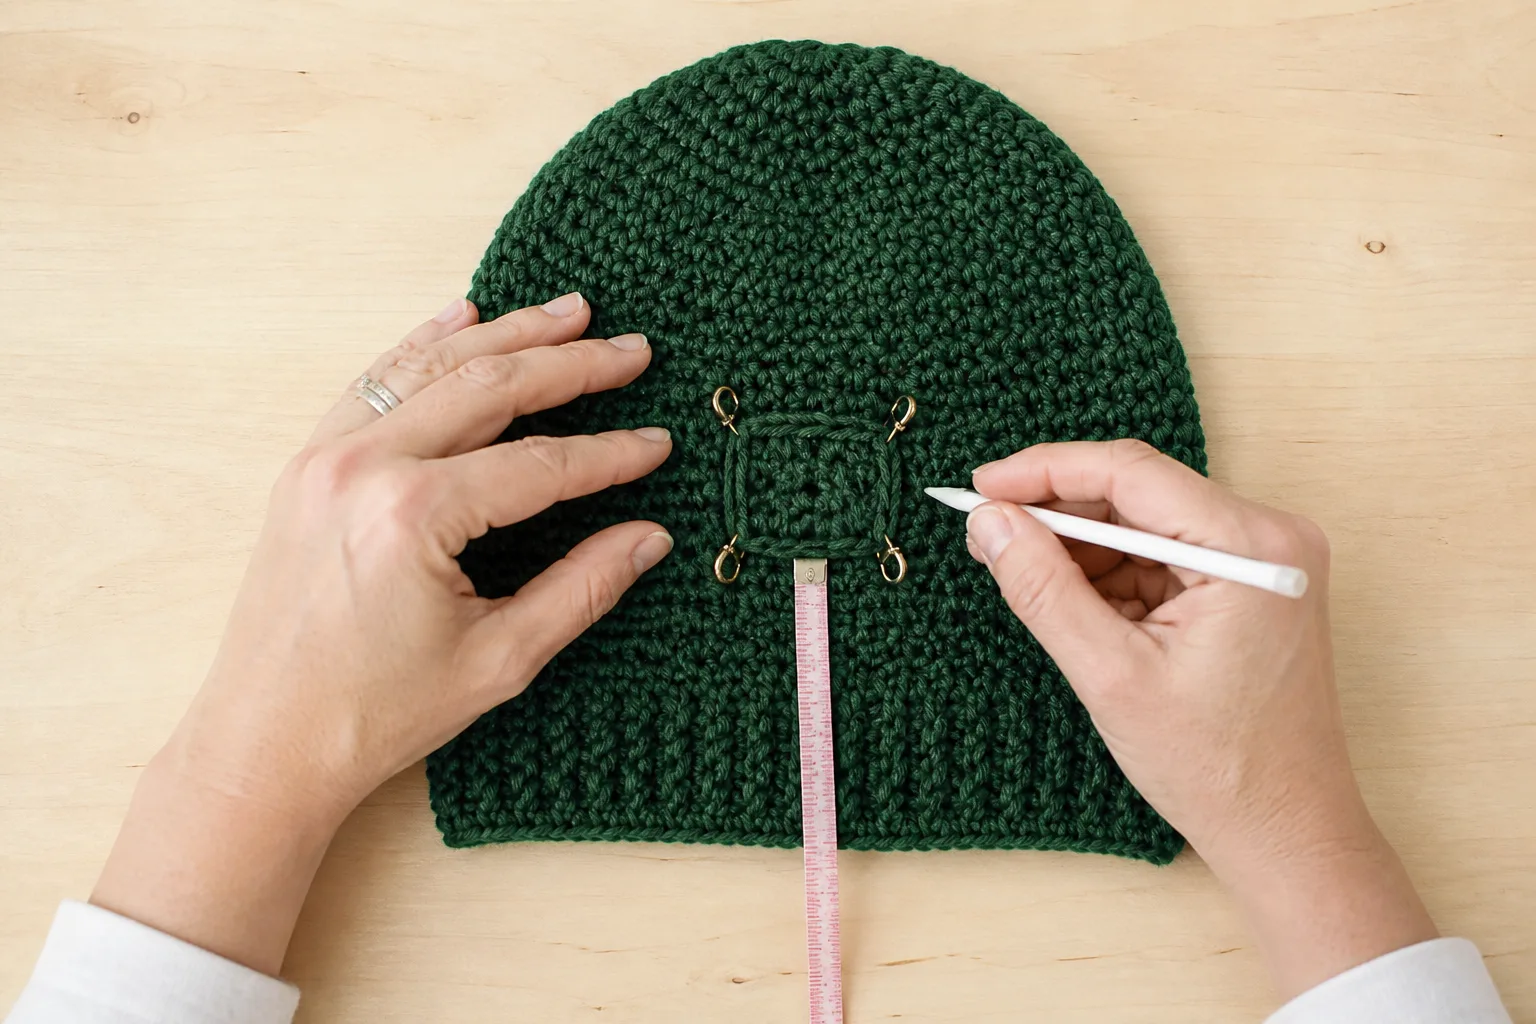
Part 2: mark the eight-stitch exit zone
Keep center back at the round join. Mark four stitches on each side of that center boundary, creating one centered eight-stitch zone. Confirm that 64 body stitches remain outside the opening.
Put the partial hat on the wearer with the intended ponytail. Pin or baste the proposed opening outline. Its center—not only one edge—must meet the gathered hair. If it sits too high or low, move the complete eight-stitch by four-row zone before crocheting it.
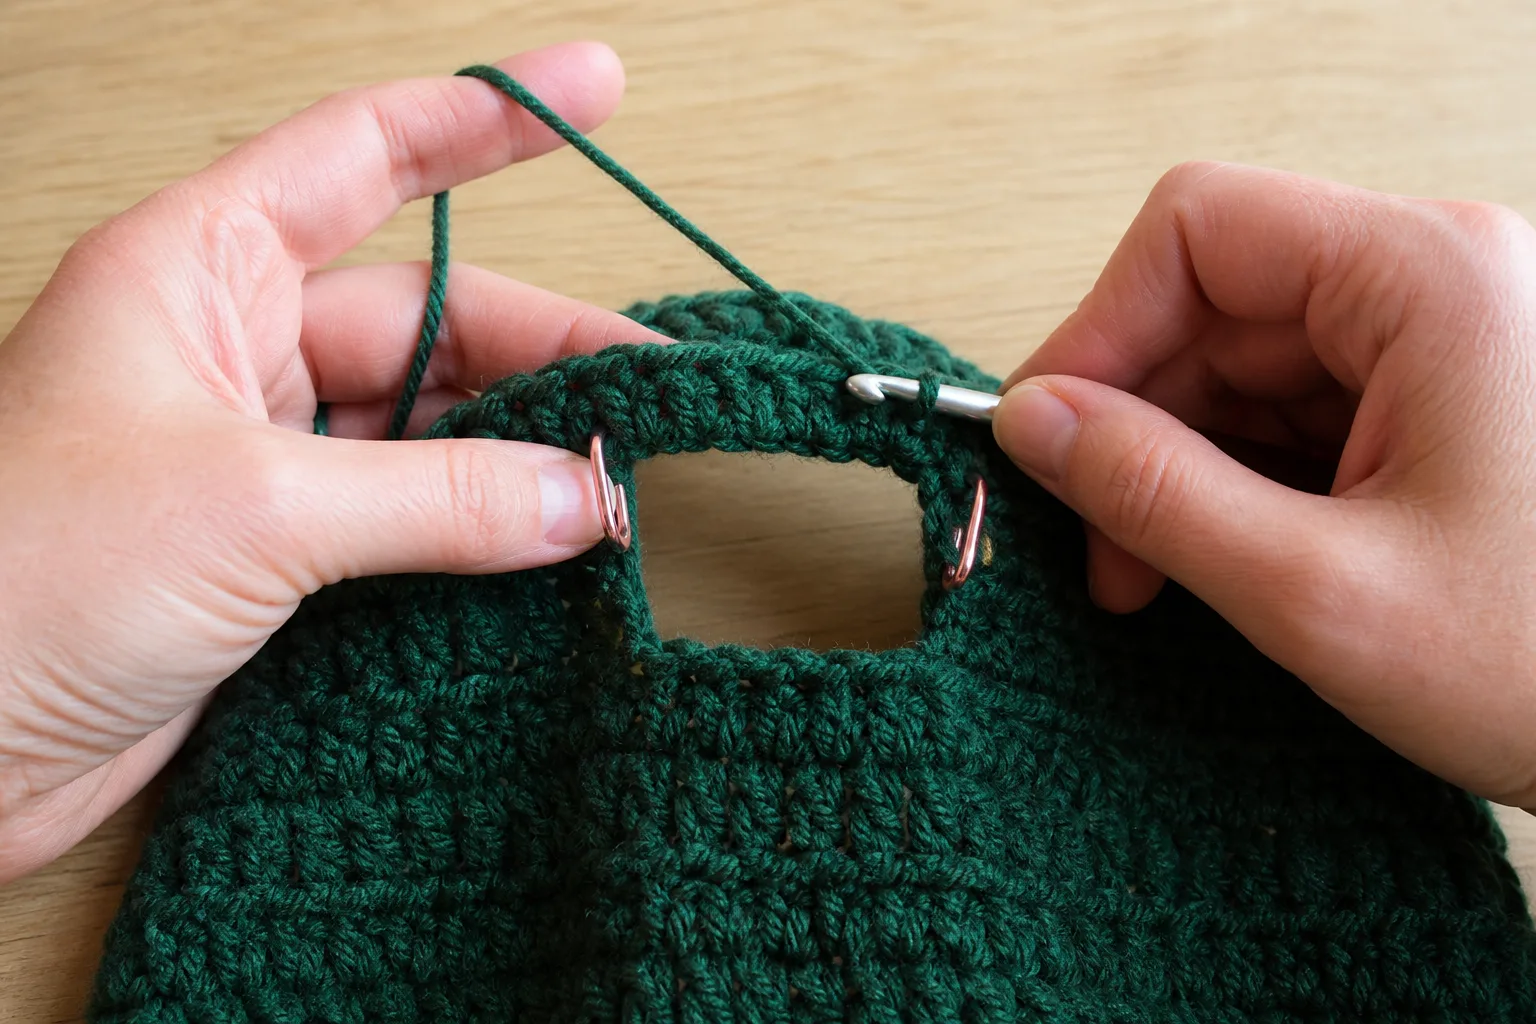
Part 3: crochet the four-row back window
Begin at one opening boundary with the right side facing.
- Window row 1: chain 1, HDC across the 64 body stitches outside the marked zone; stop at the opposite boundary. Leave the eight opening stitches unworked. Chain 1 and turn—64 stitches.
- Window row 2: HDC across 64 stitches. Chain 1 and turn.
- Window row 3: HDC across 64 stitches. Chain 1 and turn.
- Window row 4: HDC across 64 stitches—do not turn.
With the larger hook if needed, chain eight loosely across the opening. Join to the first HDC on the opposite boundary. On the next round, work one HDC into the back bump of each bridge chain and one HDC in every body stitch—72 stitches.
Lay the opening flat. The bridge should span the window without drawing the two sides together. If it puckers, replace it with looser chains or foundation single crochet stitches before continuing.
Part 4: continue to the crown-start line
Resume even joined HDC rounds—72 stitches. Measure from the lower edge and stop at approximately 5.59 inches / 14.2 cm for the example.
Confirm three things on the wearer:
- the ponytail exits through the opening without lifting the lower edge;
- the opening center still aligns with the hairstyle;
- the working edge reaches the calculated crown-start line while the final 2.91 inches / 7.4 cm remain for shaping.
If the physical depth disagrees with the row-gauge estimate, use the worn measurement and preserve enough height for the eight decrease rounds.
Part 5: work the eight-sector crown
Place eight sector markers so every sector begins with nine stitches.
- Decrease round 1: repeat HDC in next 7 stitches, HDC2tog eight times—64 stitches.
- Decrease round 2: repeat HDC in next 6 stitches, HDC2tog eight times—56 stitches.
- Decrease round 3: repeat HDC in next 5 stitches, HDC2tog eight times—48 stitches.
- Decrease round 4: repeat HDC in next 4 stitches, HDC2tog eight times—40 stitches.
- Decrease round 5: repeat HDC in next 3 stitches, HDC2tog eight times—32 stitches.
- Decrease round 6: repeat HDC in next 2 stitches, HDC2tog eight times—24 stitches.
- Decrease round 7: repeat HDC in next stitch, HDC2tog eight times—16 stitches.
- Decrease round 8: HDC2tog around—8 stitches.
Fasten off with a tail, thread it through the final eight stitches, close the crown and secure inside. Steam only if appropriate for the fiber; do not stretch the hair opening during finishing.
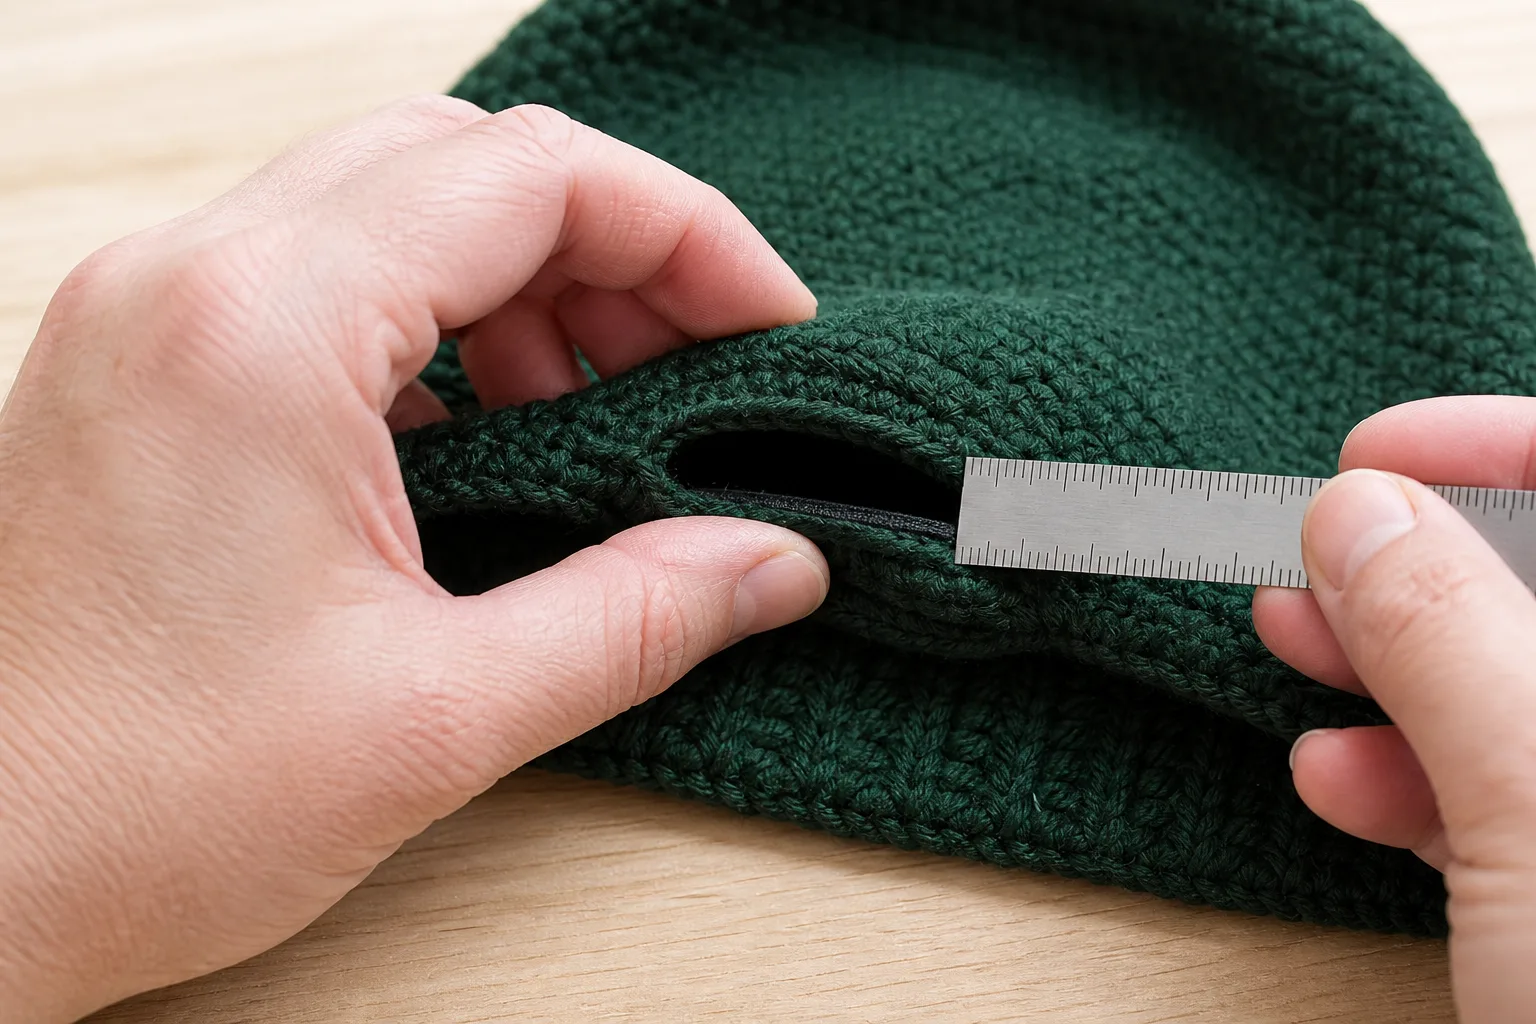
Part 6: reinforce the opening without trapping a hair tie
Attach yarn at a lower corner. Work SC evenly around the window: one SC in each bottom stitch, an even distribution along each turned-row side, and one SC in each bridge stitch. Place extra stitches only when a corner pulls inward; too many stitches create a ruffle.
Try the hat on again. If the opening already holds its shape and returns after wear, one firm edging round may be enough.
For additional support, thread narrow elastic cord through the inside loops of the edging after the crochet is complete. Tie or secure the ends inside at one accessible corner and cover them with a small removable yarn tack. The elastic can then be inspected or replaced without cutting the hat apart. Do not crochet permanently around a closed hair elastic that cannot be removed if it breaks.
The opening should expand around the gathered hair without gripping the scalp and should return close to its relaxed width after removal.
Low-ponytail modification: connect the slot to the lower edge
When the method returns LOWER-EDGE SLOT, do not make the narrow bridge below an enclosed window.
Begin with the calculated number of non-opening stitches as a flat row. For the example body and an eight-stitch opening, work across 64 stitches in turned rows. Continue until the work reaches the calculated opening top. Chain or foundation-SC eight stitches across the gap, join to form the full 72-stitch round, and continue upward.
Finish both vertical sides and the two lower corners with firm SC. If the lower edge spreads, add a short overlap tab and button above the hair rather than cinching the ponytail itself. Check that the hardware cannot catch hair and that the lower edge still lies comfortably at the nape.
High-ponytail or messy-bun modification: leave a crown ring
When the method returns CROWN RING, work the full body without a rear window. Begin the eight-sector crown at the calculated crown-start height. Stop decreasing when the method’s compatible ring count remains—16 stitches in the default example—and work the same recovery-aware edging around the ring.
The worked example estimates the gathered-hair profile as an ellipse, applies the chosen opening ease and selects a count that the eight-sector decrease path can reach. The wearer checkpoint still controls. A thick bun that must pass completely through the ring may need more circumference than a ponytail whose narrow base passes through first.
Existing-hat conversion
If a nearly finished bottom-up hat has not yet reached the desired opening bottom, use its actual stitch and round gauge in the method and choose the structure from the measured exit position.
If the hat is already finished, do not cut a hole into crochet fabric unless you are prepared to stabilize and reconstruct every cut loop. A safer conversion is usually to reopen the seam or unravel to the planned opening level, then build the slot or window with live stitches. For a top-down hat, an opening must be planned before the body rows pass its top boundary.
Fit checkpoints that prevent late failure
Checkpoint 1: lower-body fit
Before the opening, confirm circumference, lower-edge position and level wear. Change body count or ease here.
Checkpoint 2: pinned exit outline
Pin the complete calculated rectangle on the worn partial hat. Move the whole outline until its center matches the hairstyle. Change location here; do not enlarge the hole to hide a placement error.
Checkpoint 3: bridged opening
After the bridge round, pass the gathered hair through. Check width, vertical clearance, corner pull and whether the lower edge lifts.
Checkpoint 4: pre-crown depth
Confirm that the hat has reached the correct crown-start line and that the opening still sits correctly before decreasing.
Checkpoint 5: finished recovery
Wear the hat for several minutes, remove the hair, let the opening rest and compare it with its relaxed measurement. Adjust replaceable elastic support or edging—not the whole hat—if recovery is weak.
Troubleshooting by symptom
| Symptom | Most likely cause | Correction |
|---|---|---|
| Hat rides upward when hair is inserted | Opening center is above or below the hairstyle | Move the complete zone; do not merely widen it |
| Narrow strip bunches below a low ponytail | Enclosed window used too close to lower edge | Change to lower-edge slot construction |
| Window puckers before wear | Bridge is too tight or edge round has too few stitches | Replace bridge loosely and redistribute corner stitches |
| Hole gaps after the ponytail is removed | Too much width, weak recovery or stretched edging | If the opening is too wide, increase horizontal negative ease only within the fabric’s comfortable stretch, reswatch, or add replaceable elastic support. |
| Hair feels pinched vertically | Opening rows are too few | Add height or vertical clearance without changing width |
| Crown becomes lumpy around a high opening | Body window overlaps decrease zone | Use crown-ring mode and preserve all decrease sectors |
| Opening twists to one side | Center-back landmark moved or join wandered | Re-establish center back and move the entire opening zone |
| Elastic support breaks | Support was permanently enclosed | Remove and rethread the accessible elastic channel |
Frequently asked questions
How big should a crochet ponytail-hole opening be?
There is no universal size. Measure the gathered-hair width and height at the pass-through point, apply only as much horizontal negative ease as the washed opening fabric can comfortably stretch, and add vertical clearance. Convert the result through the actual gauge.
Can I start around a hair tie?
That is a workable crown-ring method for a high ponytail or bun. It does not solve a low or mid-height exit, and a permanently enclosed tie is difficult to replace. This pattern adds the elastic after the crochet edging so support remains accessible.
Why not use one long vertical slot for every hairstyle?
A long slot increases placement flexibility but also removes more supporting fabric and can gape when the hair is absent. A measured opening preserves warmth and shape while serving the intended hairstyle.
Can the same hat fit both a low ponytail and a high bun?
One opening cannot occupy two distant positions. A truly convertible design needs two independently closeable exits or a larger slot with a closure system. For a first project, choose the hairstyle worn most often and build the smallest functional opening at that position.
Should the opening be centered at the hair tie?
Center it where the gathered hair passes through the hat surface. Depending on bun shape and hat angle, that point can differ slightly from the visible center of the tie. Pinning the complete outline on the wearer resolves the difference.
Does the example count fit every adult?
No. Seventy-two stitches is the rounded result of a 22-inch head, 6% intended negative ease and 3.5 stitches per inch. Change any input and the correct count can change.
Final acceptance gate
The crochet ponytail hat is ready when all of these statements are true:
- the lower edge fits and remains level before hair is inserted;
- the opening structure matches its vertical zone;
- the opening center meets the intended hairstyle without pulling the hat;
- the gathered hair passes through without scalp pressure;
- the opening does not gape excessively when empty;
- the crown decreases remain evenly distributed;
- the finished depth reaches the intended wear line;
- the opening edging recovers after wear;
- any elastic support can be inspected and replaced.
If one statement fails, correct that variable. Do not compensate for wrong placement by enlarging the opening or for wrong body fit by tightening the hair exit.
References