

This free ribbed crochet hat pattern is worked flat, side to side, with half double crochet in the back loop only (HDC BLO). Sew the panel into a tube, gather the crown, and fold the cuff. Choose a plain rectangle or an optional shorter-stitch crown; the complete row instructions follow the materials.
Start with the 22-inch ribbed beanie example
For this calculation example, assume a 22 in (about 56 cm) head, medium-weight yarn, a 5.5 mm project hook, 12 rows across 3.85 in at comfortable stretch, and 14 stitches per 4 in along a row. Match those gauges in your own washed swatch before using the counts. These are assumed inputs and calculated starting counts, not measurements of a hat made by this site or a universal adult size.
- Set the depth: for 8.5 in worn depth plus a 2.5 in folded cuff, make an 11 in panel. At 14 stitches per 4 in, use 39 working stitches and chain 40 with a hook 0.5 mm larger than the project hook.
- Choose the crown: for the low-bulk option, work 34 hdc BLO stitches and 5 sc BLO stitches at the marked crown end on every row. The plain-rectangle option uses 39 hdc BLO stitches per row.
- Check the fit: begin the temporary tube check at 69 rows. Clip the first and last rows together, try on the panel, and adjust the row count before making the permanent seam.
Continue with the complete row-by-row pattern and its seam and crown instructions. If your head size, yarn or washed gauge differs, use the swatch-to-row calculation before crocheting the full panel.
Materials and fabric choices
For the worked example:
- Medium weight yarn, Craft Yarn Council category 4
- About 220-280 yd (200-255 m), depending on head size, cuff, gauge, and yarn
- 5.5 mm crochet hook for the fabric
- A hook 0.5 mm larger for the foundation chain
- Locking stitch markers or safety pins
- Flexible measuring tape
- Yarn needle
- Scissors
The hook size is a starting point, not the fit instruction. Choose the project hook that produces clearly defined ribs that stretch without becoming open or stiff.
Wool and many acrylic yarns often recover well after stretching. Cotton and heavy plant-fiber blends can feel comfortable but may return more slowly or continue to grow. Do not decide the row count from the fiber label alone; use the recovery check below.
Abbreviations and pattern language
For BLO rows, find the top V of the next stitch and insert the hook through the loop farther from you while the work faces you. Turn at the end of the row, then identify the back loop again from the new facing side. The turning chain is not a stitch. Put a marker in the first and last working stitches if the edges are hard to identify.
- ch: chain
- hdc: half double crochet
- sc: single crochet
- st(s): stitch(es)
- BLO: back loop only
- RS: right side
- WS: wrong side
US crochet terms are used. The turning chain does not count as a stitch.
Full ribbed rectangle pattern
Choose Option A or Option B and keep that choice for the whole panel. For the matching calculation example, each row has 39 stitches and the first circumference check is at 69 total rows, including Row 1. If your measurements or gauge differ, calculate your row count first. Check the panel after 8 rows, again around 75% of your target, and before seaming.
Foundation
With a hook 0.5 mm larger than the project hook, make your calculated foundation chain, then switch to the project hook before Row 1. For the matching 22-inch calculation example, chain 40 to make 39 working stitches. For another depth or gauge, calculate your working stitches and add one chain.
The larger foundation hook prevents the chain edge from behaving like a rigid cord along the side of the finished hat. It should be neat, not loose enough to form loops.
Place a marker at the crown end so it cannot be confused with the brim end later.
Option A: true rectangle
Row 1: Hdc in the second ch from the hook and in every ch across. Ch 1, turn.
Row 2: Hdc in the BLO of every st across. Ch 1, turn.
Repeat Row 2 until you reach the calculated target rows, completing all three checkpoints before seaming.
Option B: low-bulk crown
The following worked example uses 39 stitches: 34 hdc body stitches and 5 sc crown-zone stitches. Replace those counts with your calculated numbers.
Row 1, brim to crown: Hdc in the second ch from the hook and in the next 33 ch; sc in the final 5 ch. Ch 1, turn. (39 sts)
Row 2, crown to brim: Sc in the BLO of the first 5 sts; hdc in the BLO of the remaining 34 sts. Ch 1, turn. (39 sts)
Row 3, brim to crown: Hdc in the BLO of the first 34 sts; sc in the BLO of the final 5 sts. Ch 1, turn. (39 sts)
Repeat Rows 2 and 3 until the panel reaches the calculated target rows.
Keep the shorter stitches at the marked crown end on every row. If they migrate to the opposite end, stop and correct the row before continuing.
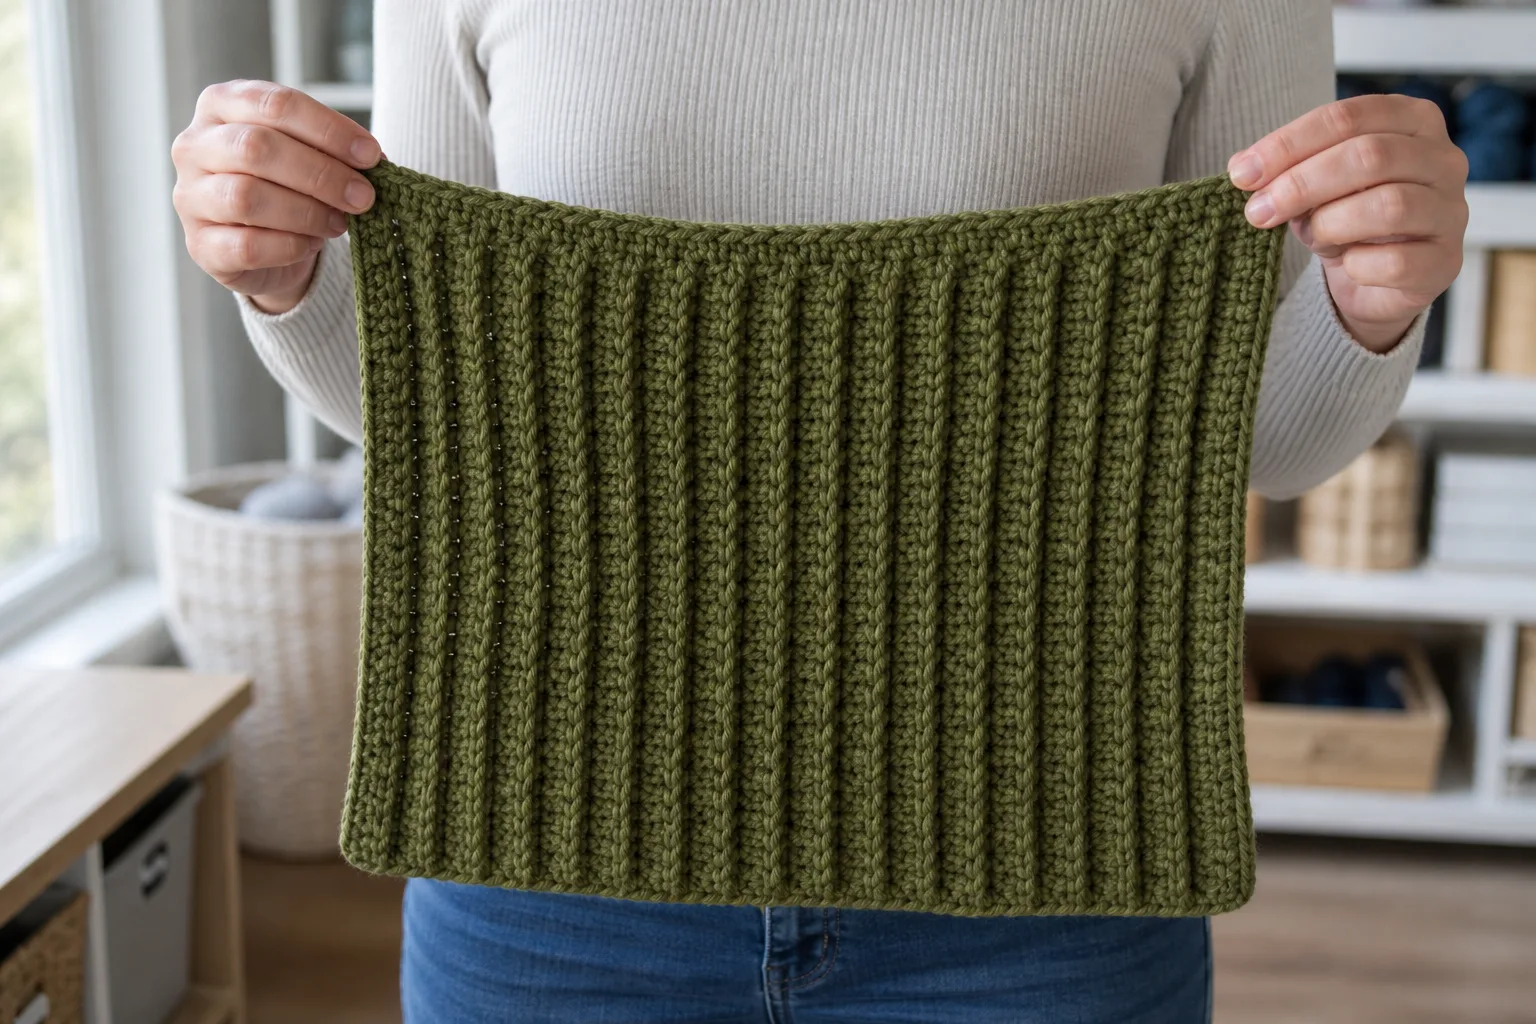
Checkpoint 1: after the first 8 rows
Do not wait until the rectangle is almost finished to inspect it.
Check four things:
- Stitch count: Every row must contain the same total number of stitches.
- Back loop: The unused front loops should form clear horizontal ridges while the work is flat; those ridges become vertical on the finished hat.
- Foundation edge: Stretch it beside the current edge. The foundation should not be noticeably shorter.
- Crown marker: The sc zone, if used, must remain at one consistent end.
If the panel is becoming diagonal, the most likely cause is a missed first or last stitch. Correct it now; extra edging at the end will not restore the lost circumference evenly.
Checkpoint 2: at about 75% of the calculated rows
Row gauge can change after the maker settles into the stitch rhythm. Measure a centered block of recent rows rather than the first rows only.
Repeat the relaxed, comfortable-stretch, and recovery measurements. Recalculate:
If the revised target differs, use the new result. This is more reliable than forcing the original row count after the fabric has shown a different gauge.
Also check panel length. If it is too short or too long, changing the number of circumference rows will not fix it; depth is controlled by stitches in each row.
Checkpoint 3: clip-fit before the permanent seam
When the calculated row count is reached:
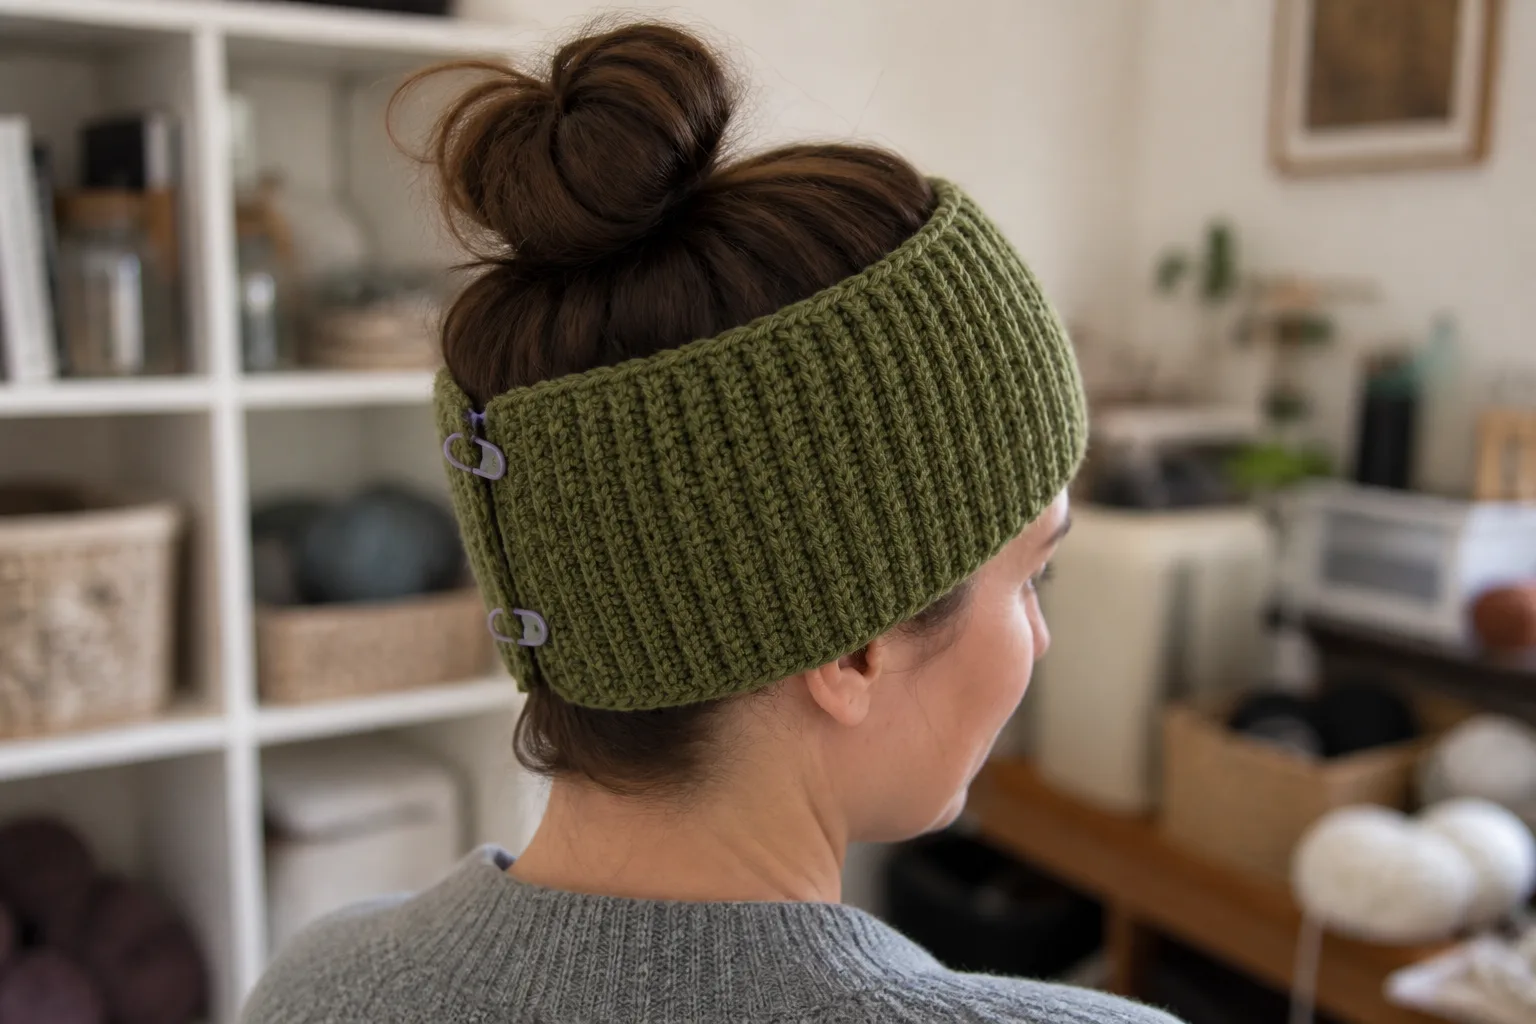
- Lay the panel flat with the ribs running from crown to lower edge.
- Bring the first and last rows together without overlapping them.
- Clip the edges together every 1-2 in (2.5-5 cm).
- Put the temporary tube on with the crown still open.
- Fold the cuff, if used, and check the actual lower-edge position.
The panel is ready to seam when:
- it reaches around the head without a gap at the clipped edges;
- the ribs open but do not become completely flat;
- the lower edge stays in position without painful pressure;
- the clipped seam does not dig into the head;
- the planned depth covers the intended part of the ears.
Add or remove rows now. A permanent seam should confirm the fit, not reveal it.
Make a ridge-matched flexible seam
A tight slip-stitch seam can be less elastic than the surrounding ribs. A sewn mattress-style seam makes it easier to control tension one section at a time.
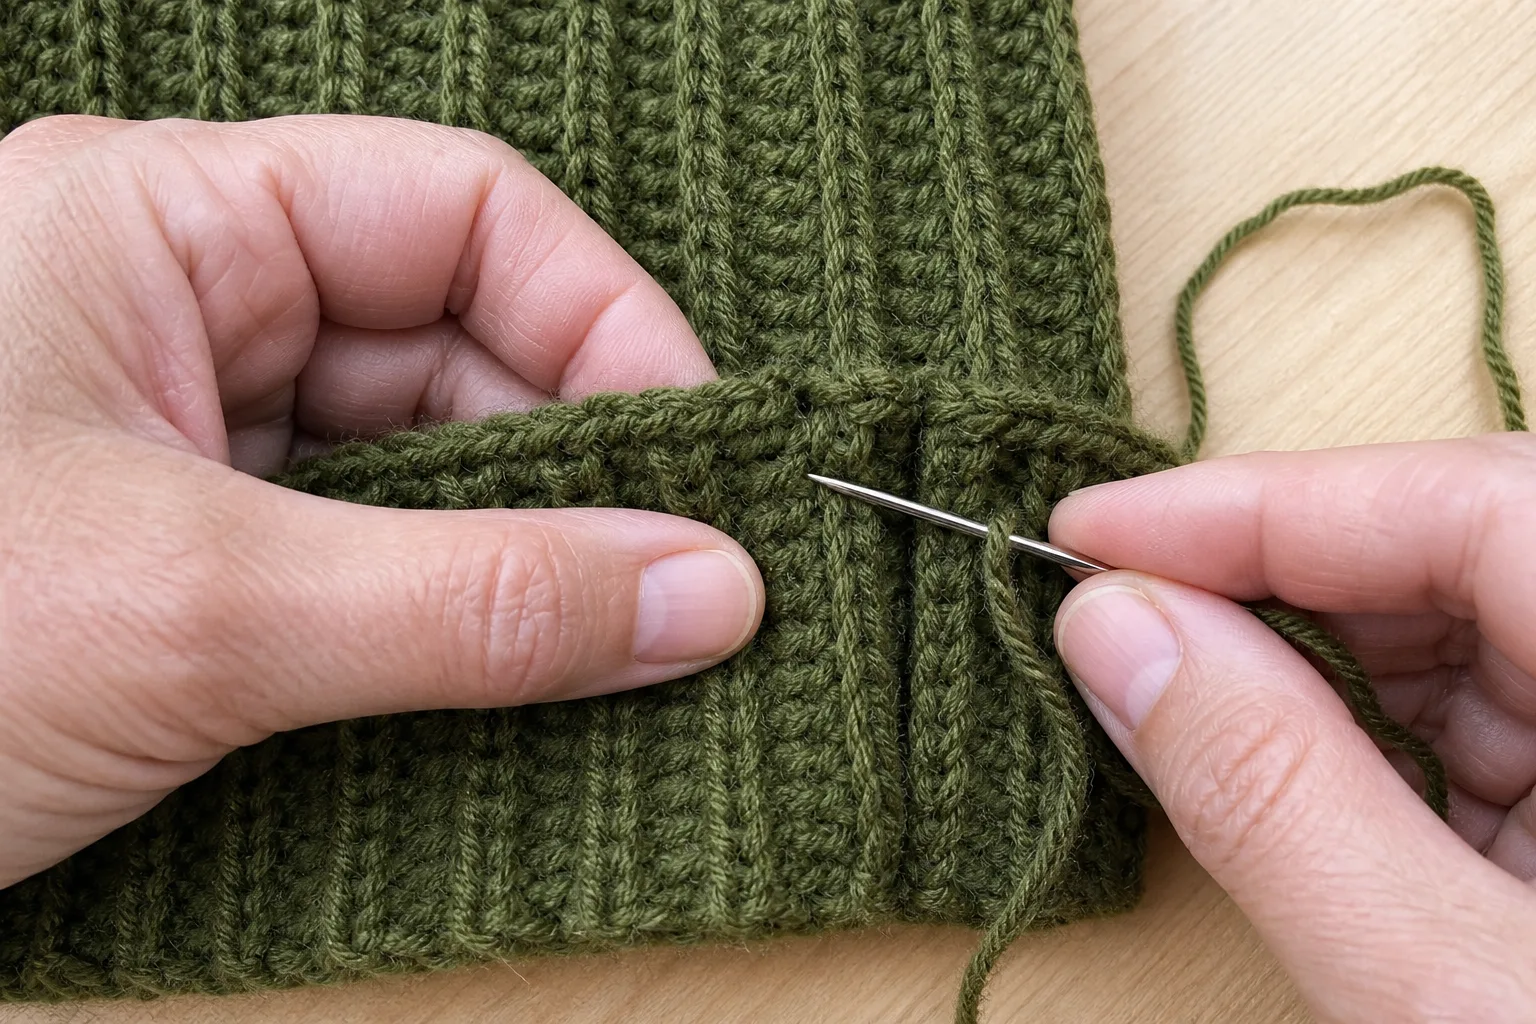
- Place the panel flat with the right side facing up and the first and last rows touching.
- Thread a long yarn tail onto the yarn needle.
- Catch one edge bar from the first row, then the corresponding edge bar from the last row.
- Alternate from side to side for about 1 in (2.5 cm).
- Pull only until the gap closes. Do not overlap the edges or flatten the neighboring ribs.
- Continue in short sections, matching row height from crown to lower edge.
Seam Match Test
Before weaving in the tail, stretch a short section centered on the seam and compare it with an equal section of uninterrupted ribbing.
- If both expand with similar effort, the seam is flexible enough.
- If the seam behaves like a cord while the ribs beside it expand, reopen that section and sew with longer, looser passes.
- If the seam forms a raised ridge, check that the edges meet rather than overlap.
Only secure and weave in the tail after this test.
Close the crown without one bulky knot
Use the marked crown edge. On the low-bulk version, this is the edge formed by the shorter sc stitches.
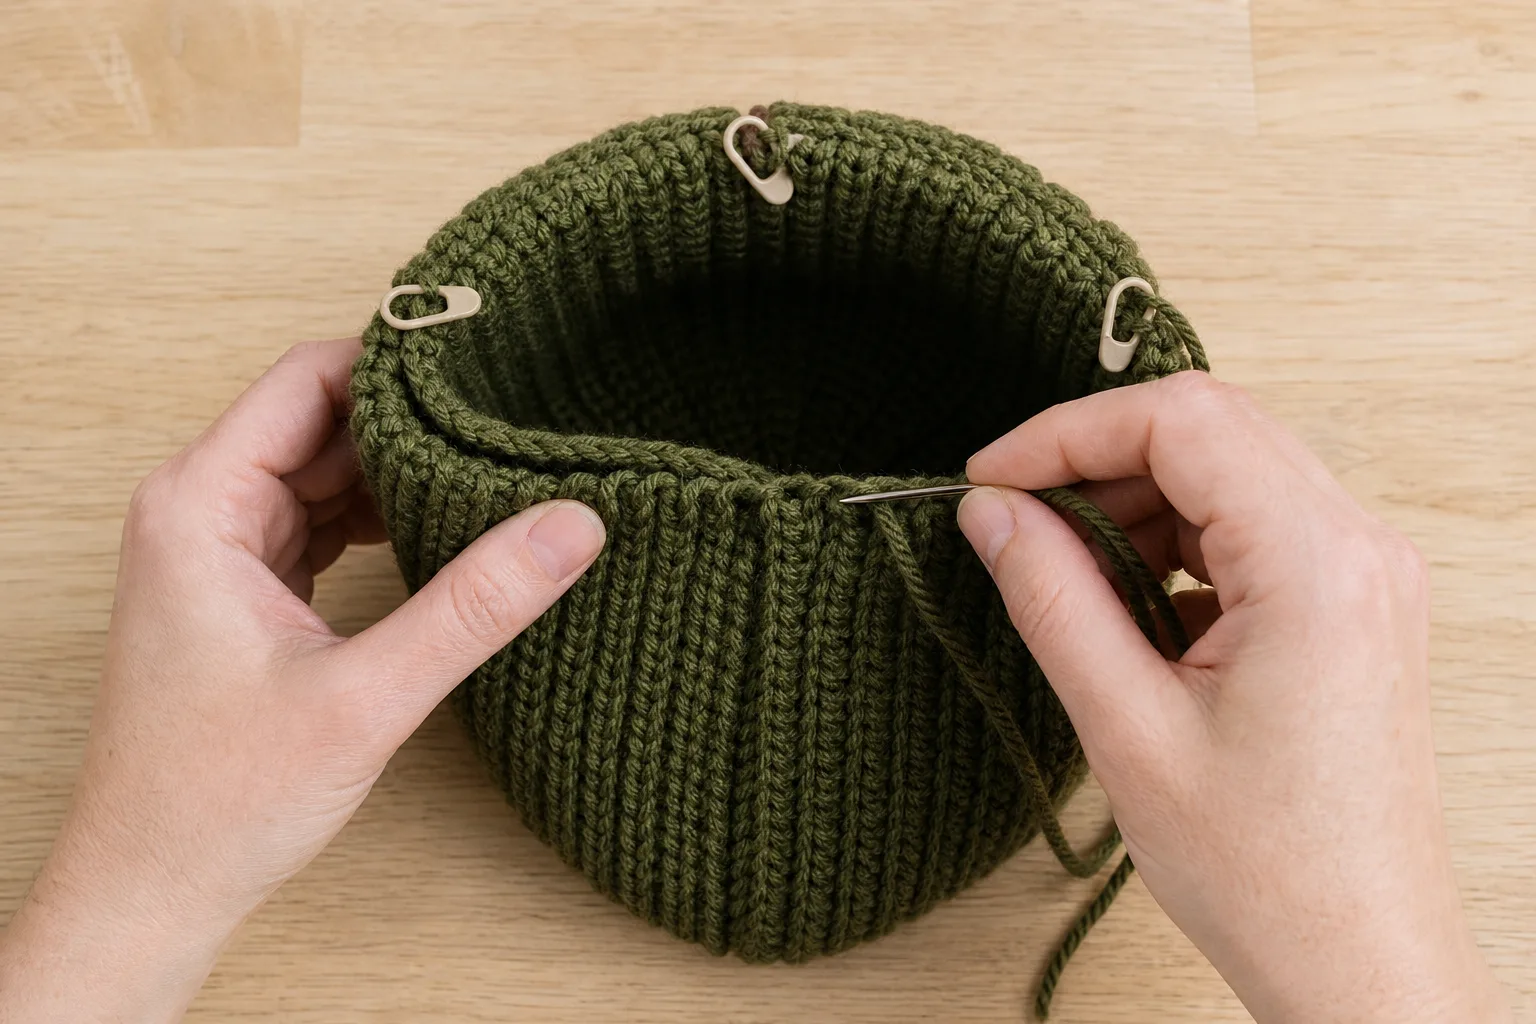
Quartered two-pass close
- Turn the tube inside out.
- Divide the crown opening into four equal quarters with markers.
- With a long tail and yarn needle, make a running pass through the very edge of the row ends from Marker 1 to Marker 2. Pull that quarter partly closed.
- Repeat around the remaining three quarters, distributing the gathers instead of pushing them into one place.
- Pull the full opening smaller, but stop before excessive force distorts the yarn.
- Make a second pass through the remaining center loops.
- Pull the center closed, cross the opening in two directions, and secure the tail on the inside.
Passing through the edge of each row is important. Sewing too far down creates an extra ring of fabric above the gathering line.
Turn the hat right side out and massage the gathers around the crown so they are evenly distributed.
Calculate your rectangle dimensions
This ribbed beanie is crocheted flat from side to side. Each row runs from the lower edge to the crown; the total number of rows wraps around the head. That distinction matters:
- Stitches in one row control hat depth.
- The number of rows controls hat circumference.
Instead of copying a fixed rectangle width, make a small sample in the actual rib stitch, stretch it only until it feels right for the wearer, and calculate the number of rows from that measurement.
Stretch-to-Fit formula
The permanent seam comes only after the panel has been clipped into a temporary tube and tried on. This one checkpoint prevents the most expensive rectangle-hat mistake: finishing the seam and crown before discovering that the ribbing is too tight or too loose.
Use the example or calculate your own counts
Use the worked example only when your measurements and gauge match its assumptions. Otherwise, the calculation sections below give the stitch count for depth and the row count for circumference. Both routes use the same stitch pattern and finishing sequence.
This pattern uses the wearer’s head and the maker’s fabric. It also separates five decisions that are often mixed together:
- How deep should the finished hat sit?
- How deep should the fold-up cuff be?
- How much should this particular ribbed fabric stretch during wear?
- How many rows produce that circumference?
- How should the crown and seam be closed without turning stretchy fabric into a stiff ring?
The result is still an easy flat-panel beanie. The difference is that every important dimension can be checked before finishing.
Choose the finished style before measuring
Cuffed or uncuffed
An uncuffed beanie ends at the lower edge you crochet. A cuffed beanie folds part of that length upward, so the flat panel must include both the worn depth and the cuff depth.
Example: If the hat should measure 8.5 in from crown to the folded lower edge and the cuff should be 2.5 in deep, crochet a panel about 11 in long.
Metric example: If the worn depth is 21.5 cm and the cuff is 6.5 cm, the panel length is about 28 cm.
Standard crown or low-bulk crown
You may work every stitch in half double crochet for a true rectangle. It is the simplest choice, but the full circumference must gather into the center at the crown.
The low-bulk option uses shorter single crochet stitches over a small zone at the crown end of every row. The stitch count stays constant, but that end of the panel grows more slowly around the head. When gathered, it has less fabric to compress.
For the worked adult example, the crown zone is 1.5 in (3.8 cm) long. Calculate the number of crown-zone stitches from your own lengthwise stitch gauge instead of copying a fixed number from a different yarn.
or
Round to the nearest whole stitch. A slightly longer crown zone produces more taper; a shorter zone keeps the silhouette closer to a perfect rectangle.
Step 1: Measure the head and the desired depth
Measure the actual head where the lower edge of the hat will sit. Keep the tape level across the forehead, above the ears, and around the widest part at the back. The tape should touch without compressing the skin.
Record:
- H = actual head circumference
- D = desired worn depth, measured from the center of the crown to the intended lower edge
- F = cuff depth, or zero for an uncuffed hat
Do not use age alone to choose the rectangle. People of the same age can have different head circumferences, head heights, and preferences for ear coverage.
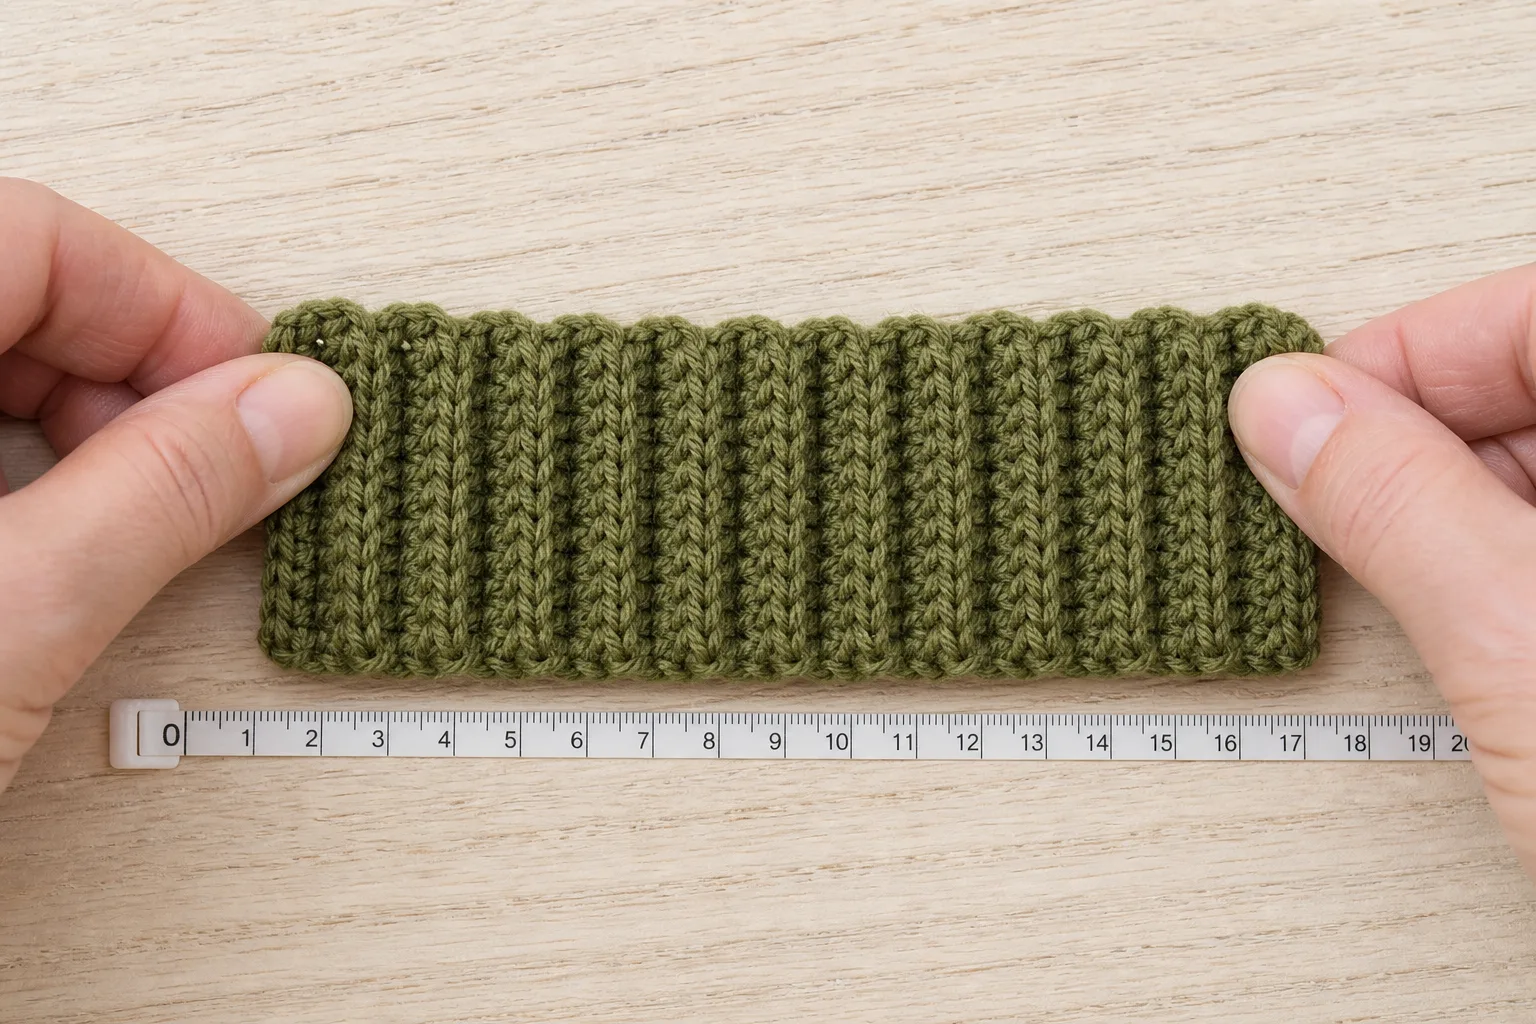
Step 2: Make the ribbed fit swatch
The important gauge for this construction runs across the rows, because rows become the circumference.
- Chain enough stitches to make a sample at least 4 in (10 cm) long.
- Work at least 12 rows of hdc in the back loop only.
- Count the stitches at the end of every row so the sample remains rectangular.
- Wash and dry the sample as the finished hat will be cared for, then let it rest on a flat surface without stretching it.
- Choose a centered section containing a clear number of complete rows. Twelve rows are convenient, but another count works.
Record:
- R = number of rows in the measured section
- Wr = relaxed width of those rows
Find the wearer’s comfortable stretch
Hold the same measured section in the direction it will stretch around the head. Extend it gradually until the pressure resembles the desired hat fit: gentle for a relaxed beanie, firmer for a close winter fit. Do not pull to the fabric’s maximum limit.
Measure the width while held at that chosen pressure.
- Ws = comfortably stretched width of the same rows
This measurement replaces a universal negative-ease guess. Two yarns may both be called medium weight and still require different relaxed panel widths to produce the same feel.
Check recovery before calculating
Hold the swatch at Ws for about 30 seconds, release it, and allow it to rest. Measure the same rows again.
- If the swatch returns close to Wr, it has useful recovery for this plan.
- If it stays noticeably wider, make a denser sample, try a smaller hook, or choose a yarn with better recovery before calculating the hat.
- If the ribs barely stretch, try a slightly larger hook or a different stitch fabric rather than forcing a very small rectangle around the head.
Recovery matters because circumference is not only about how far the fabric can stretch once; it is also about whether it can return after the hat is removed.
Step 3: Use the Swatch-To-Row Fit Method
Formula in inches or centimeters
Use the same unit for head circumference and stretched swatch width.
Round to the nearest whole row, then confirm the result with the temporary clip-fit checkpoint before seaming.
Worked inch example
- Head circumference H = 22 in
- Swatch rows R = 12 rows
- Relaxed width Wr = 3.50 in
- Comfortable stretched width Ws = 3.85 in
Begin the fit check at 69 rows.
The predicted relaxed panel circumference is:
The effective negative ease is:
1 – 20.13 / 22 = 0.085, or about 8.5%.
That percentage is a result of the wearer’s chosen swatch pressure. It was not imposed before the fabric was measured.
Worked centimeter example
- Head circumference H = 56 cm
- Swatch rows R = 12 rows
- Relaxed width Wr = 8.9 cm
- Comfortable stretched width Ws = 9.8 cm
Begin the fit check at 69 rows.
Predicted relaxed circumference:
Effective negative ease:
1 – 51.18 / 56 = 0.086, or about 8.6%.
If your answer is between two rows
Choose the lower row count only when the temporary tube reaches around the head comfortably and the seam will remain flexible. Choose the higher row count when the lower result pulls hard at the forehead, flattens the ribs completely, or makes the temporary join gap open.
One row is usually a smaller adjustment than changing the hook after most of the panel is complete.
Step 4: Calculate the panel length and chain
Calculate flat panel length first:
Make or extend the swatch so you can measure stitch gauge along one complete row.
- Gs = stitches per inch, or stitches per 10 cm
Inches:
Centimeters:
Round to the nearest whole stitch. Add one foundation chain because this pattern works the first stitch into the second chain from the hook and the turning chain does not count.
Worked height example
- Desired worn depth = 8.5 in
- Folded cuff = 2.5 in
- Flat panel length = 11 in
- Lengthwise gauge = 14 stitches per 4 in, or 3.5 stitches per inch
Use 39 working stitches, so chain 40.
For a 1.5 in low-bulk crown zone:
Use 5 crown-zone stitches and 34 body stitches.
Troubleshooting decision guide
The panel reached the listed rows but is too narrow
Ignore the listed example count and recalculate from your stretched row gauge. Add rows until the clip-fit test works. Yarn weight alone cannot guarantee the same row width.
The first edge is tighter than the rest
The foundation chain was made more tightly than the ribbing. Restart with a hook about 0.5 mm larger for the chain, then return to the project hook for Row 1. Do not try to stretch a rigid chain aggressively after the panel is complete.
The panel is becoming diagonal
Count the current row and compare it with Row 1. A missing first or last stitch shortens one edge repeatedly. Use a marker in the first and last stitch of every row until the edges remain stable.
The fabric looks flat instead of ribbed
Confirm that the hook enters only the back loop of the top “V.” The unused loop should form a ridge. If the loop is correct but the fabric is board-like, try a larger hook and make a new swatch; compressed stitches cannot open into elastic ribs.
The temporary tube fits, but the finished seam is tight
The seam removed the stretch that was present during fitting. Reopen it and use the ridge-matched sewn seam with less tension. Repeat the Seam Match Test before securing the tail.
The hat becomes loose after wearing
The fabric stretched but did not recover. Reopen the seam and remove rows if the yarn still has adequate spring, or redo the panel with a denser gauge or a more resilient yarn. For future hats, do the recovery check before calculating.
The crown has a bulky ring
Confirm that the gathering pass went through the very edge, not below it. Redistribute the gathers by quarters. If the yarn is thick or the true rectangle produces too much bulk, use the sc crown-zone option on the next version.
A small hole remains at the crown
Do not keep pulling harder on the first running stitch. Make a second pass through the remaining center loops, then cross the opening in two directions and secure it from the inside.
The cuff feels tighter than the body
Check whether an added edging or slip-stitch row was worked too tightly. The bottom edge does not need an extra border when the row ends are even. If an edging is desired, use a larger hook and stop frequently to compare its stretch with the ribbed panel.
Changing yarn, hook, size, or style
A different head size
Keep the stitch pattern and repeat the head measurement, swatch stretch measurement, and row calculation. Do not scale the row count by age.
A different yarn
Make a new ribbed swatch. Recalculate both circumference rows and panel-length stitches. A yarn that produces the same relaxed gauge may still have different comfortable stretch and recovery.
A different hook
Changing the hook changes the rib width, panel length, drape, and recovery. Treat the new hook as new fabric and repeat the method.
A slouchier silhouette
Add the desired slouch to D before adding cuff depth. Do not add circumference rows to create slouch; extra rows make the hat looser around the head.
No folded cuff
Set F = 0. Recalculate the working stitches from the shorter panel length.
Ribbed Beanie Fit Calculator
Open the tool in a separate page. The article also retains the manual formulas and worked checks.
JavaScript is optional: use the manual calculation method and worked examples in the article.
Apply the Swatch-To-Row Fit Method
The worked calculation on this page does the arithmetic. Use measurements from the wearer and the same ribbed swatch; the formulas above show every result. Switch between inches and centimeters at any time.
What to enter
- Actual head circumference.
- The number of rows in one measured swatch section.
- The relaxed width and comfortably stretched width of that same section.
- Desired worn depth and folded-cuff depth.
- The number of stitches counted along a measured length.
- Optional low-bulk crown-zone length.
What the calculation returns
- Target whole rows and the 75% recheck point.
- Predicted relaxed circumference and effective negative ease.
- Flat panel length, working stitches, and foundation-chain count.
- Body-stitch and crown-zone-stitch split for the low-bulk version.
Example already loaded
For a 22 in (56 cm) head, a 12-row swatch measuring 3.50 in (8.9 cm) relaxed and 3.85 in (9.8 cm) at comfortable stretch, the worked example shows 69 rows. With a finished worn depth of 8.5 in, a 2.5 in cuff, and 14 stitches per 4 in, it returns 39 working stitches, chain 40, 34 body stitches, and 5 crown-zone stitches.
The calculated result is the starting point, not permission to skip the fit check. Clip the panel into a temporary tube before making the permanent seam.
Final fit checklist
Before calling the hat finished, confirm:
- The lower edge sits where planned.
- The wearer can keep the hat on without forehead pressure.
- The ribs reopen after the hat is removed.
- The seam stretches with the surrounding fabric.
- The crown gathers are distributed rather than stacked in one lump.
- No hole remains at the crown.
- The cuff stays folded without creating a tight band.
Frequently asked questions
How wide should a crochet beanie rectangle be?
Its relaxed width depends on the head, the row gauge, and how the ribbing feels when stretched. Use H x R / Ws to calculate rows, then clip the panel into a tube and try it on. A universal 20 in rectangle is not correct for every yarn or head.
Should the rectangle be as wide as the head circumference?
Usually not for elastic ribbing. A panel equal to the head measurement when relaxed may become loose during wear. This article calculates the smaller relaxed width from the actual fabric at the wearer’s preferred stretch.
Which direction should the ribs run?
For this side-to-side construction, the ribs run vertically from the crown toward the lower edge. Rows build around the head; stitches within each row build the hat depth.
Is hdc BLO or sc BLO better for a ribbed beanie?
Hdc BLO works faster and creates a taller, softer rib. Sc BLO is denser and usually takes more rows and more time. Either can work, but each requires its own swatch and row calculation.
Why is the starting chain made with a larger hook?
The foundation chain forms one side of the seam. If it is tighter than the final row, the seam side may not stretch with the rest of the hat. A slightly larger chain hook helps the two edges behave more similarly.
Do I have to use the shaped crown zone?
No. Work hdc BLO across every row for the simplest true rectangle. Use the sc crown zone when you want less fabric gathered at the top.
Can I join with slip stitches instead of sewing?
Yes, provided the join stays loose and passes the Seam Match Test. If slip stitches create a firm ridge, a mattress-style sewn seam is easier to adjust.
Why does my crown still bunch after using shorter stitches?
The gathering line may be too far below the top edge, the crown zone may be too short for the yarn’s bulk, or the gathers may be concentrated in one place. Check the edge path and use the quartered two-pass close.
Should I block the hat stretched over a form?
Do not stretch the ribbing wider than the intended fit while drying. Shape it to the desired dimensions and follow the yarn label’s care directions. Stretching the fabric open during drying can reduce the recovery you measured in the swatch.
References